Your 1st Soap mock
🗓️ Last updated on November 12, 2024 | 11 | Improve this pageOverview
This tutorial is a step-by-step walkthrough on how to use SoapUI projects to get mocks for your SOAP WebService. This is hands-on introduction to SoapUI Conventions reference that brings all details on conventions being used.
We will go through a practical example based on the famous PetStore API. We’ll build the reference petstore-1.0-soapui-project.xml file by iterations, highlighting the details to get you starting with mocking SOAP WebServices on Microcks.
Of course, to complete this tutorial, you will need to install SoapUI to define mocks on top of the WSDL file that describes your SOAP WebService interface. To validate that our mock is working correctly, you’ll be able to reuse SoapUI as-well but we’ll also provide simple curl commands.
Let’s start! 💥
1. Setup Microcks, a WSDL skeleton and a SoapUI project
First mandatory step is obviously to setup Microcks 😉. For OpenAPI usage, we don’t need any particular setup and the simple docker way of deploying Microcks as exposed in Getting started is perfectly suited. Following the getting started, you should have a Microcks running instance on http://localhost:8585.
This could be on another port if
8585is already used on your machine.
Following the getting started, you should have a Microcks running instance on http://localhost:8585.
Now let start with the skeleton of our WSDL contract for the Petstore Service. We’ll start with the definition of two different types:
Petis the data structure that represents a registered pet in our store - it has anidand aname,PetsResponseis a structure that allows returning many pets as a service method result.
We also have the definition of one getPets operation that allow returning all the pets in the store. This is over-simplistic but enough to help demonstrate how to do things. Here’s the WSDL contract (yes, it’s pretty verbose 😅):
<?xml version='1.0' encoding='UTF-8'?>
<wsdl:definitions xmlns:wsdl="http://schemas.xmlsoap.org/wsdl/"
    xmlns:tns="http://www.acme.org/petstore" xmlns:soap="http://schemas.xmlsoap.org/wsdl/soap/"
    name="PetstoreService" targetNamespace="http://www.acme.org/petstore">
  <wsdl:types>
    <xs:schema xmlns:xs="http://www.w3.org/2001/XMLSchema"
        xmlns:tns="http://www.acme.org/petstore" targetNamespace="http://www.acme.org/petstore">
      <xs:complexType name="Pet">
        <xs:sequence>
          <xs:element name="id" type="xs:int"/>
          <xs:element name="name" type="xs:string"/>
        </xs:sequence>
      </xs:complexType>
      <xs:complexType name="PetsResponse">
        <xs:sequence>
          <xs:element minOccurs="0" maxOccurs="unbounded" name="pet" type="tns:Pet" />
        </xs:sequence>
      </xs:complexType>

      <xs:element name="getPets">
        <xs:complexType/>
      </xs:element>
      <xs:element name="getPetsResponse" type="tns:PetsResponse" />
    </xs:schema>
  </wsdl:types>

  <wsdl:message name="getPets">
    <wsdl:part element="tns:getPets" name="parameters" />
  </wsdl:message>
  <wsdl:message name="getPetsResponse">
    <wsdl:part element="tns:getPetsResponse" name="parameters" />
  </wsdl:message>

  <wsdl:portType name="PetstoreService">
    <wsdl:operation name="getPets">
      <wsdl:input message="tns:getPets" name="getPets"/>
      <wsdl:output message="tns:getPetsResponse" name="getPetsResponse"/>
    </wsdl:operation>
  </wsdl:portType>

  <wsdl:binding name="PetstoreServiceSoapBinding" type="tns:PetstoreService">
    <soap:binding style="document" transport="http://schemas.xmlsoap.org/soap/http" />
    <wsdl:operation name="getPets">
      <soap:operation soapAction="http://www.acme.org/petstore/getPets" style="document" />
      <wsdl:input>
        <soap:body use="literal" />
      </wsdl:input>
      <wsdl:output>
        <soap:body use="literal" />
      </wsdl:output>
    </wsdl:operation>
  </wsdl:binding>
  <wsdl:service name="PetstoreService">
    <wsdl:port binding="tns:PetstoreServiceSoapBinding" name="PetstoreServiceEndpointPort">
      <soap:address location="http://localhost:8080/services/PetstoreService" />
    </wsdl:port>
  </wsdl:service>
</wsdl:definitions>
From now, you can save this as a file on your disk - or your can retrieve our finalized petstore-1.0.wsdl file. Then open SoapUI and choose New SOAP Project in the File menu or from the top buttons bar. Give your project a name like PetstoreService and choose to Upload this file as its definition. It should create a new folder for your project on the left pane initialized with a Service named PetstoreServiceSoapBinding.
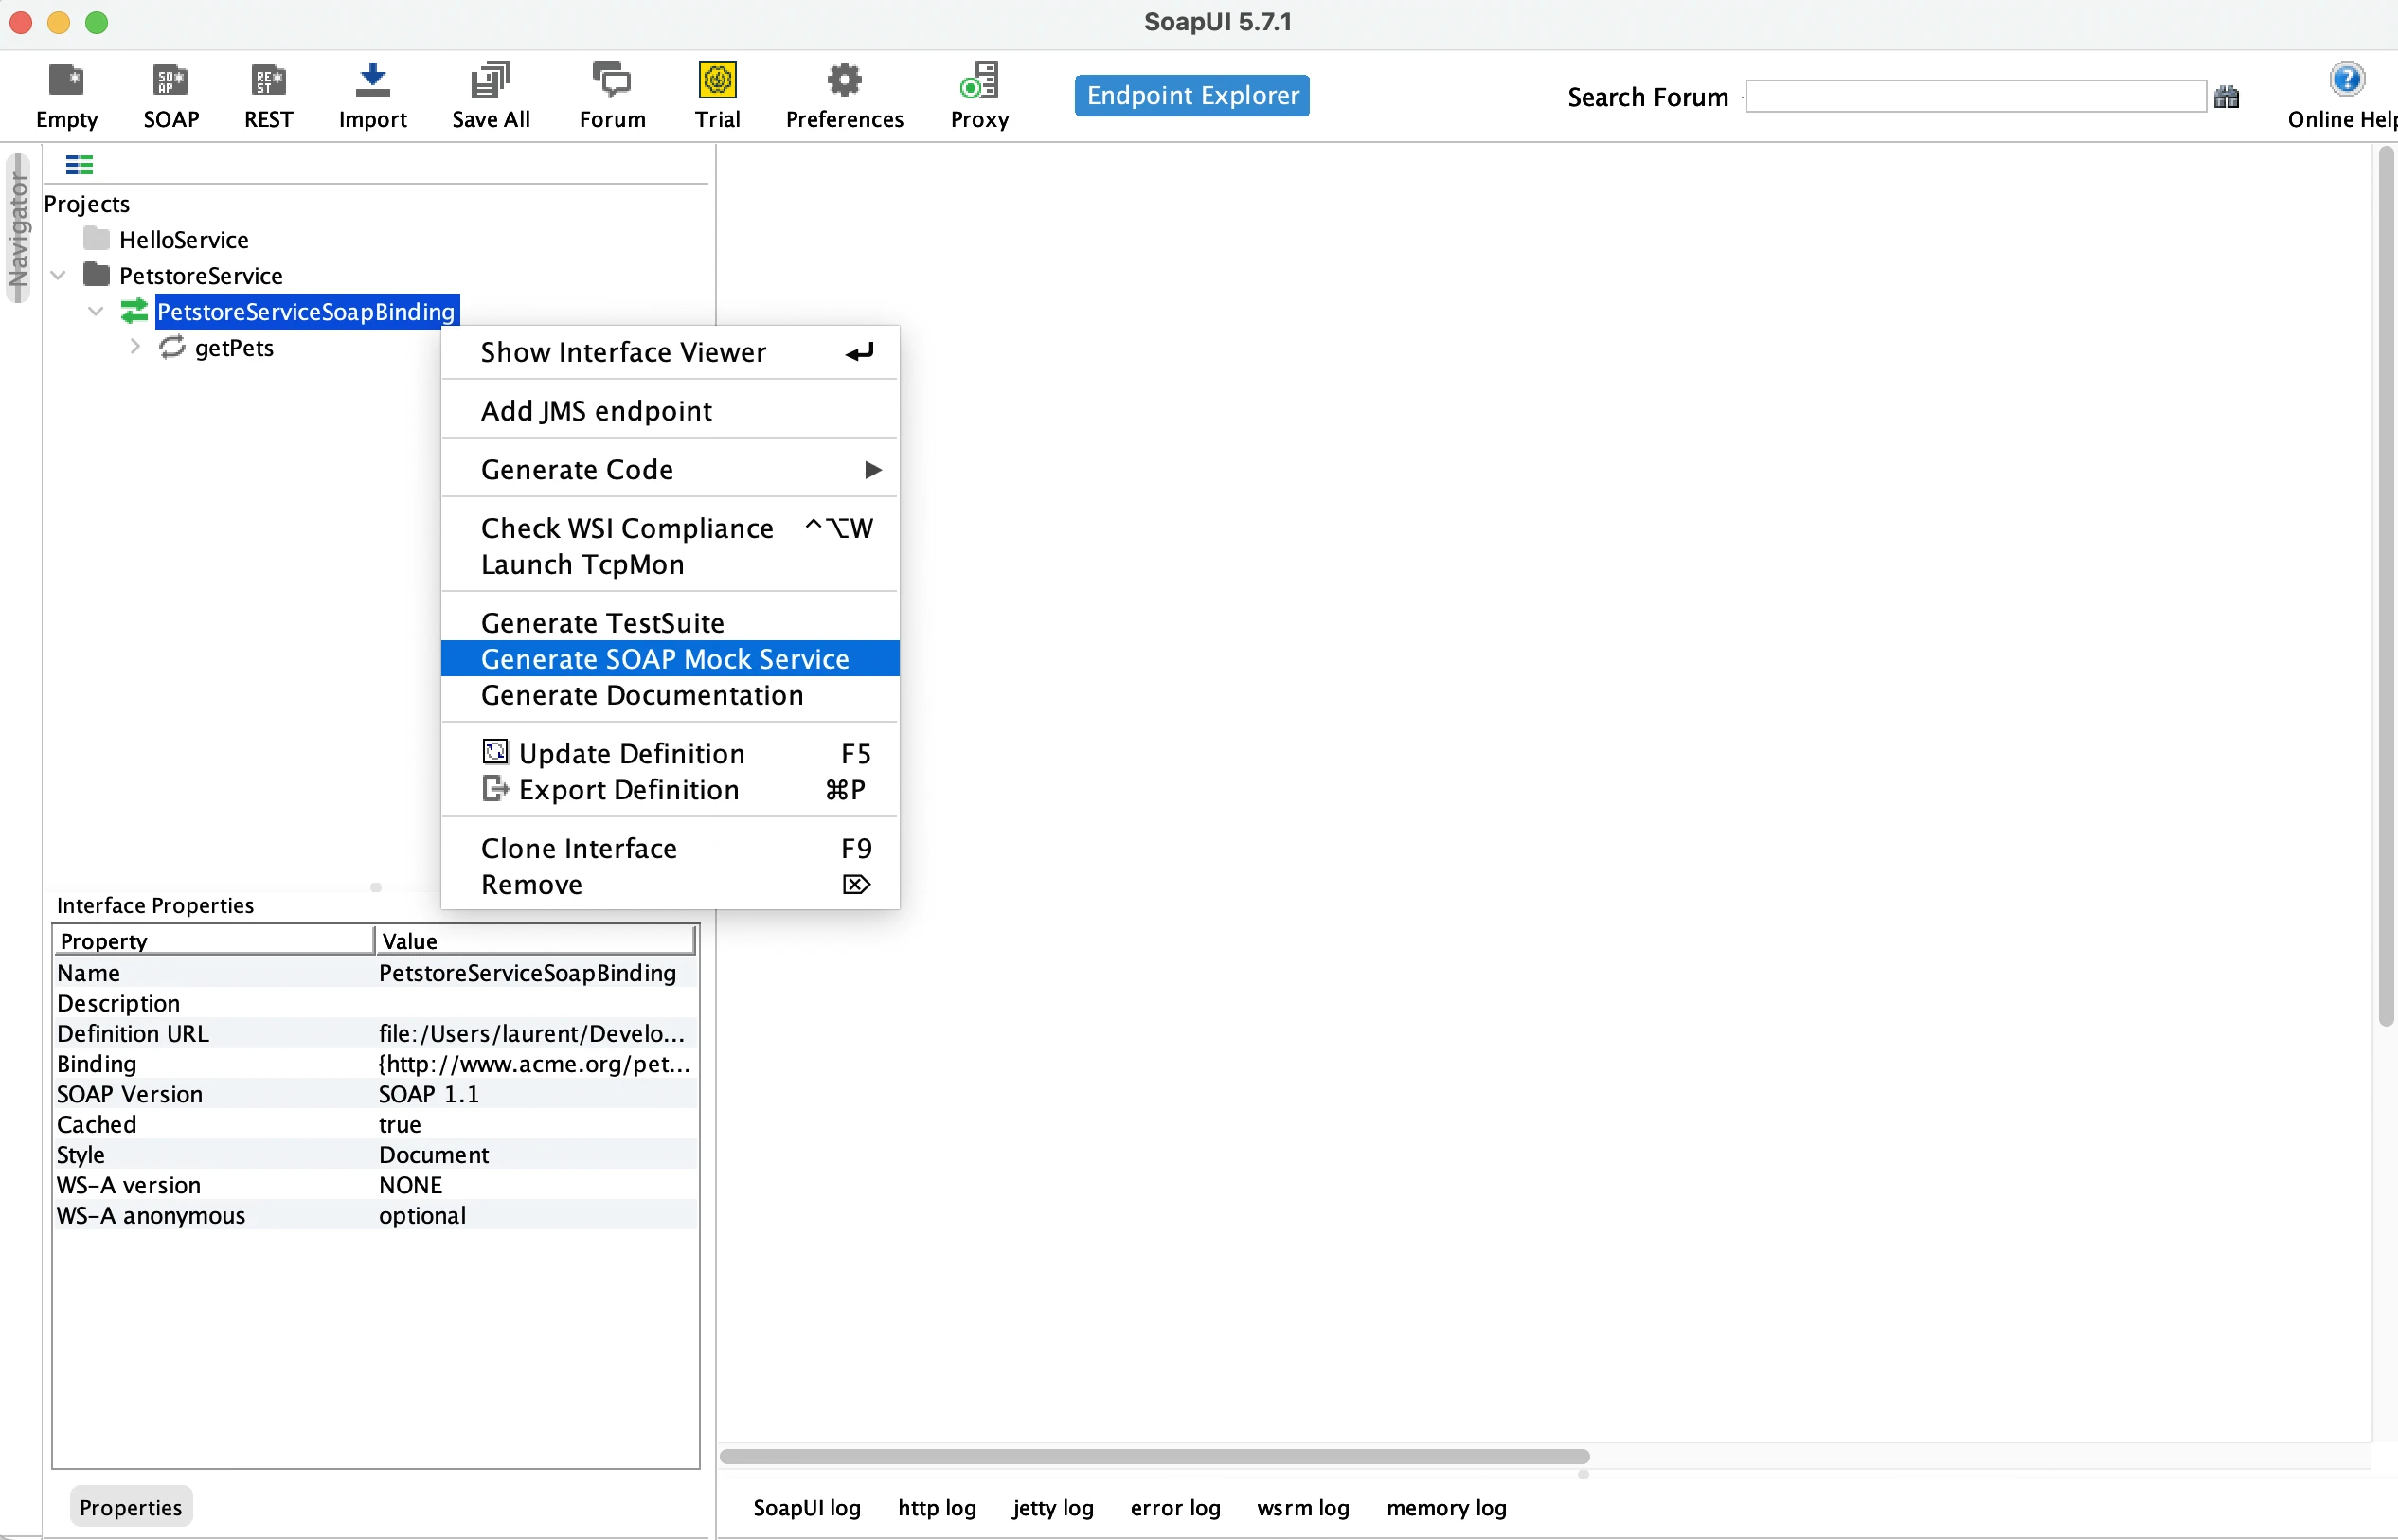
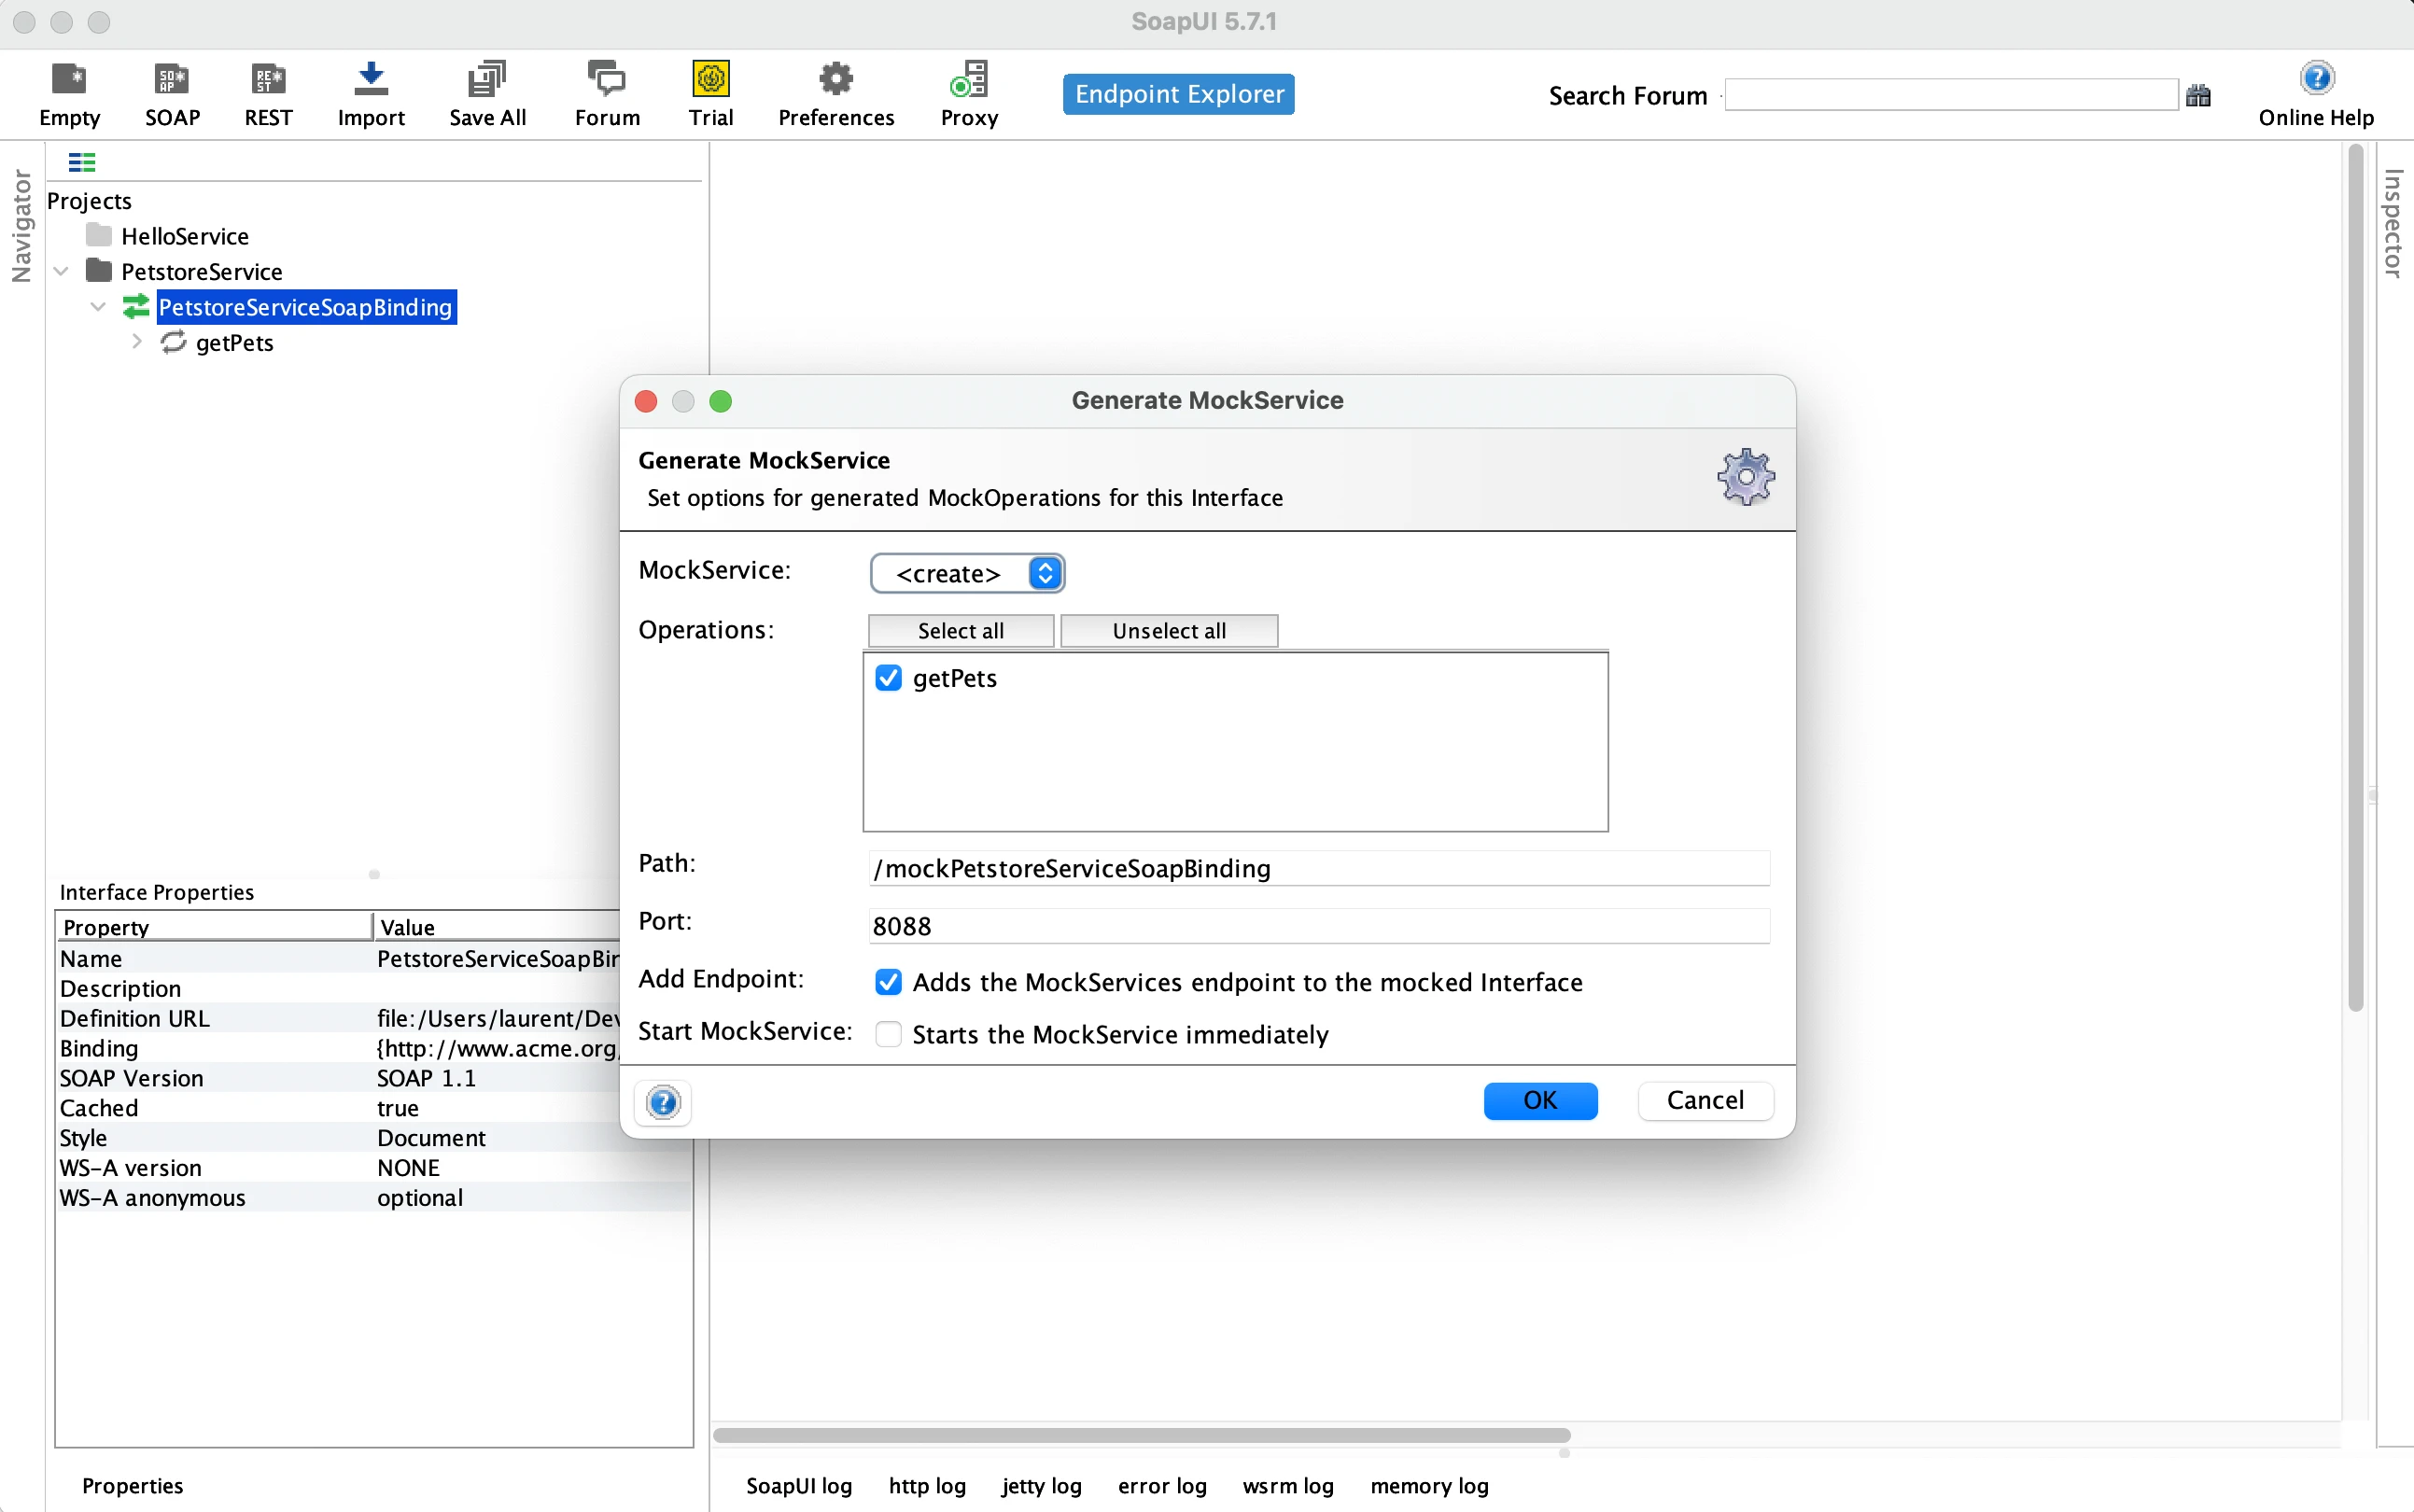
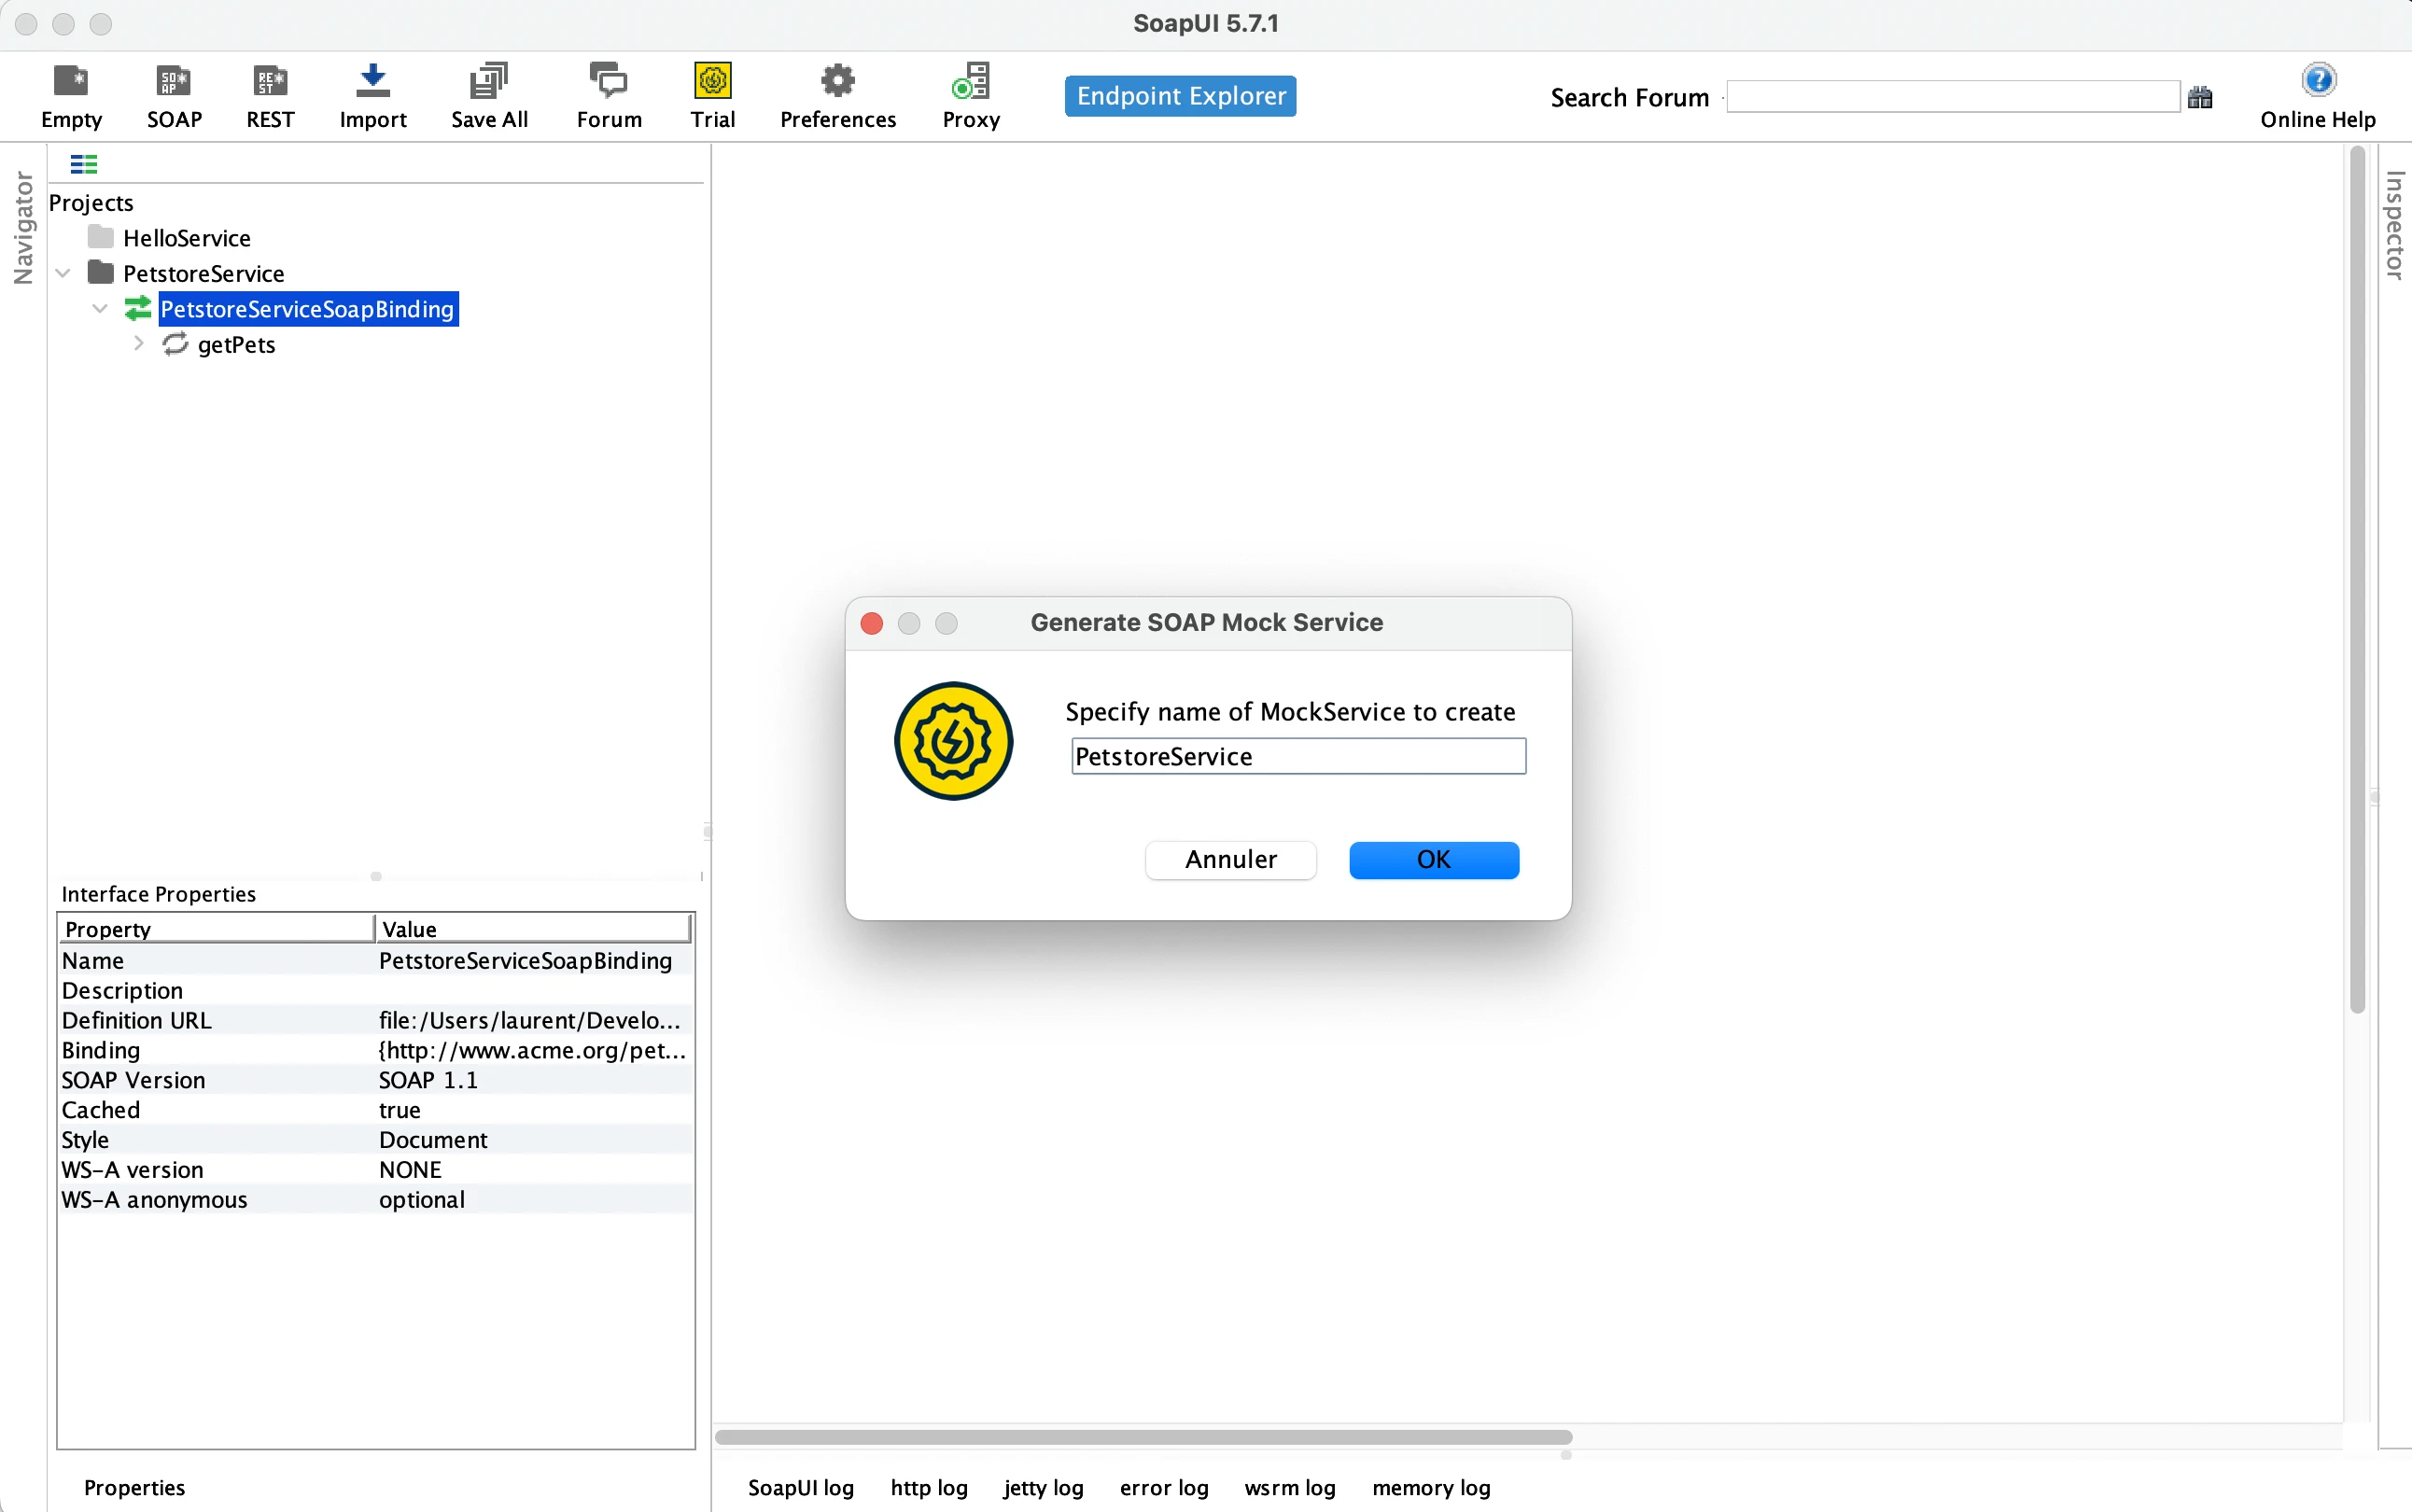
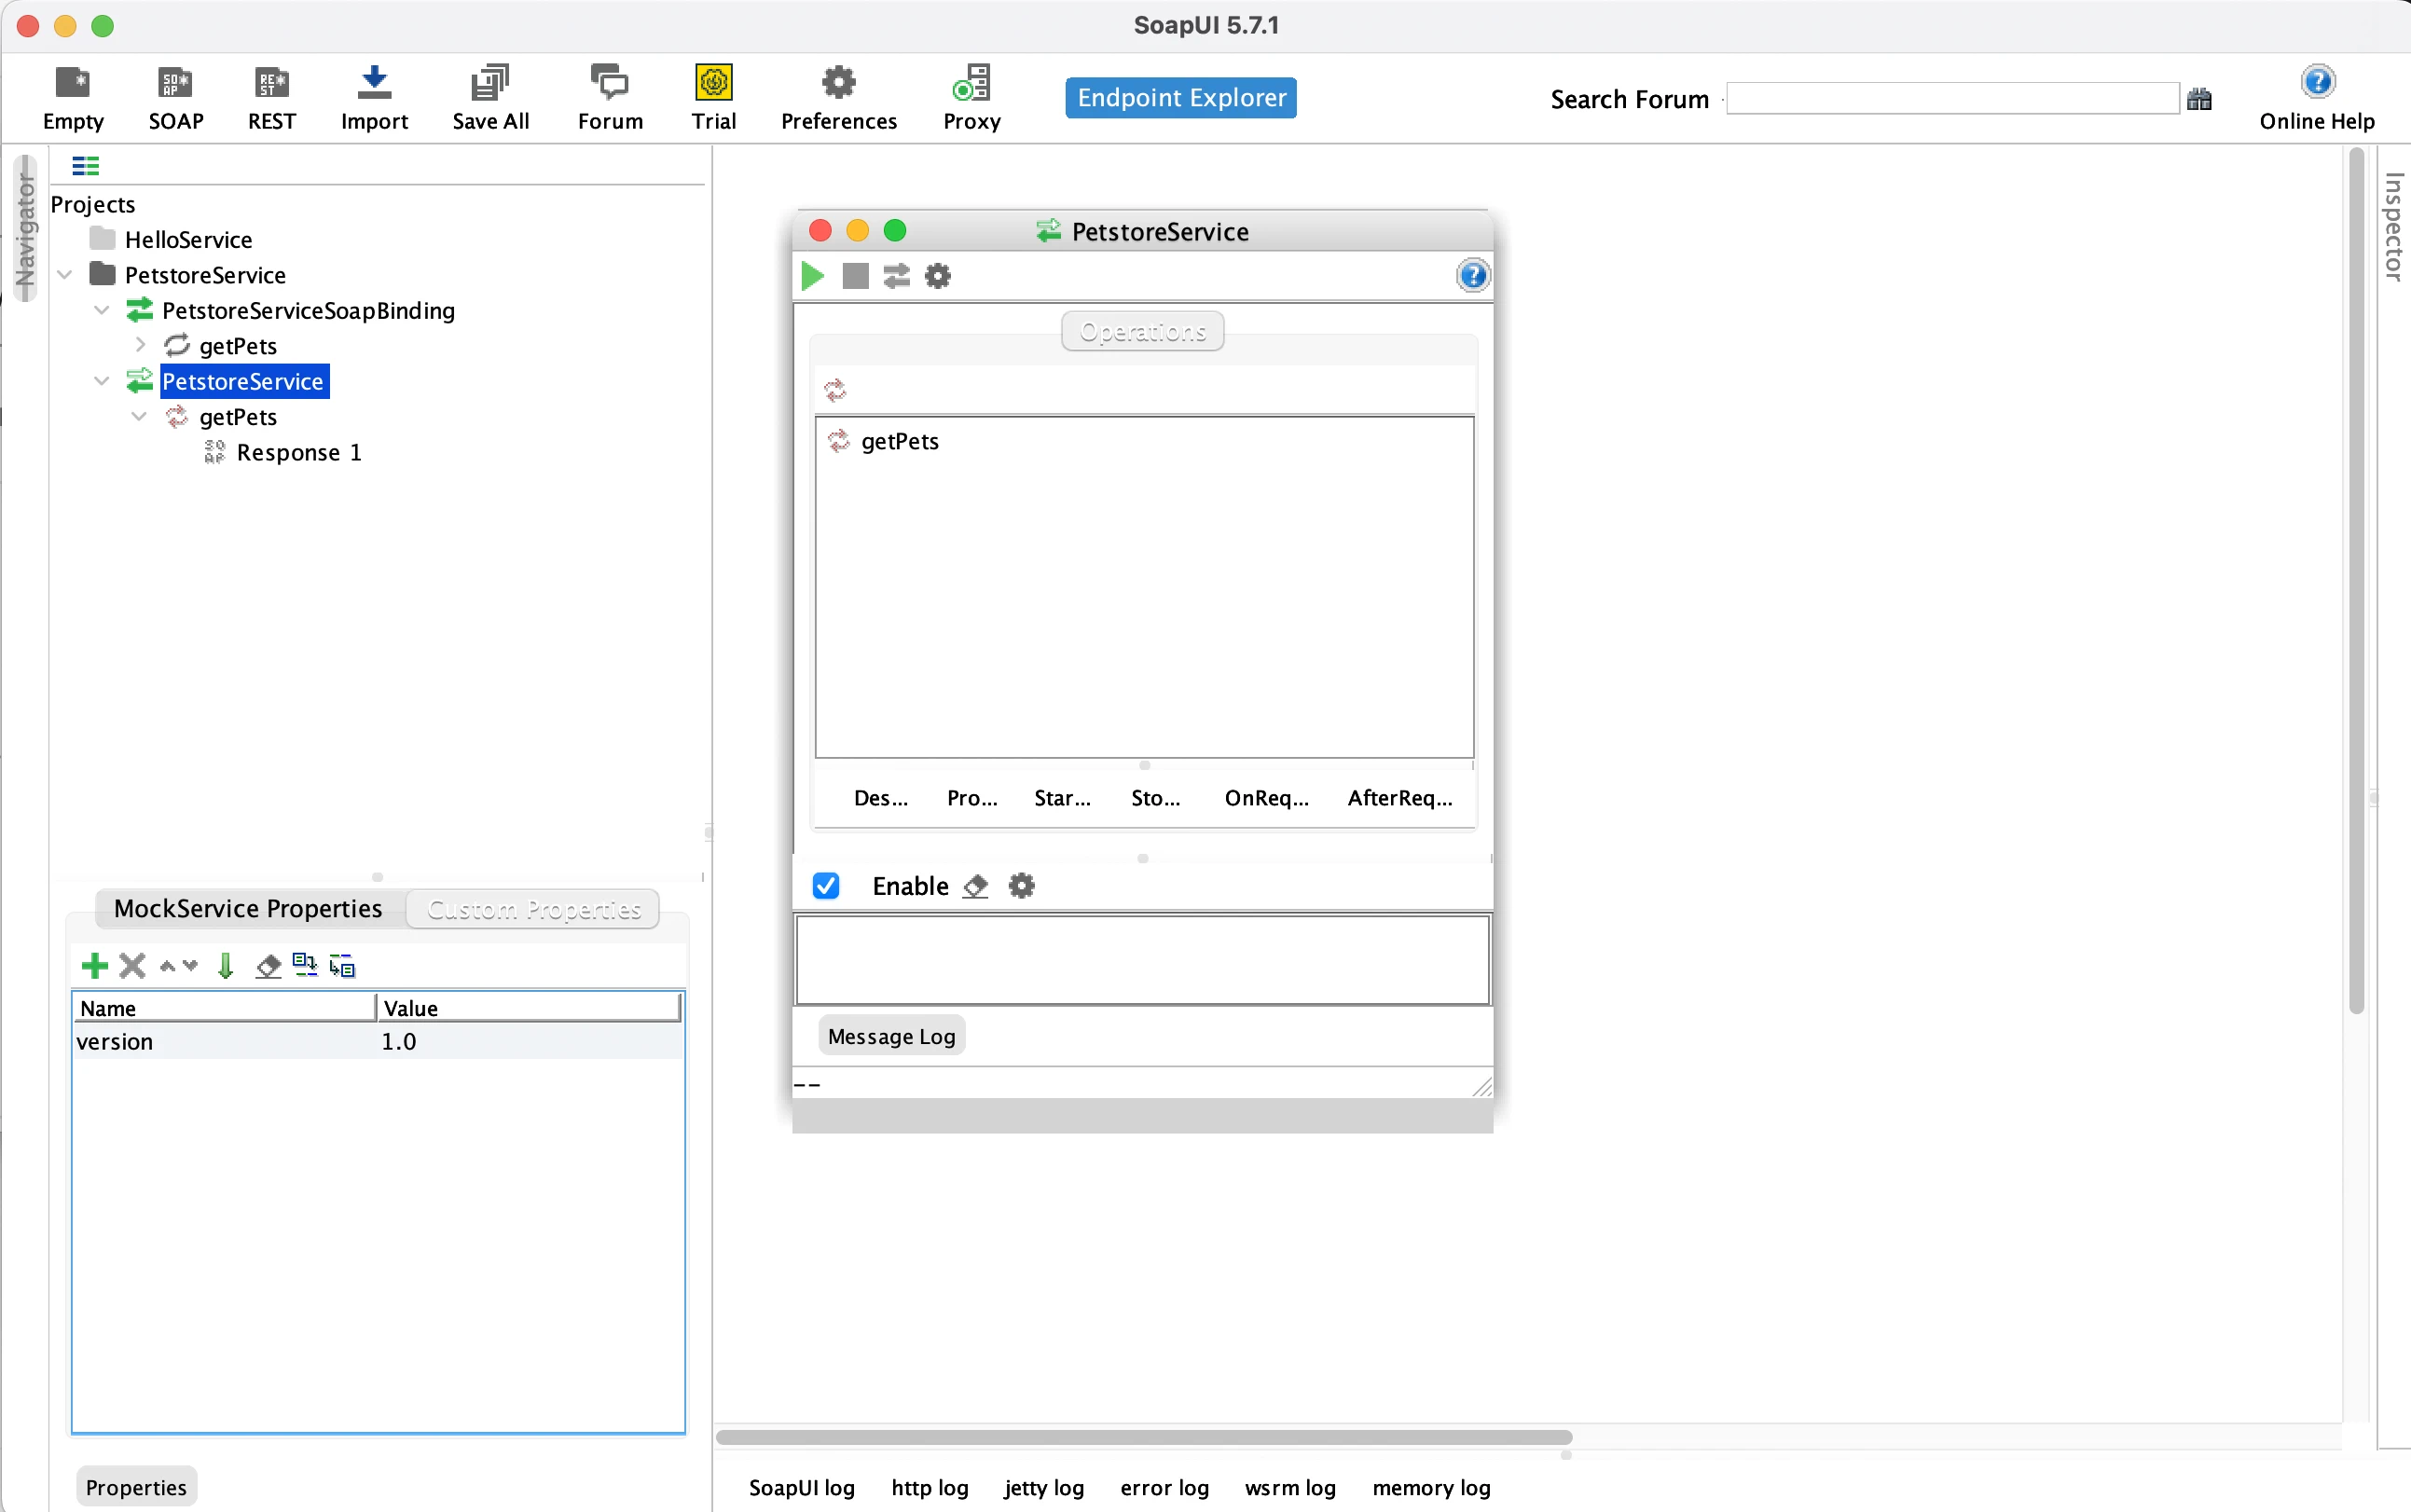
We now have some more initialization work to do. This is a four steps process that is illustrated below in the slider (you can the blue dots to freeze the swiper below):
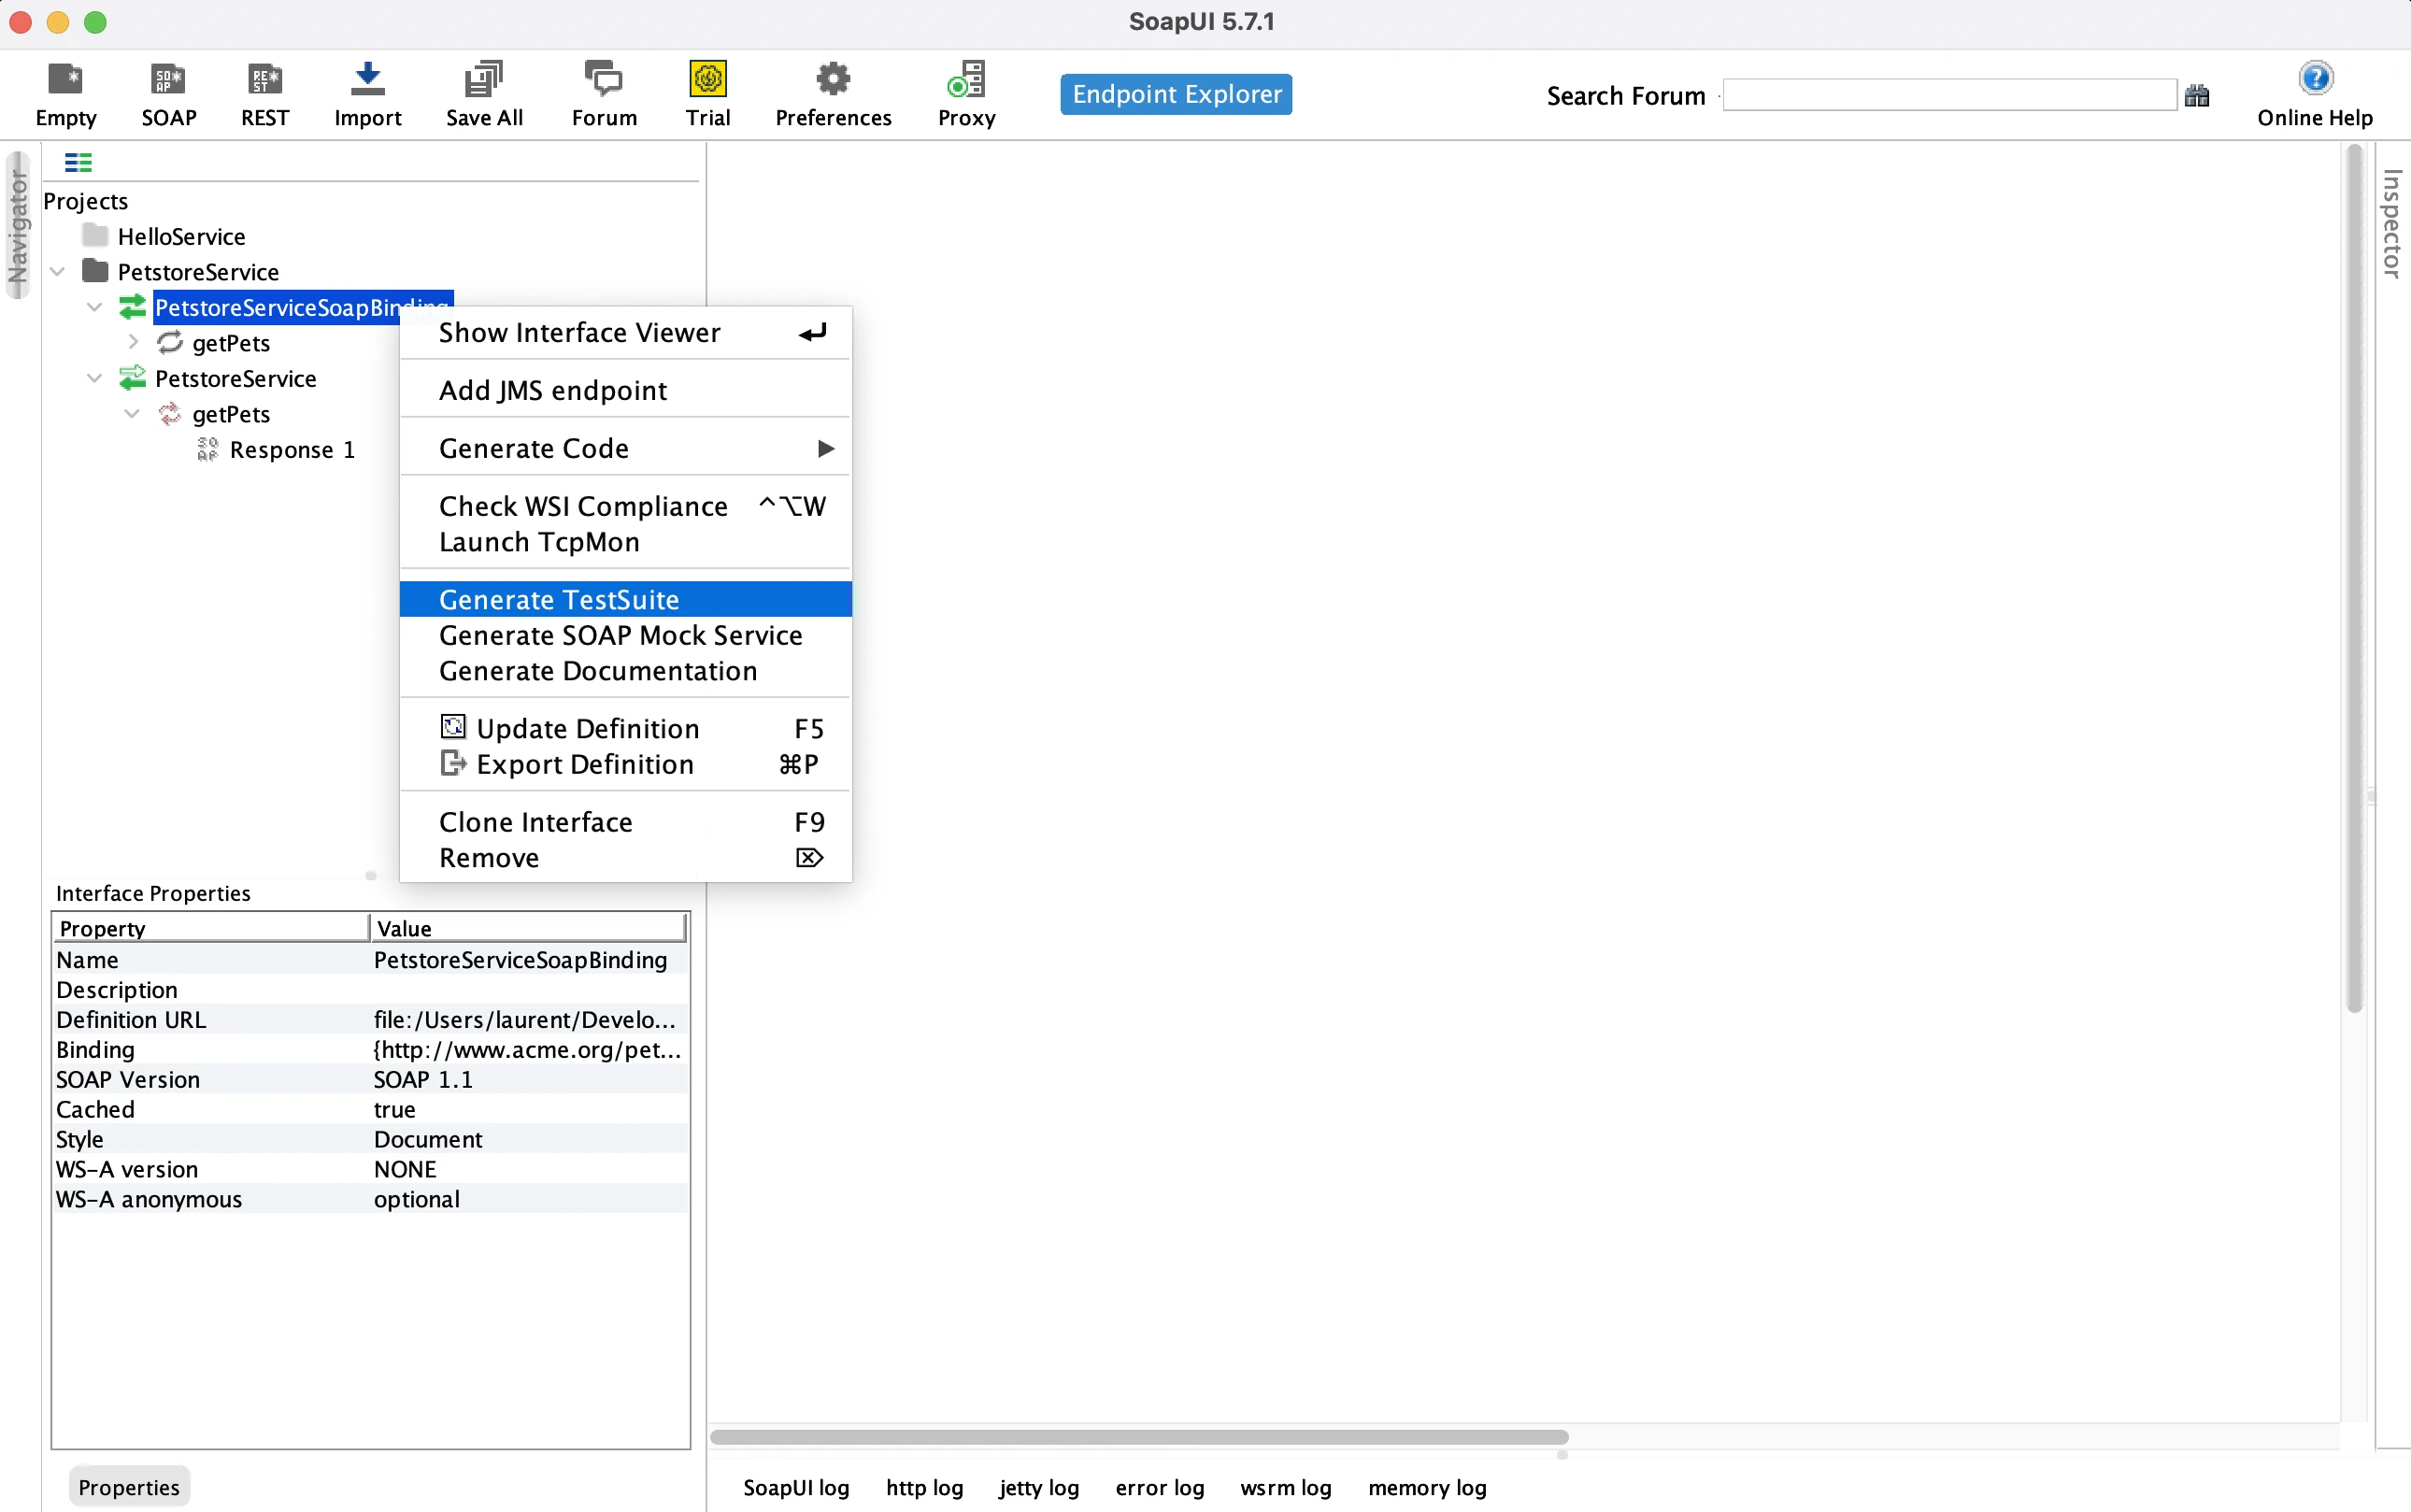
1️⃣ Right-click on the imported binding and ask SoapUI to generate a new mock server for this binding,,
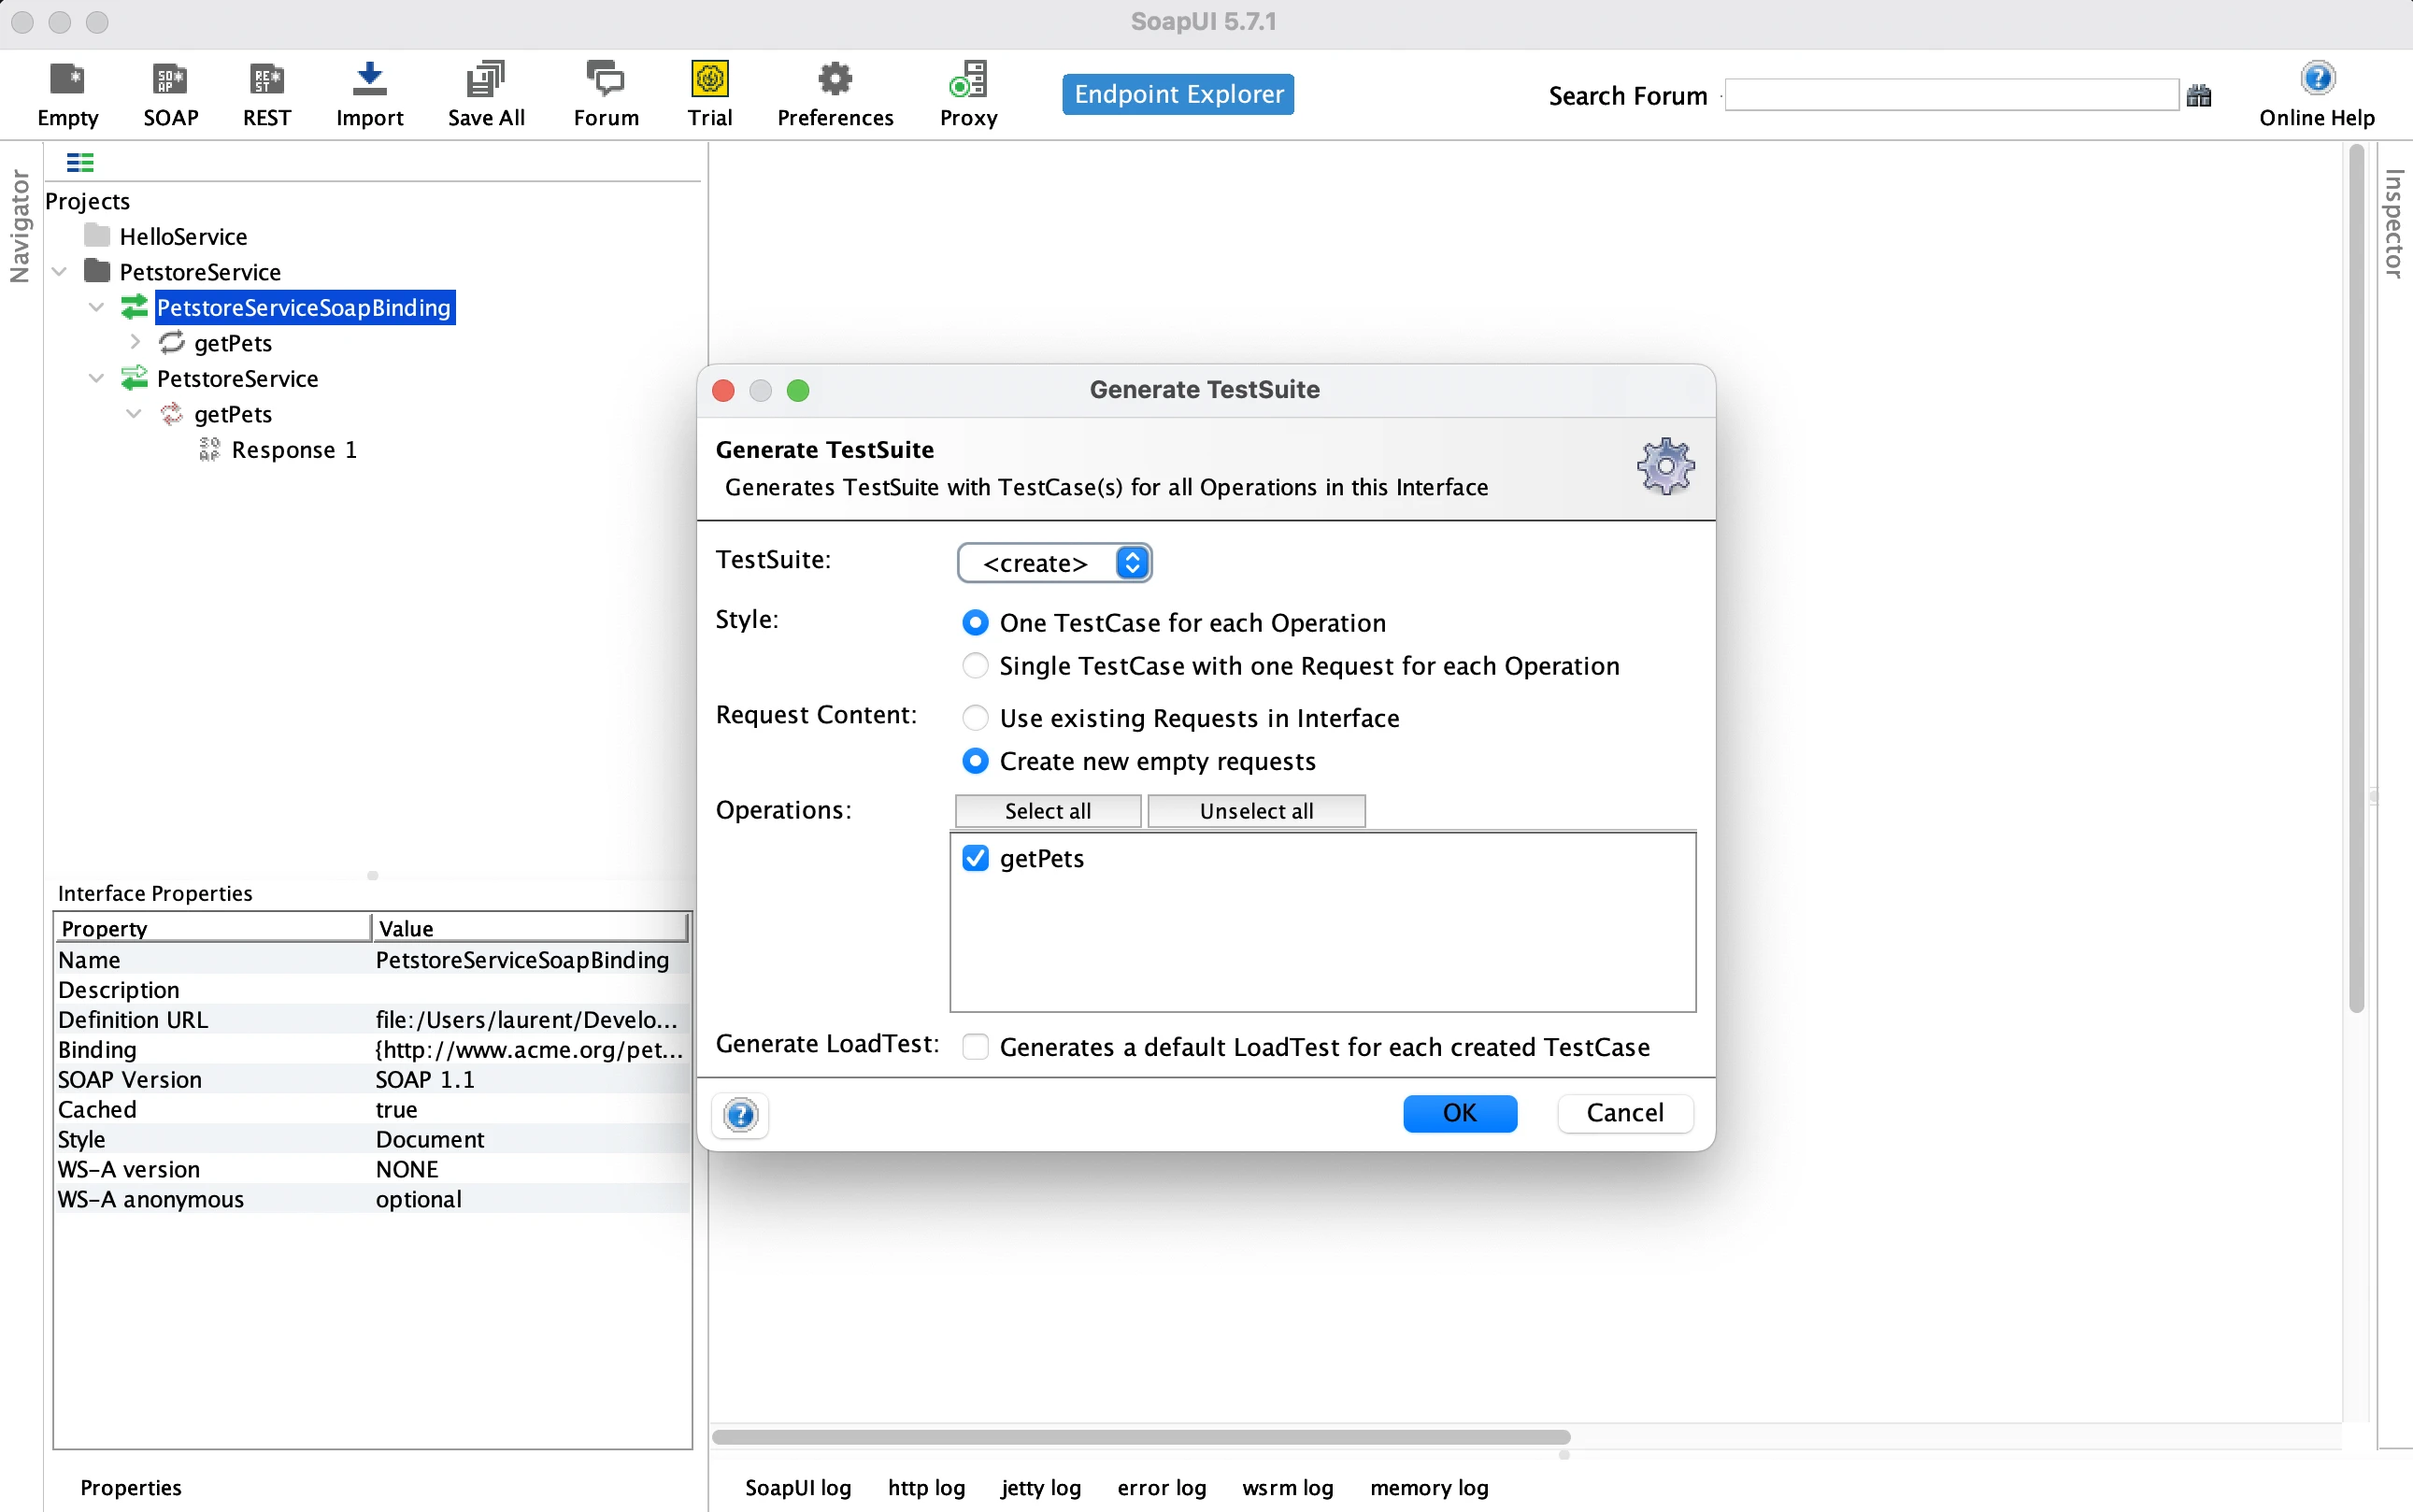
2️⃣ Keep the default options on the generation form. You can check that the getPets operation is correctly detected,
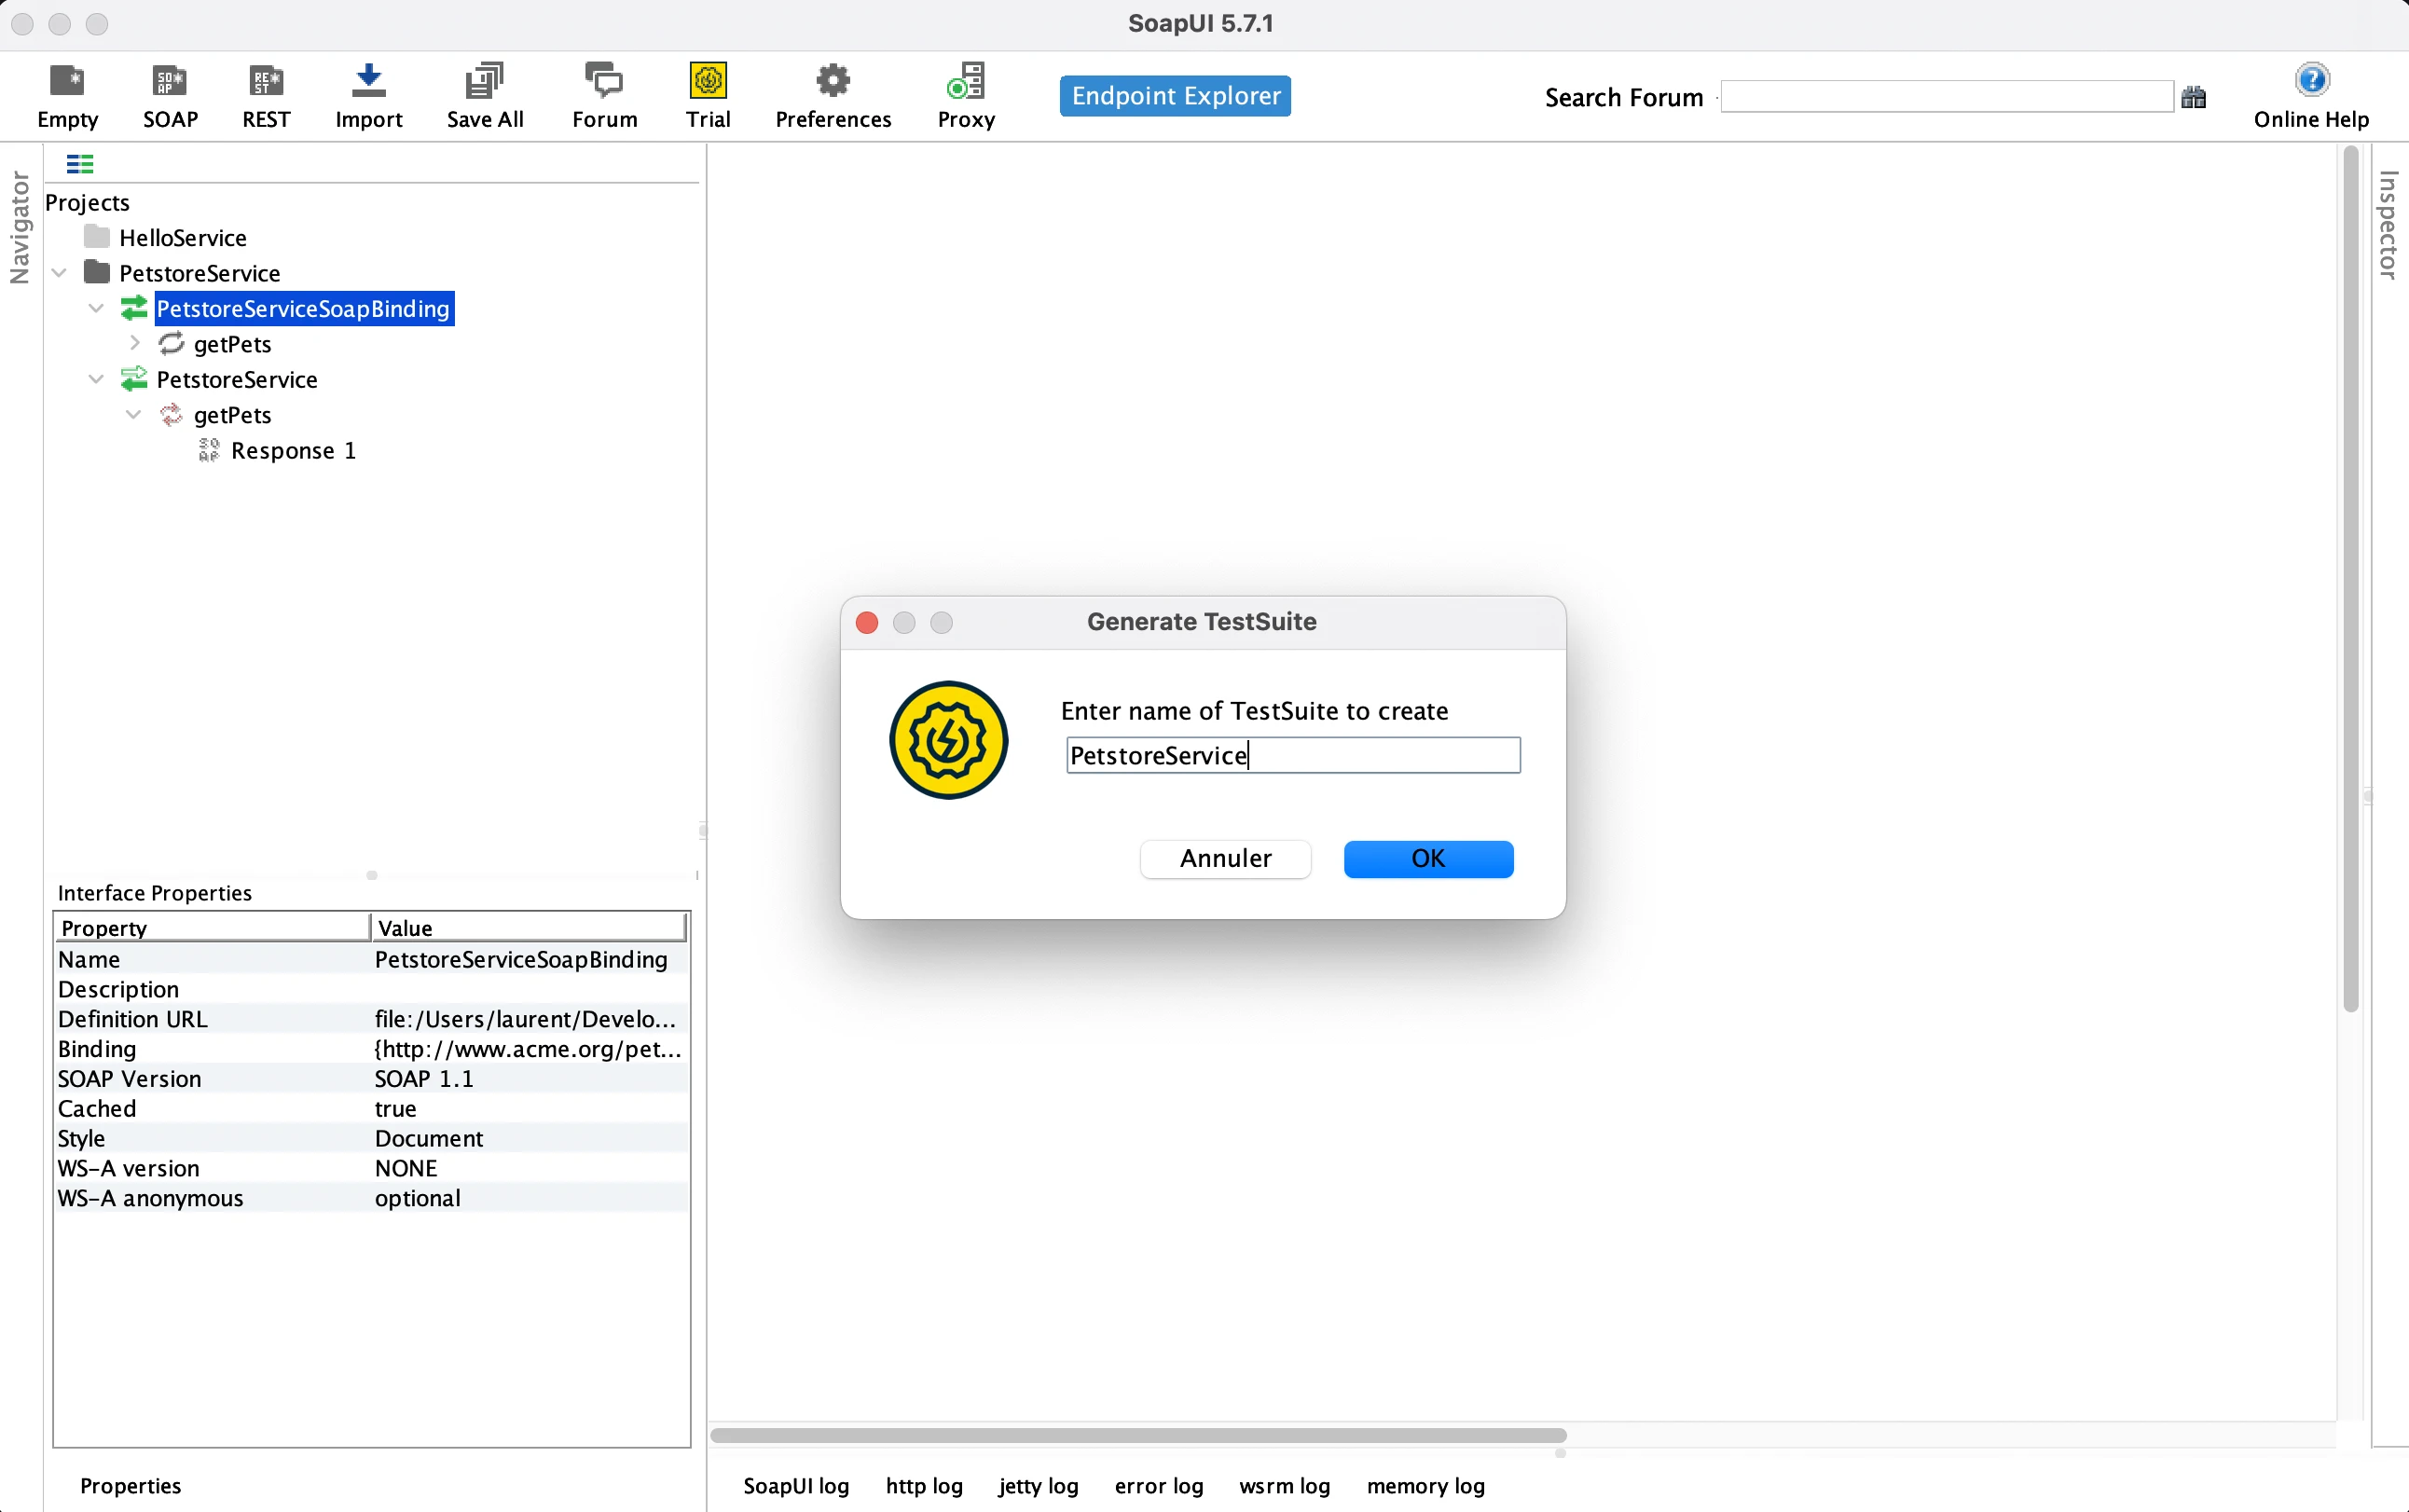
3️⃣ You have now to name the mock server - this will be the name that will appear later in Microcks. Prefer something simple like PetstoreService for example,
4️⃣ On the newly created mock server, use the left pane to add a custom properties named version having 1.0 as a value. This is one of our conventions for SoapUI projects.
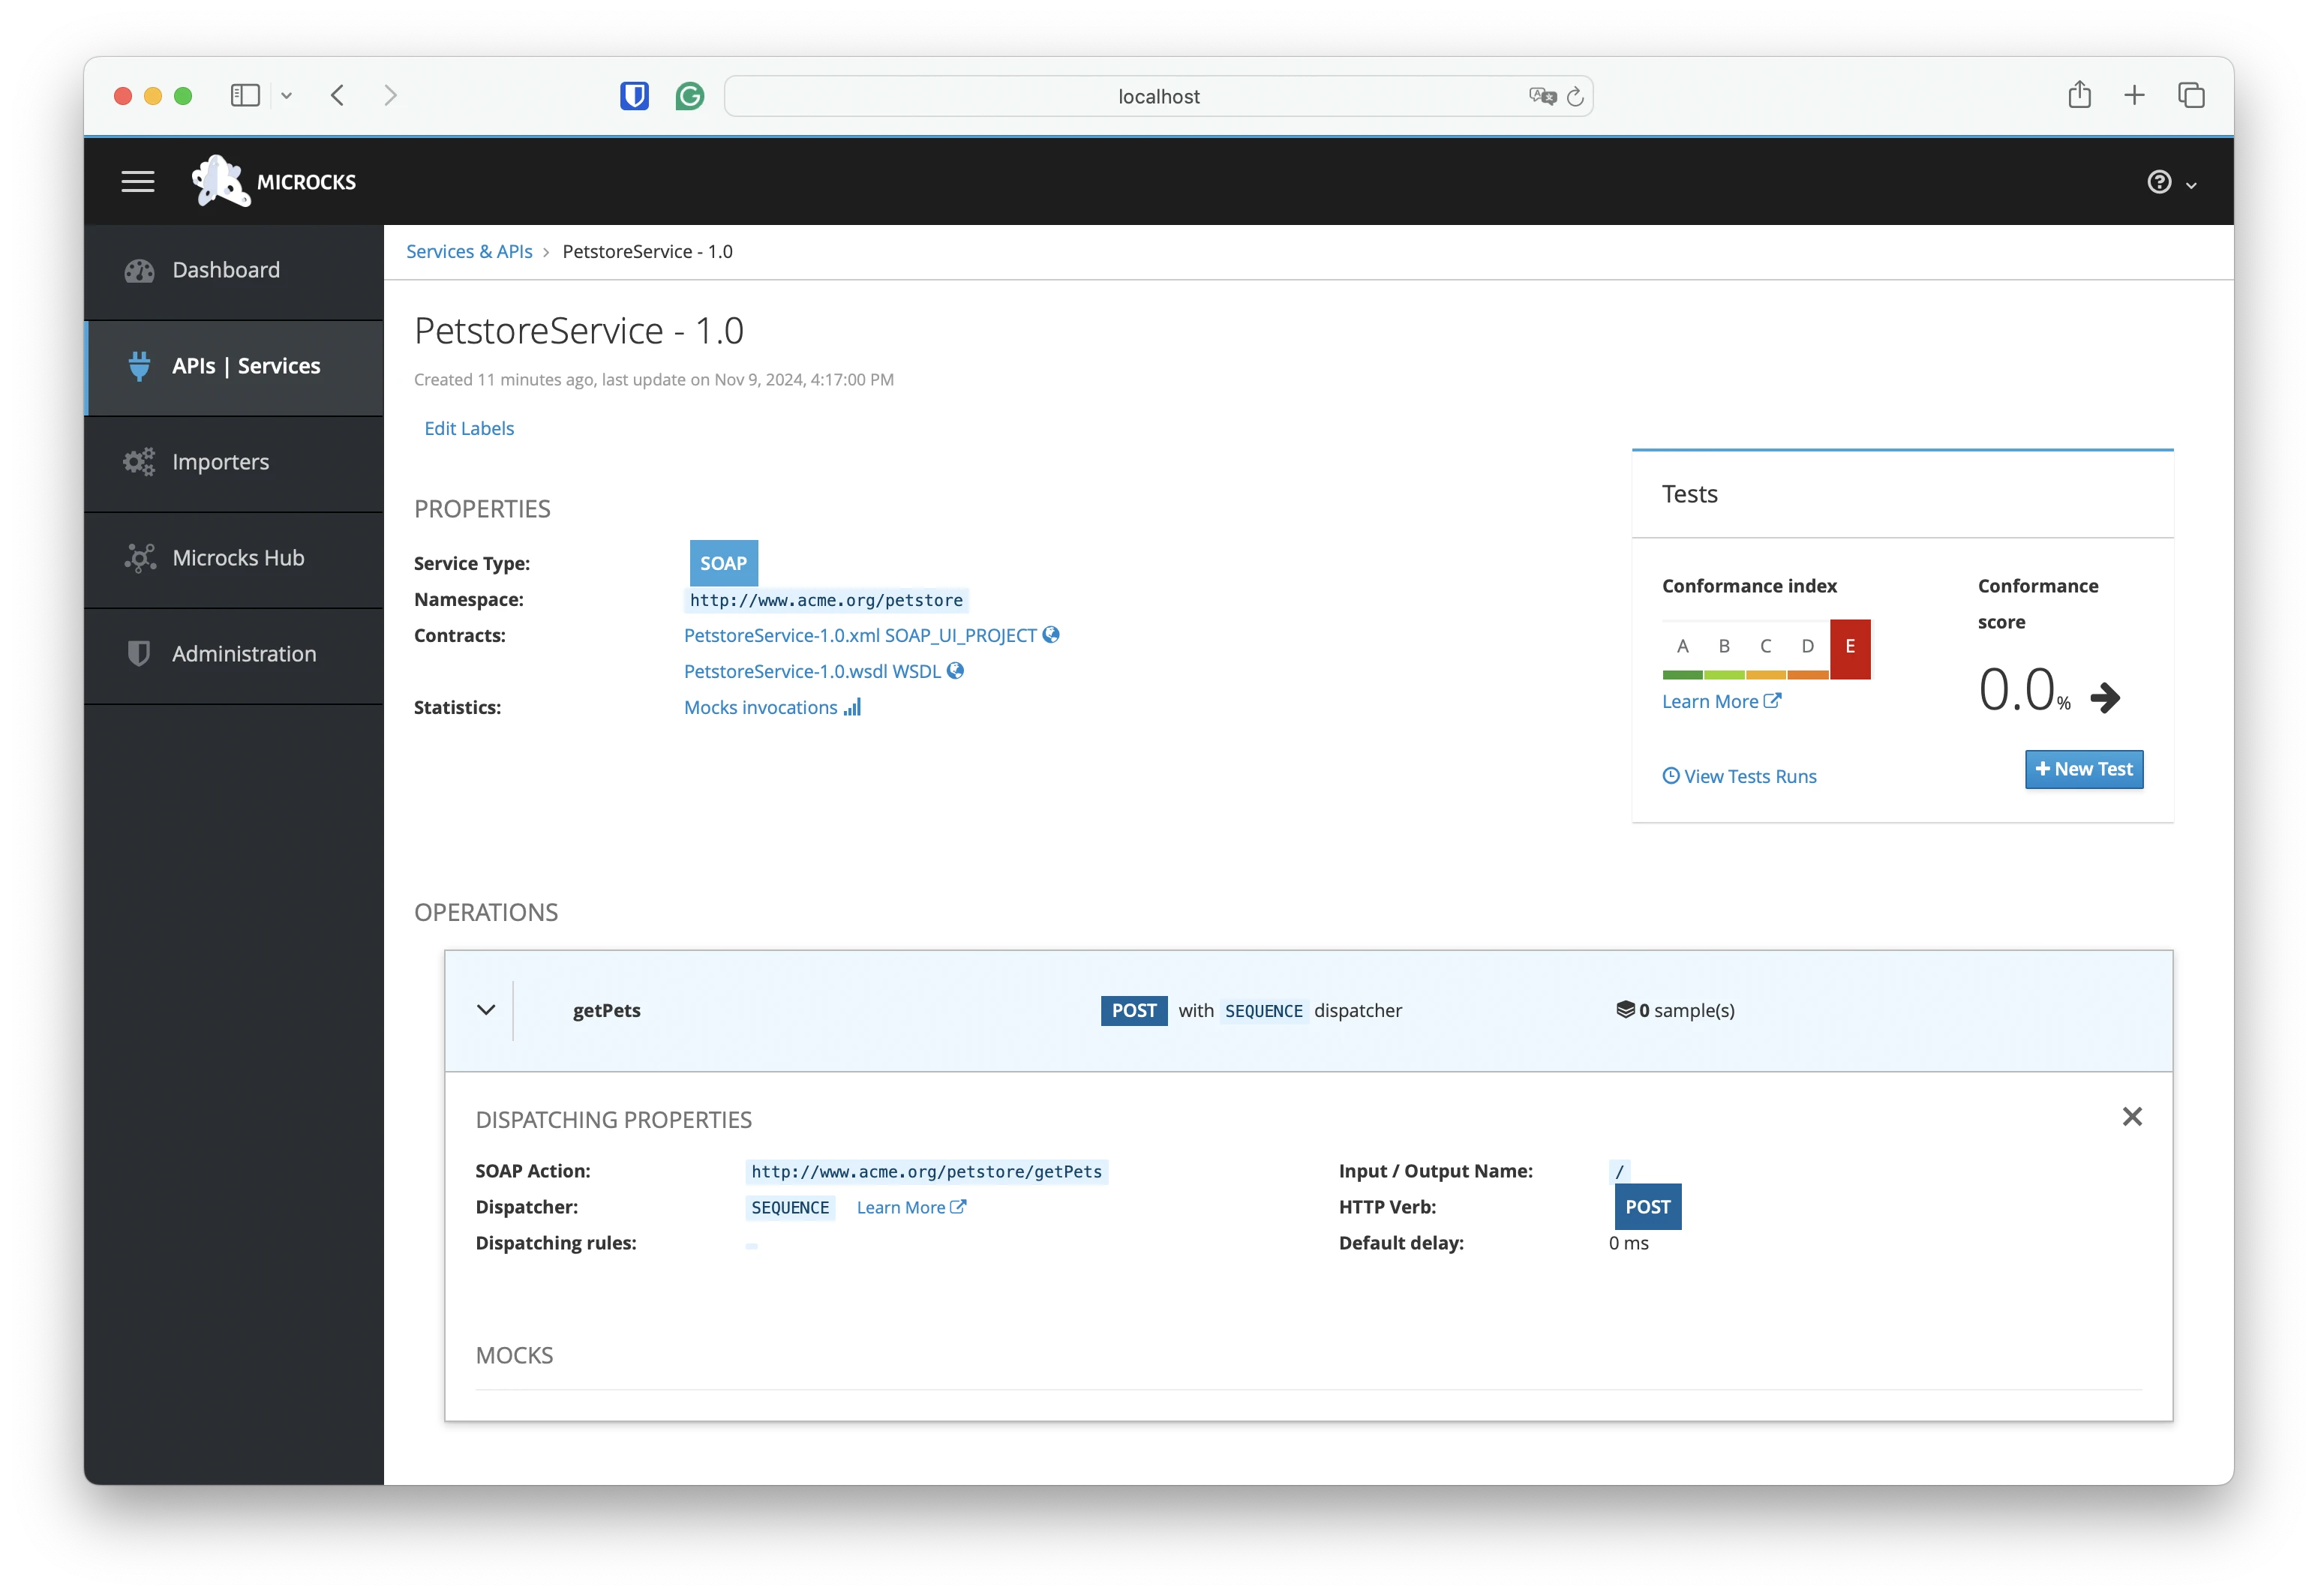
To finish this first preparation step, you can save this project as a XML file on your disk, then open Microcks in your browser and go to the Importers page in the left navigation menu and choose to Upload this file. The file should import correctly and you should receive a toast notifiation on the upper right corner. Then, while browsing APIs | Services, you should get acess to the following details in Microcks:
2. Specifying mock data with SoapUI
We have loaded a SoapUI project in Microcks that correctly discovered the structure of your WebService, but you have no sample data loaded at the moment. We’re going to fix this using SoapUI by defining:
- a Ressponse in the
PetstoreServiceMock Server, - a Request in a new Test Suite for our Service.
Let’s start by the request. This is a three steps process that is illustrated below in the slider (you can the blue dots to freeze the swiper below):
1️⃣ Right-click on the imported binding and ask SoapUI to generate a new test suite server for this binding,,
2️⃣ Keep the default options on the generation form. You can check that the getPets operation is correctly detected,
3️⃣ You can now rename the mock server. I like sticking with simple names like PetstoreService,
You can open and check the default getPets request that has been created in the Test Suite. This one is basic has we have no arguments in the request.
Let’s now take care of the rseponse definition. The PetstoreService Mock Server has been initialized with a default request named Request 1.
To tell Microcks that this one should match with the request we just defined, we have to rename it and simply call it getPets as well.
This is one of our conventions for SoapUI projects.
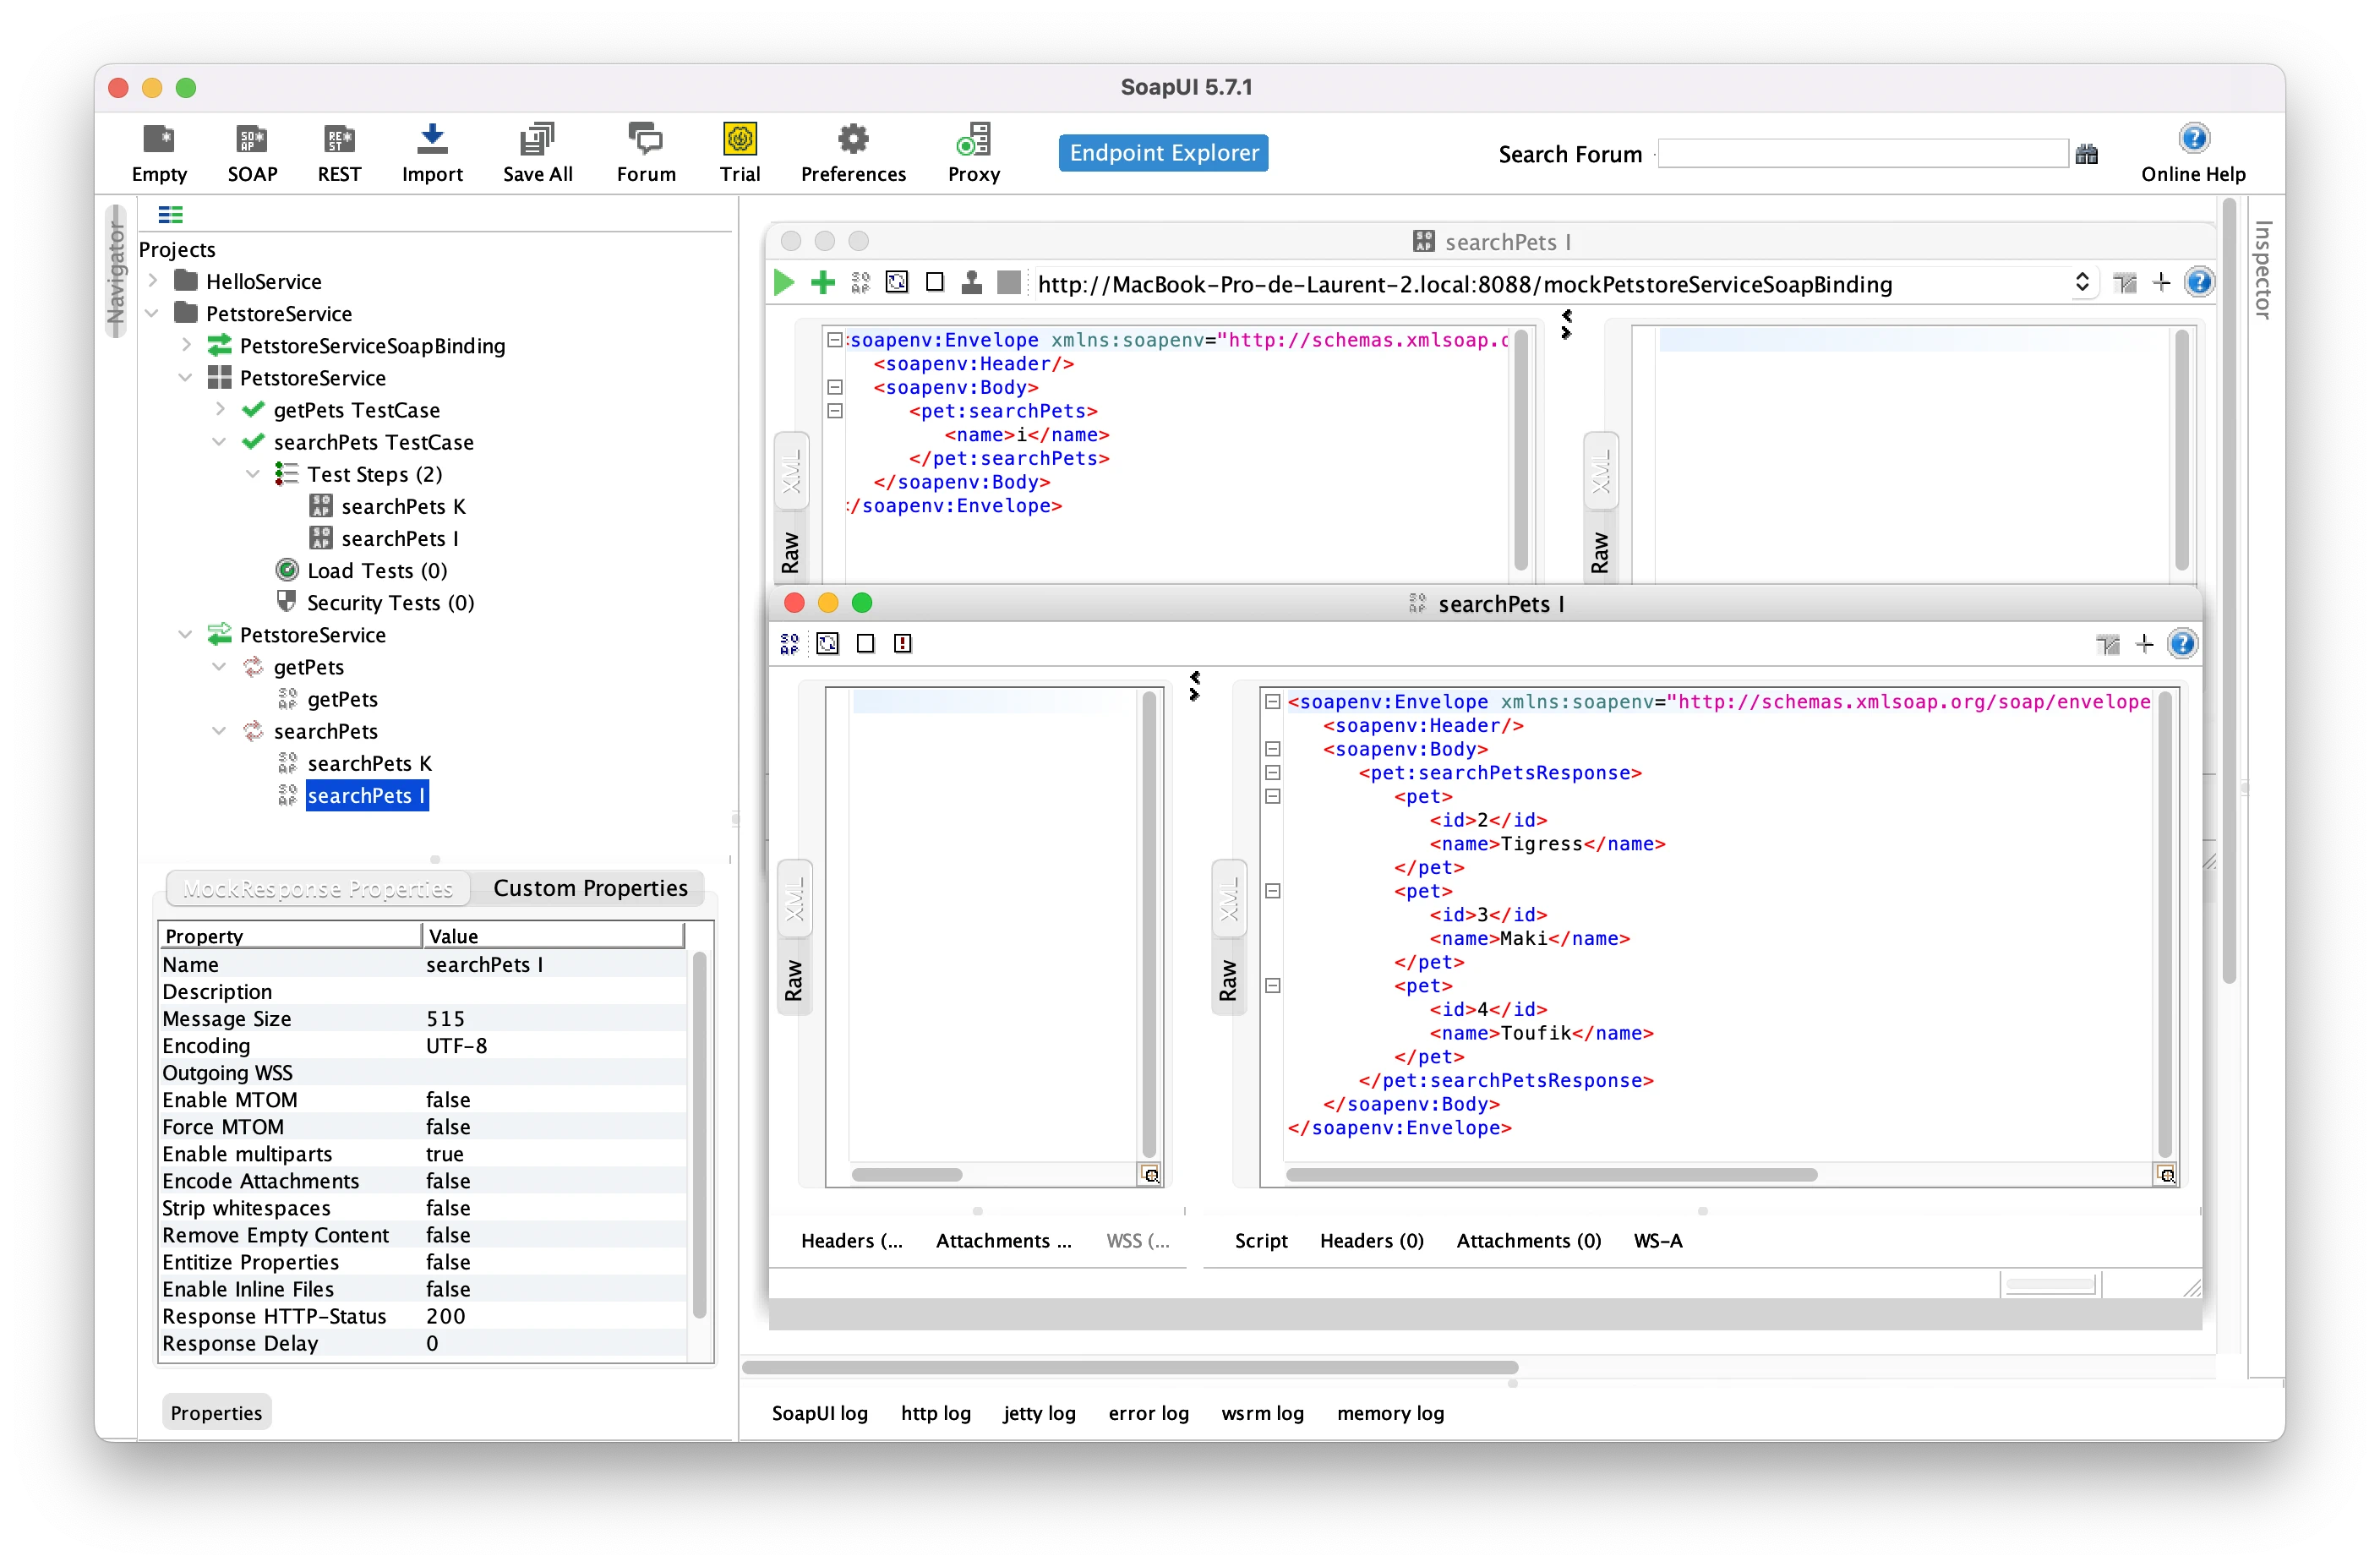
Edit the content of this response to put some sample data:
<soapenv:Envelope xmlns:soapenv="http://schemas.xmlsoap.org/soap/envelope/" xmlns:pet="http://www.acme.org/petstore">
  <soapenv:Header/>
  <soapenv:Body>
    <pet:getPetsResponse>
      <pet>
        <id>1</id>
        <name>Zaza</name>
      </pet>
      <pet>
        <id>2</id>
        <name>Tigress</name>
      </pet>
      <pet>
        <id>3</id>
        <name>Maki</name>
      </pet>
      <pet>
        <id>4</id>
        <name>Toufik</name>
      </pet>
    </pet:getPetsResponse>
  </soapenv:Body>
</soapenv:Envelope>
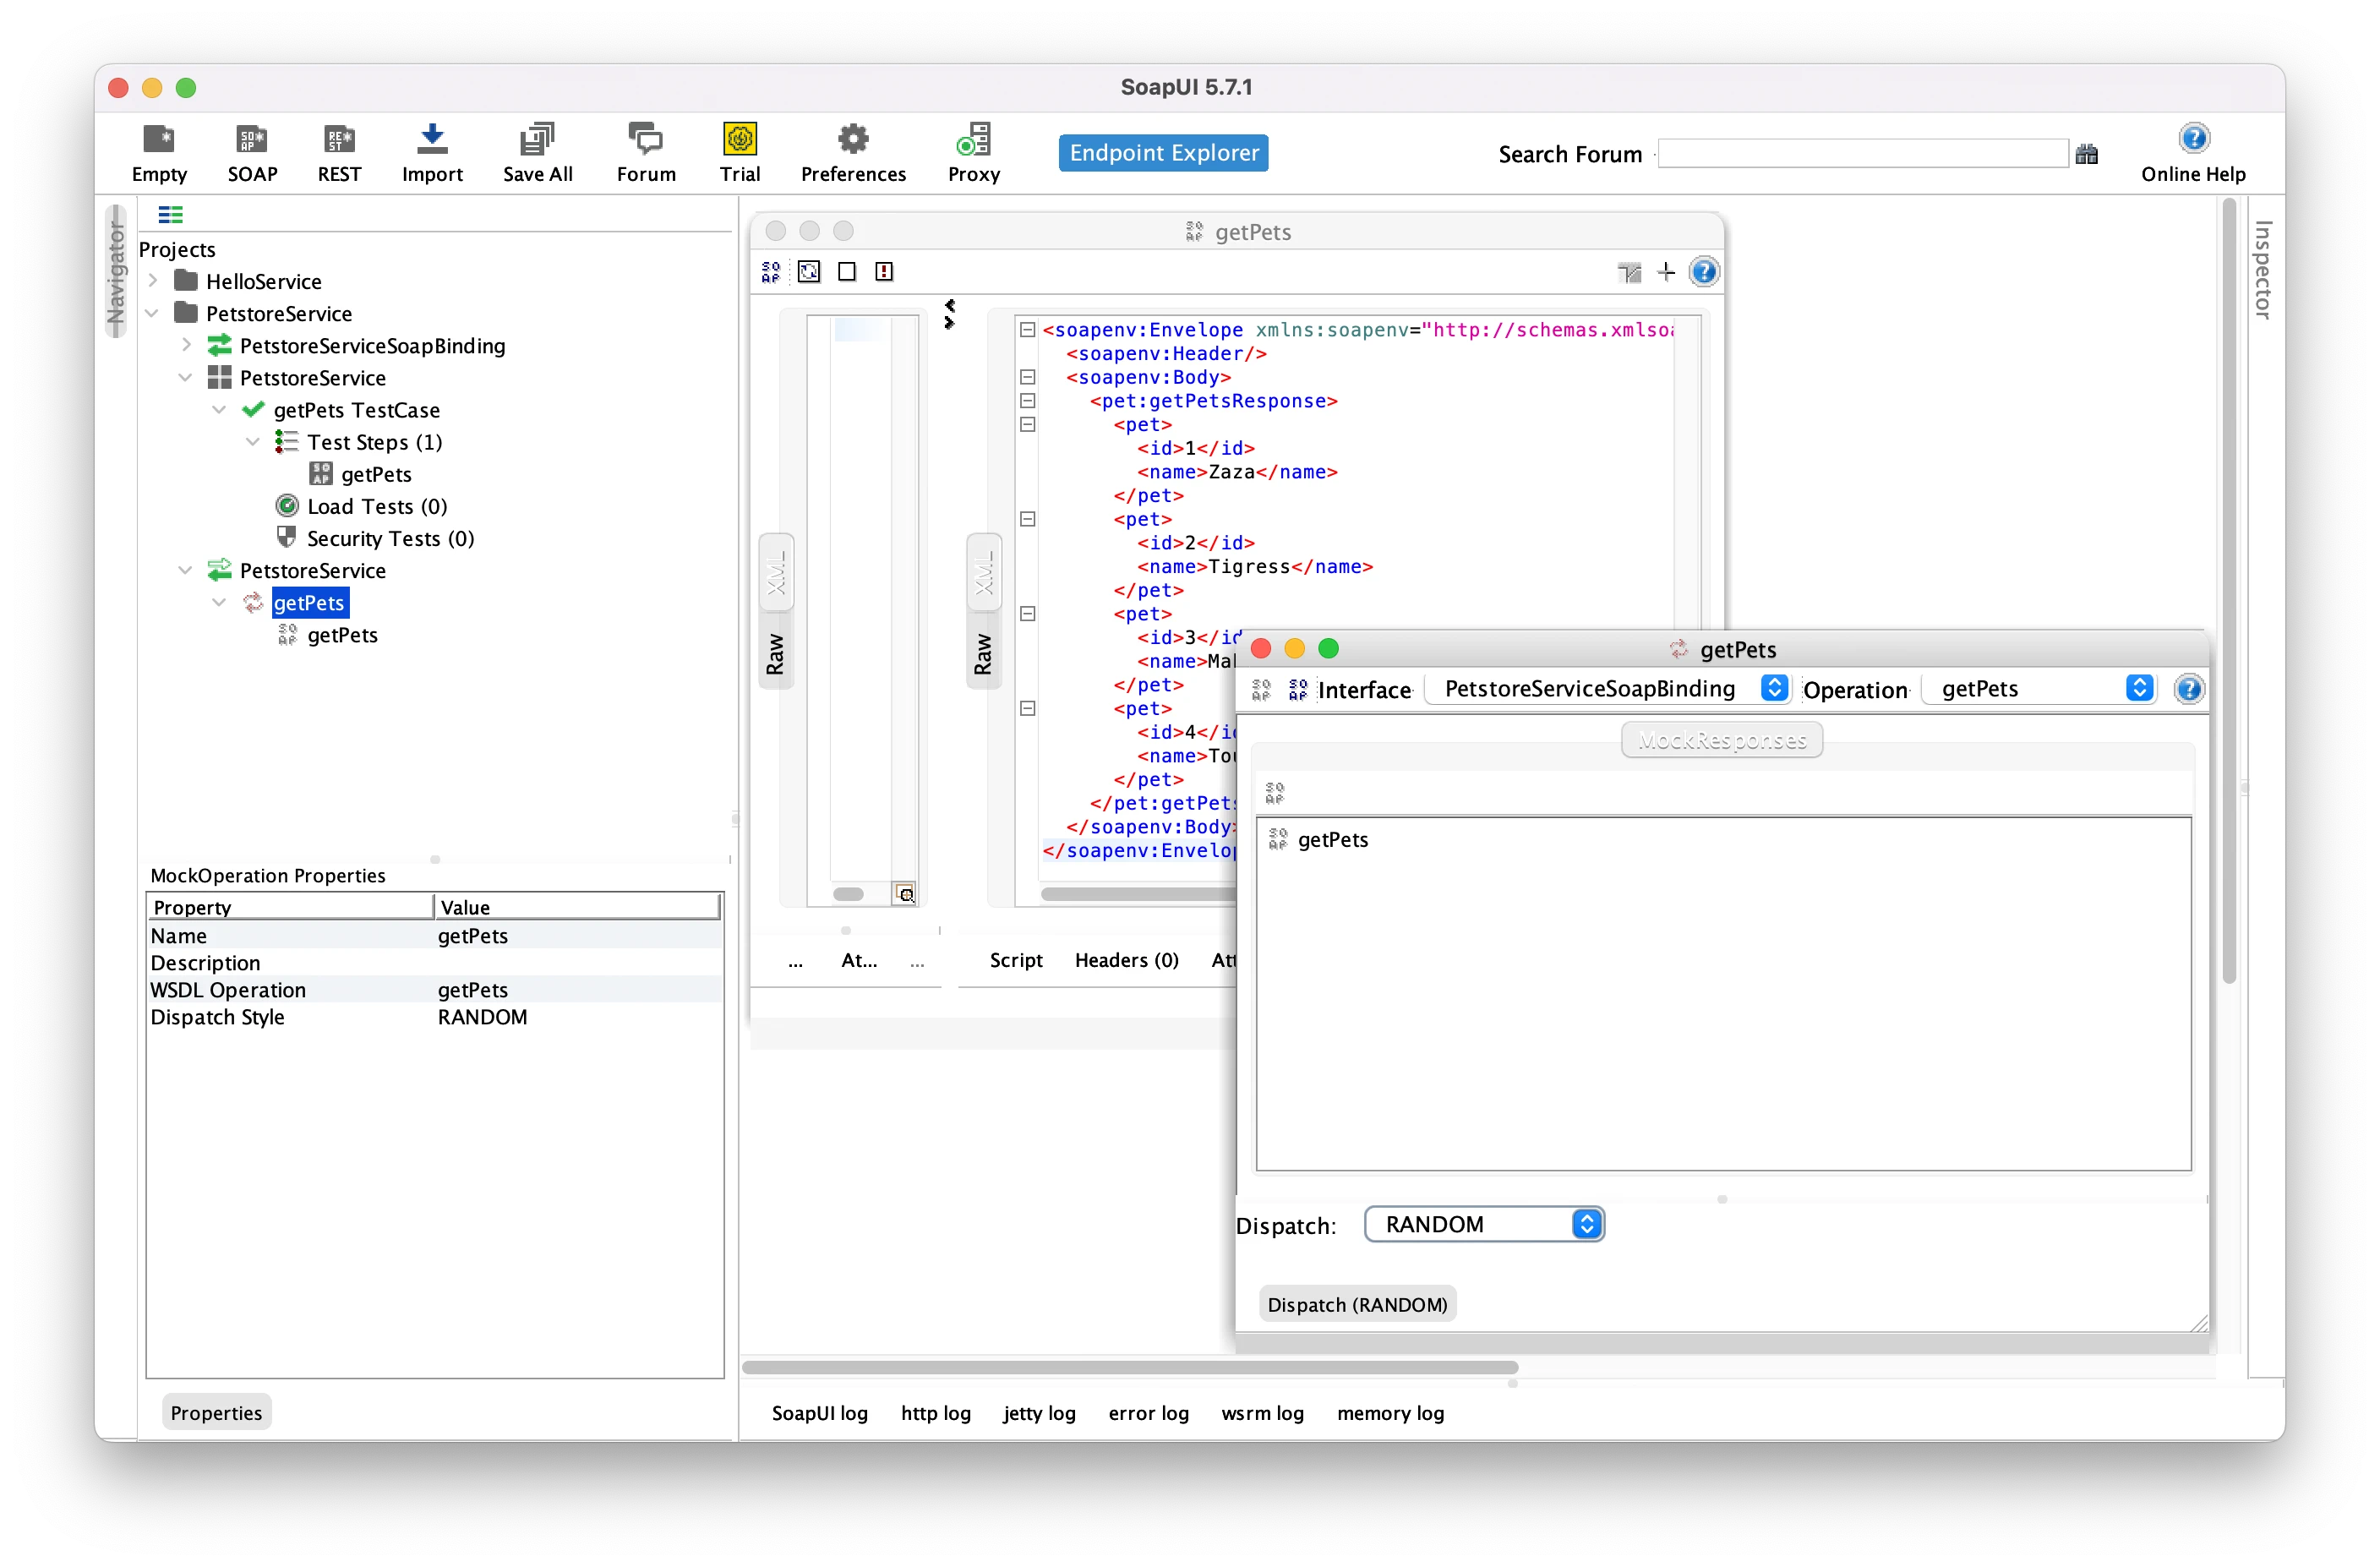
Finally, the last thing we have to do is to change the dispatcher that is set on the Mock Server getPets operation. As illustrated below, change its value from the default SEQUENCE to RANDOM:
🚨 Take care of saving your SoapUI project after your edits!
3. Basic operation of SOAP service
It’s now the moment to import this SoapUI Project back in Microcks and see the results! Go to the Importers page in the left navigation menu and choose to Upload this file. Your SOAP WebService details should now have been updated with the samples you provided via the SoapUI Project:
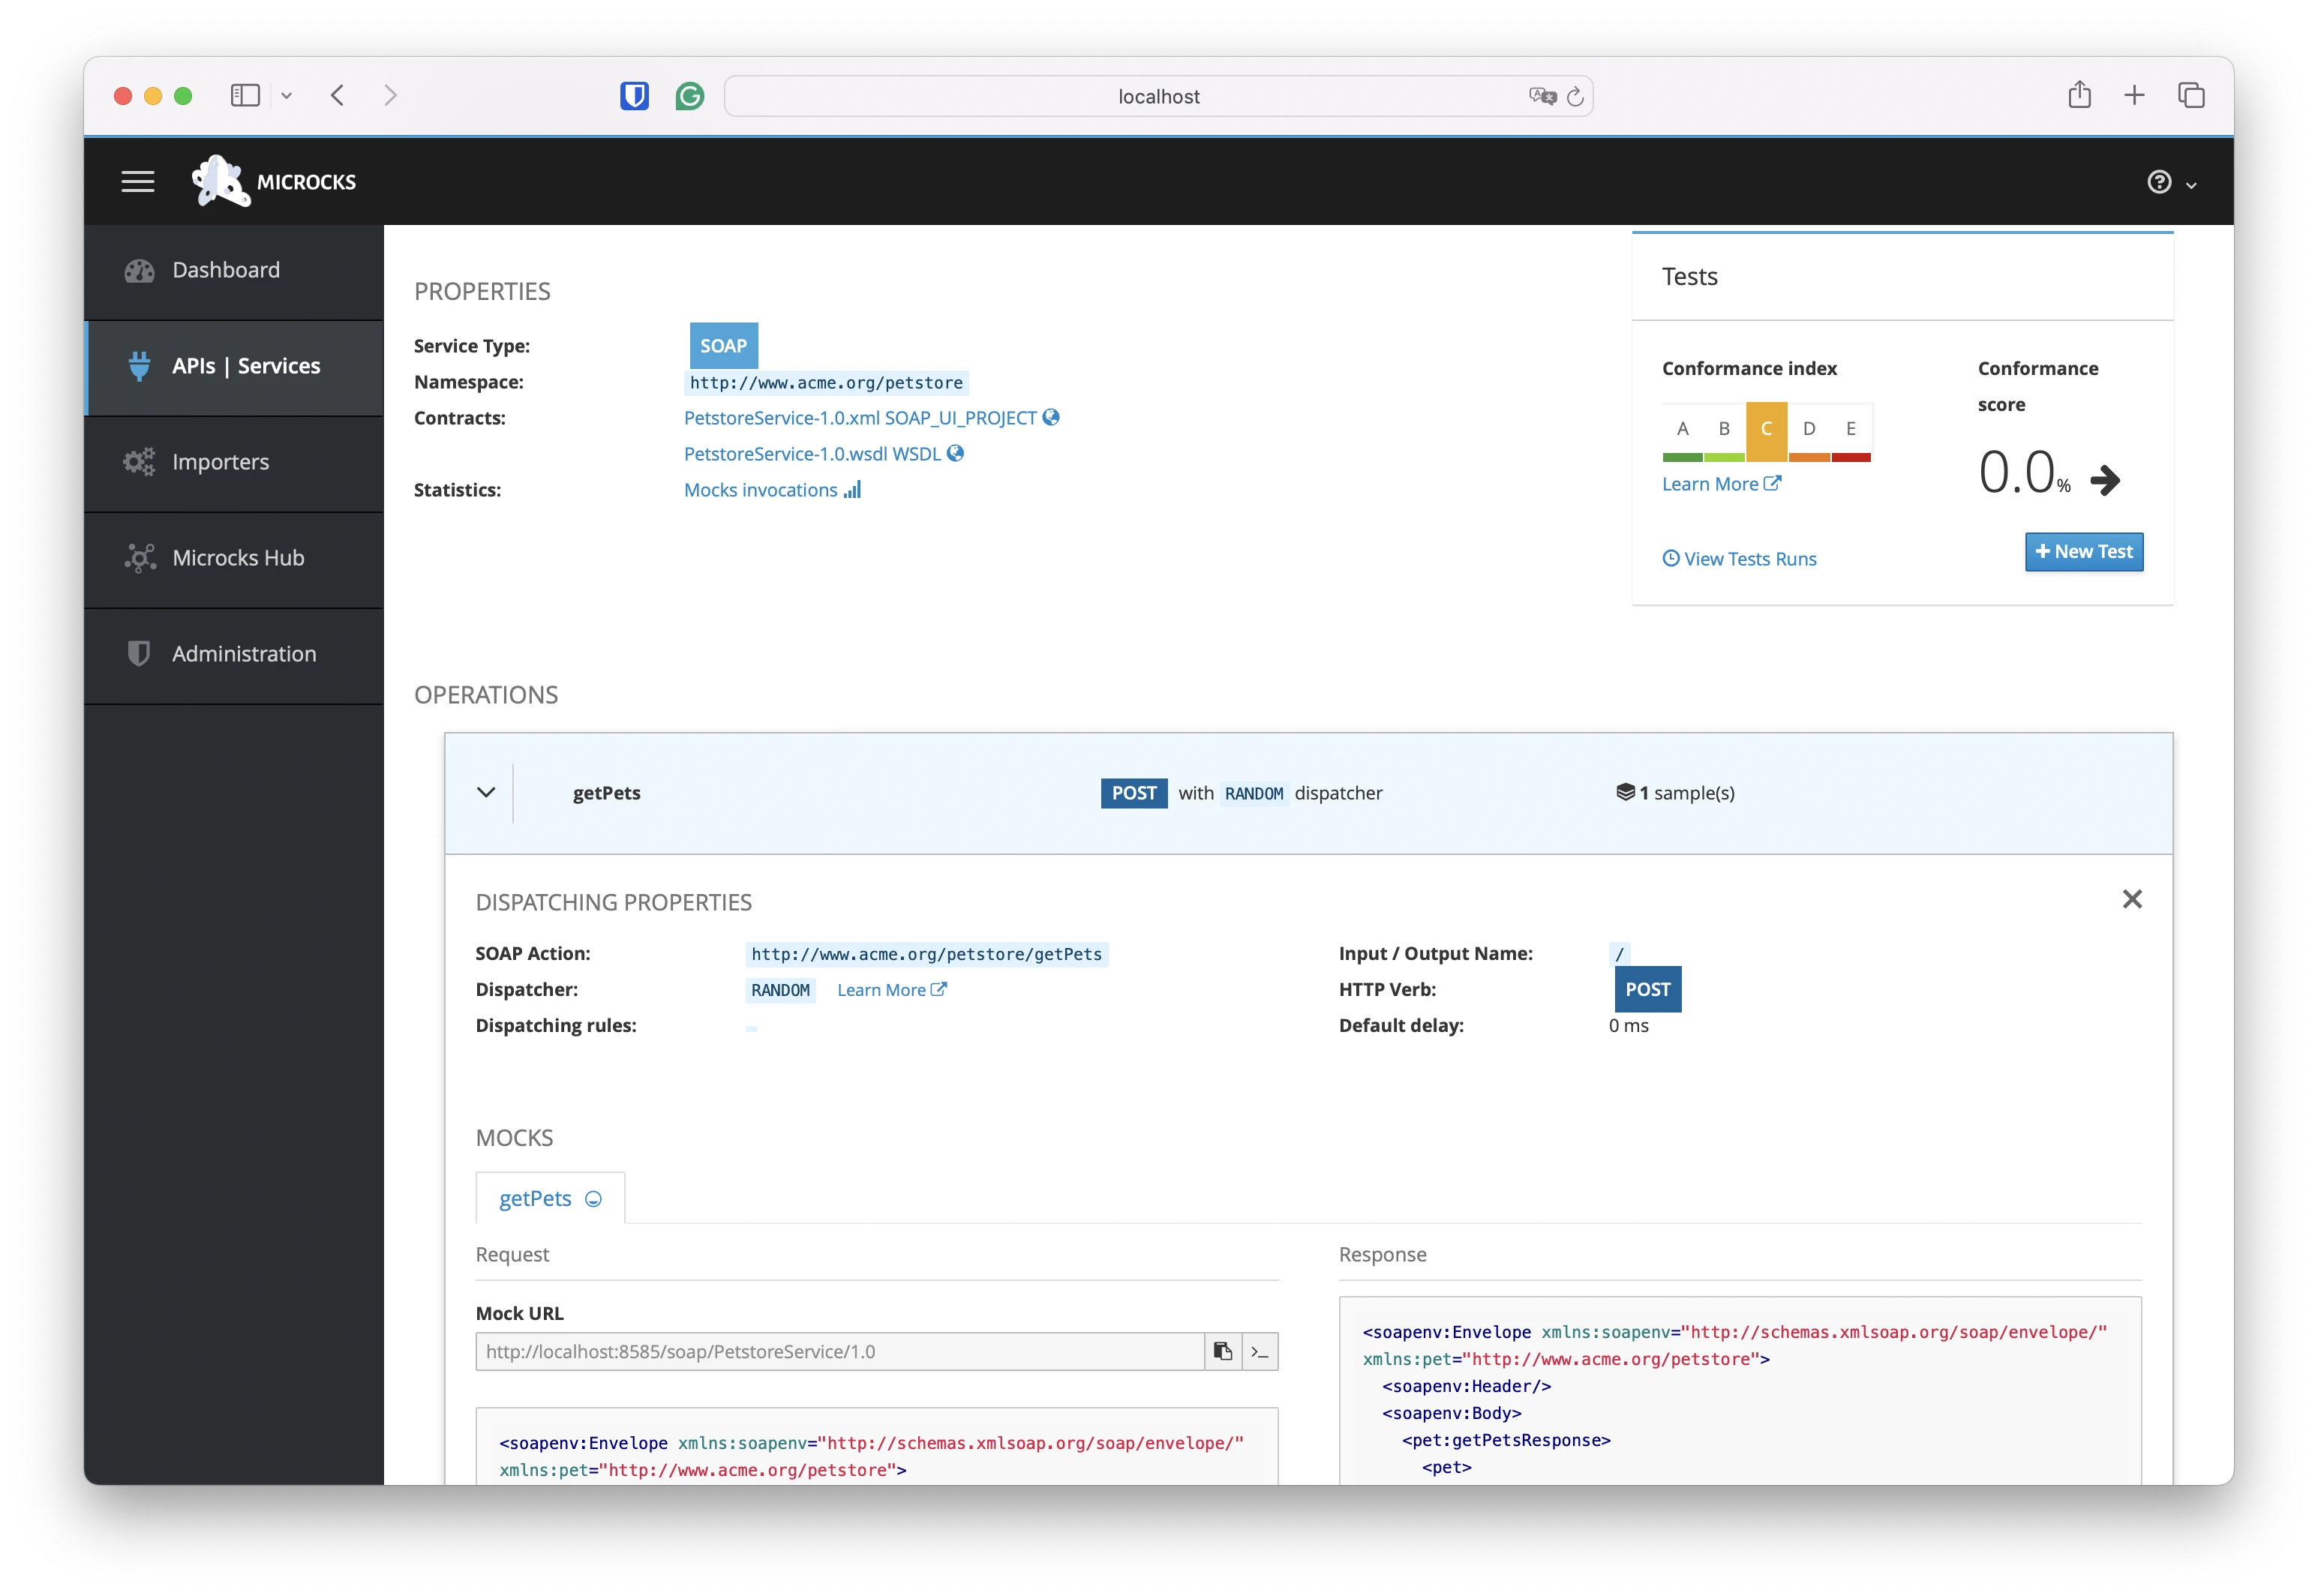
🤔 You may have noticed in the above section and screenshot that dispatching rules are empty for now. This is normal as we’re on a basic operation with no routing logic. We’ll talk about dispatchers in next section.
Microcks has found getPets as a valid sample to build a simulation upon. A mock URL has been made available. We can use this to test the query as demonstrated below with a curl command:
curl -X POST 'http://localhost:8585/soap/PetstoreService/1.0' -H 'Content-Type: application/xml' \
   -d '<soapenv:Envelope xmlns:soapenv="http://schemas.xmlsoap.org/soap/envelope/" xmlns:pet="http://www.acme.org/petstore"><soapenv:Header/><soapenv:Body><pet:getPets/></soapenv:Body></soapenv:Envelope>'

<soapenv:Envelope xmlns:soapenv="http://schemas.xmlsoap.org/soap/envelope/" xmlns:pet="http://www.acme.org/petstore">
  <soapenv:Header/>
  <soapenv:Body>
    <pet:getPetsResponse>
      <pet>
        <id>1</id>
        <name>Zaza</name>
      </pet>
      <pet>
        <id>2</id>
        <name>Tigress</name>
      </pet>
      <pet>
        <id>3</id>
        <name>Maki</name>
      </pet>
      <pet>
        <id>4</id>
        <name>Toufik</name>
      </pet>
    </pet:getPetsResponse>
  </soapenv:Body>
</soapenv:Envelope>
This is your first gRPC mock 🎉 Nice achievement!
4. Using SOAP request element
Let’s make things a bit more spicy by adding request parameters. Now assume we want to provide a simple searching operation to retrieve all pets in store using simple filter. We’ll end up adding a new searchPets method in our WebService. Of course, we’ll have to define a new searchPetsRequest input message so that users will specify name=zoe to get all the pets having zoe in name.
So we’ll add new things in our WSDL document like below: new elements, messages and we complete the service with a new saerchPets operation:
<wsdl:types>
  <xs:schema>
    <!-- [...] -->
    <xs:element name="searchPets">
      <xs:complexType>
        <xs:sequence>
          <xs:element minOccurs="1" maxOccurs="1" name="name" type="xs:string" />
        </xs:sequence>
      </xs:complexType>
    </xs:element>
    <xs:element name="searchPetsResponse" type="tns:PetsResponse" />
  </xs:schema>
</wsdl:types>

<wsdl:message name="searchPets">
  <wsdl:part element="tns:searchPets" name="parameters" />
</wsdl:message>
<wsdl:message name="searchPetsResponse">
  <wsdl:part element="tns:searchPetsResponse" name="parameters" />
</wsdl:message>

<wsdl:portType name="PetstoreService">
  <!-- [...] -->
  <wsdl:operation name="searchPets">
    <wsdl:input message="tns:searchPets" name="searchPets"/>
    <wsdl:output message="tns:searchPetsResponse" name="searchPetsResponse"/>
  </wsdl:operation>
</wsdl:portType>
<!-- [...] -->
<wsdl:binding name="PetstoreServiceSoapBinding" type="tns:PetstoreService">
  <soap:binding style="document" transport="http://schemas.xmlsoap.org/soap/http" />
  <!-- [...] -->
  <wsdl:operation name="searchPets">
    <soap:operation soapAction="http://www.acme.org/petstore/searchPets" style="document" />
    <wsdl:input>
      <soap:body use="literal" />
    </wsdl:input>
    <wsdl:output>
      <soap:body use="literal" />
    </wsdl:output>
  </wsdl:operation>
</wsdl:binding>
You can then refresh the Service definition in SoapUI to have it detect the new operation. Still in SoapUi, you must now add the new operation to your Mock Server and a new Test Case to the existing Test Suite. Let’s complete our samples data with two new requests and responses for the new searchPets operation:
- One request/response pair for searching for pets having a
kin their name. We’ll name itsearchPets K, - Another request/response pair for searching for pets having a
iin their name. We’ll name itsearchPets I
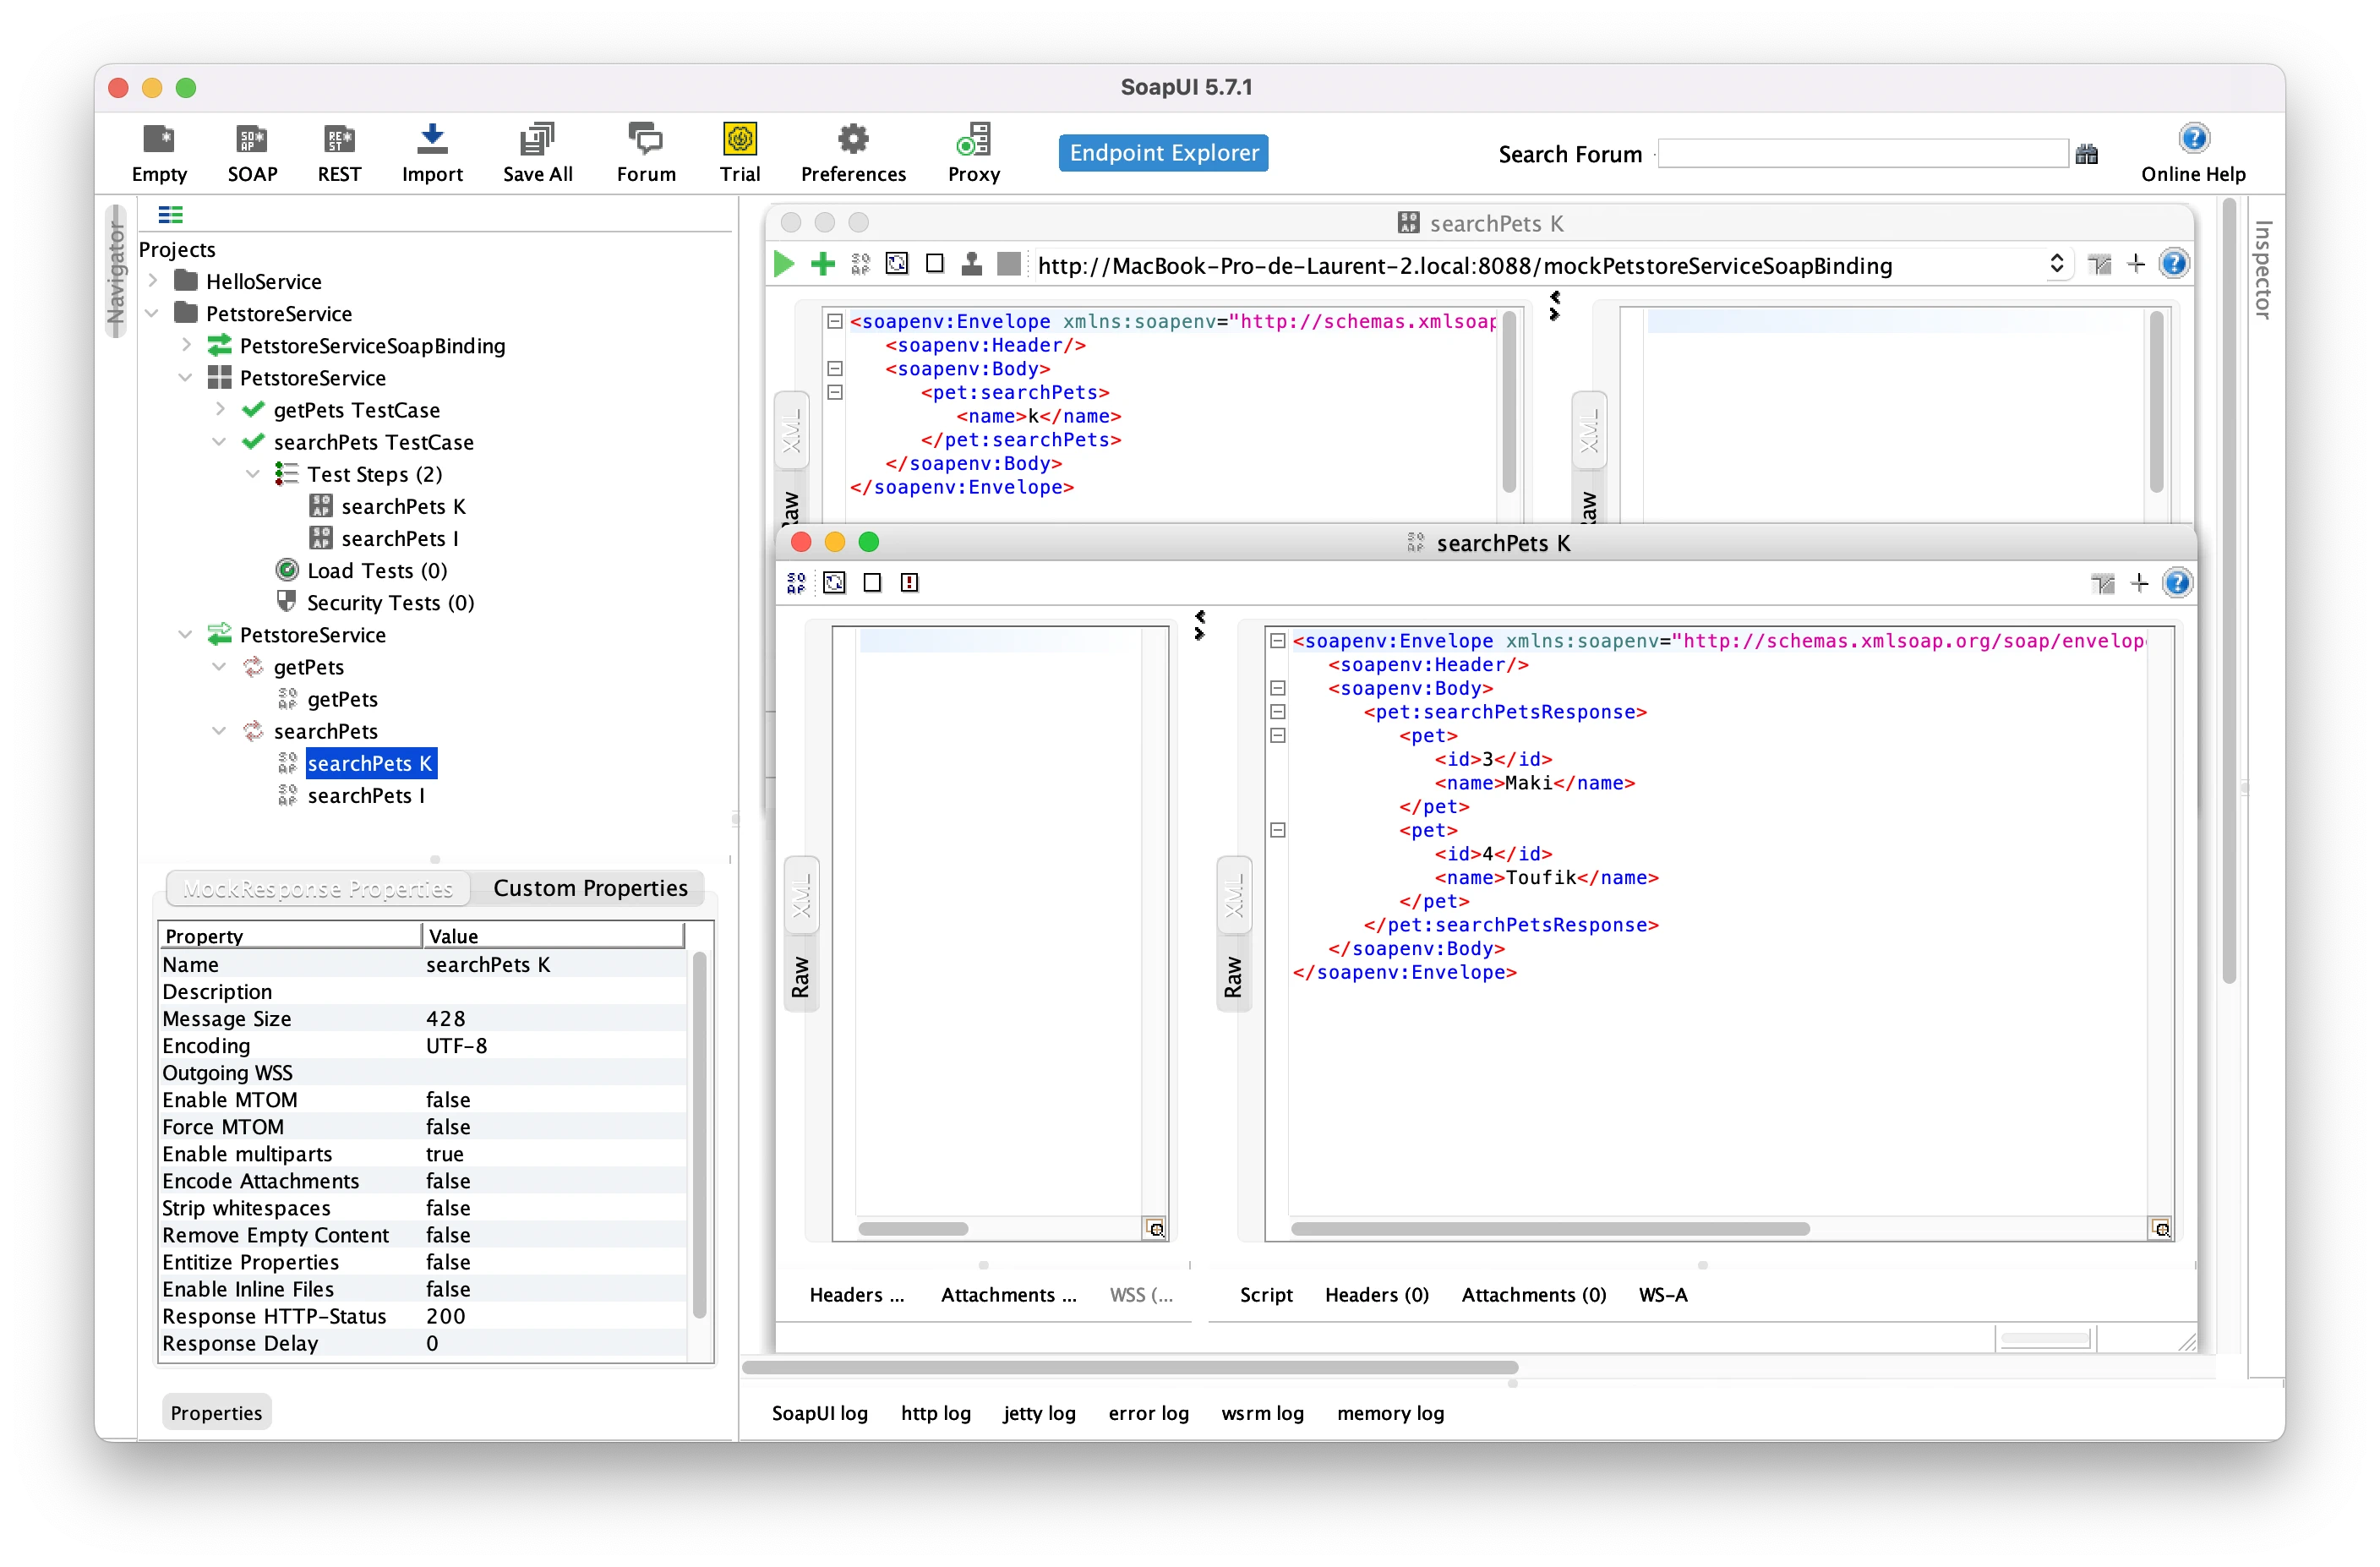
This is the results you should achieve below:
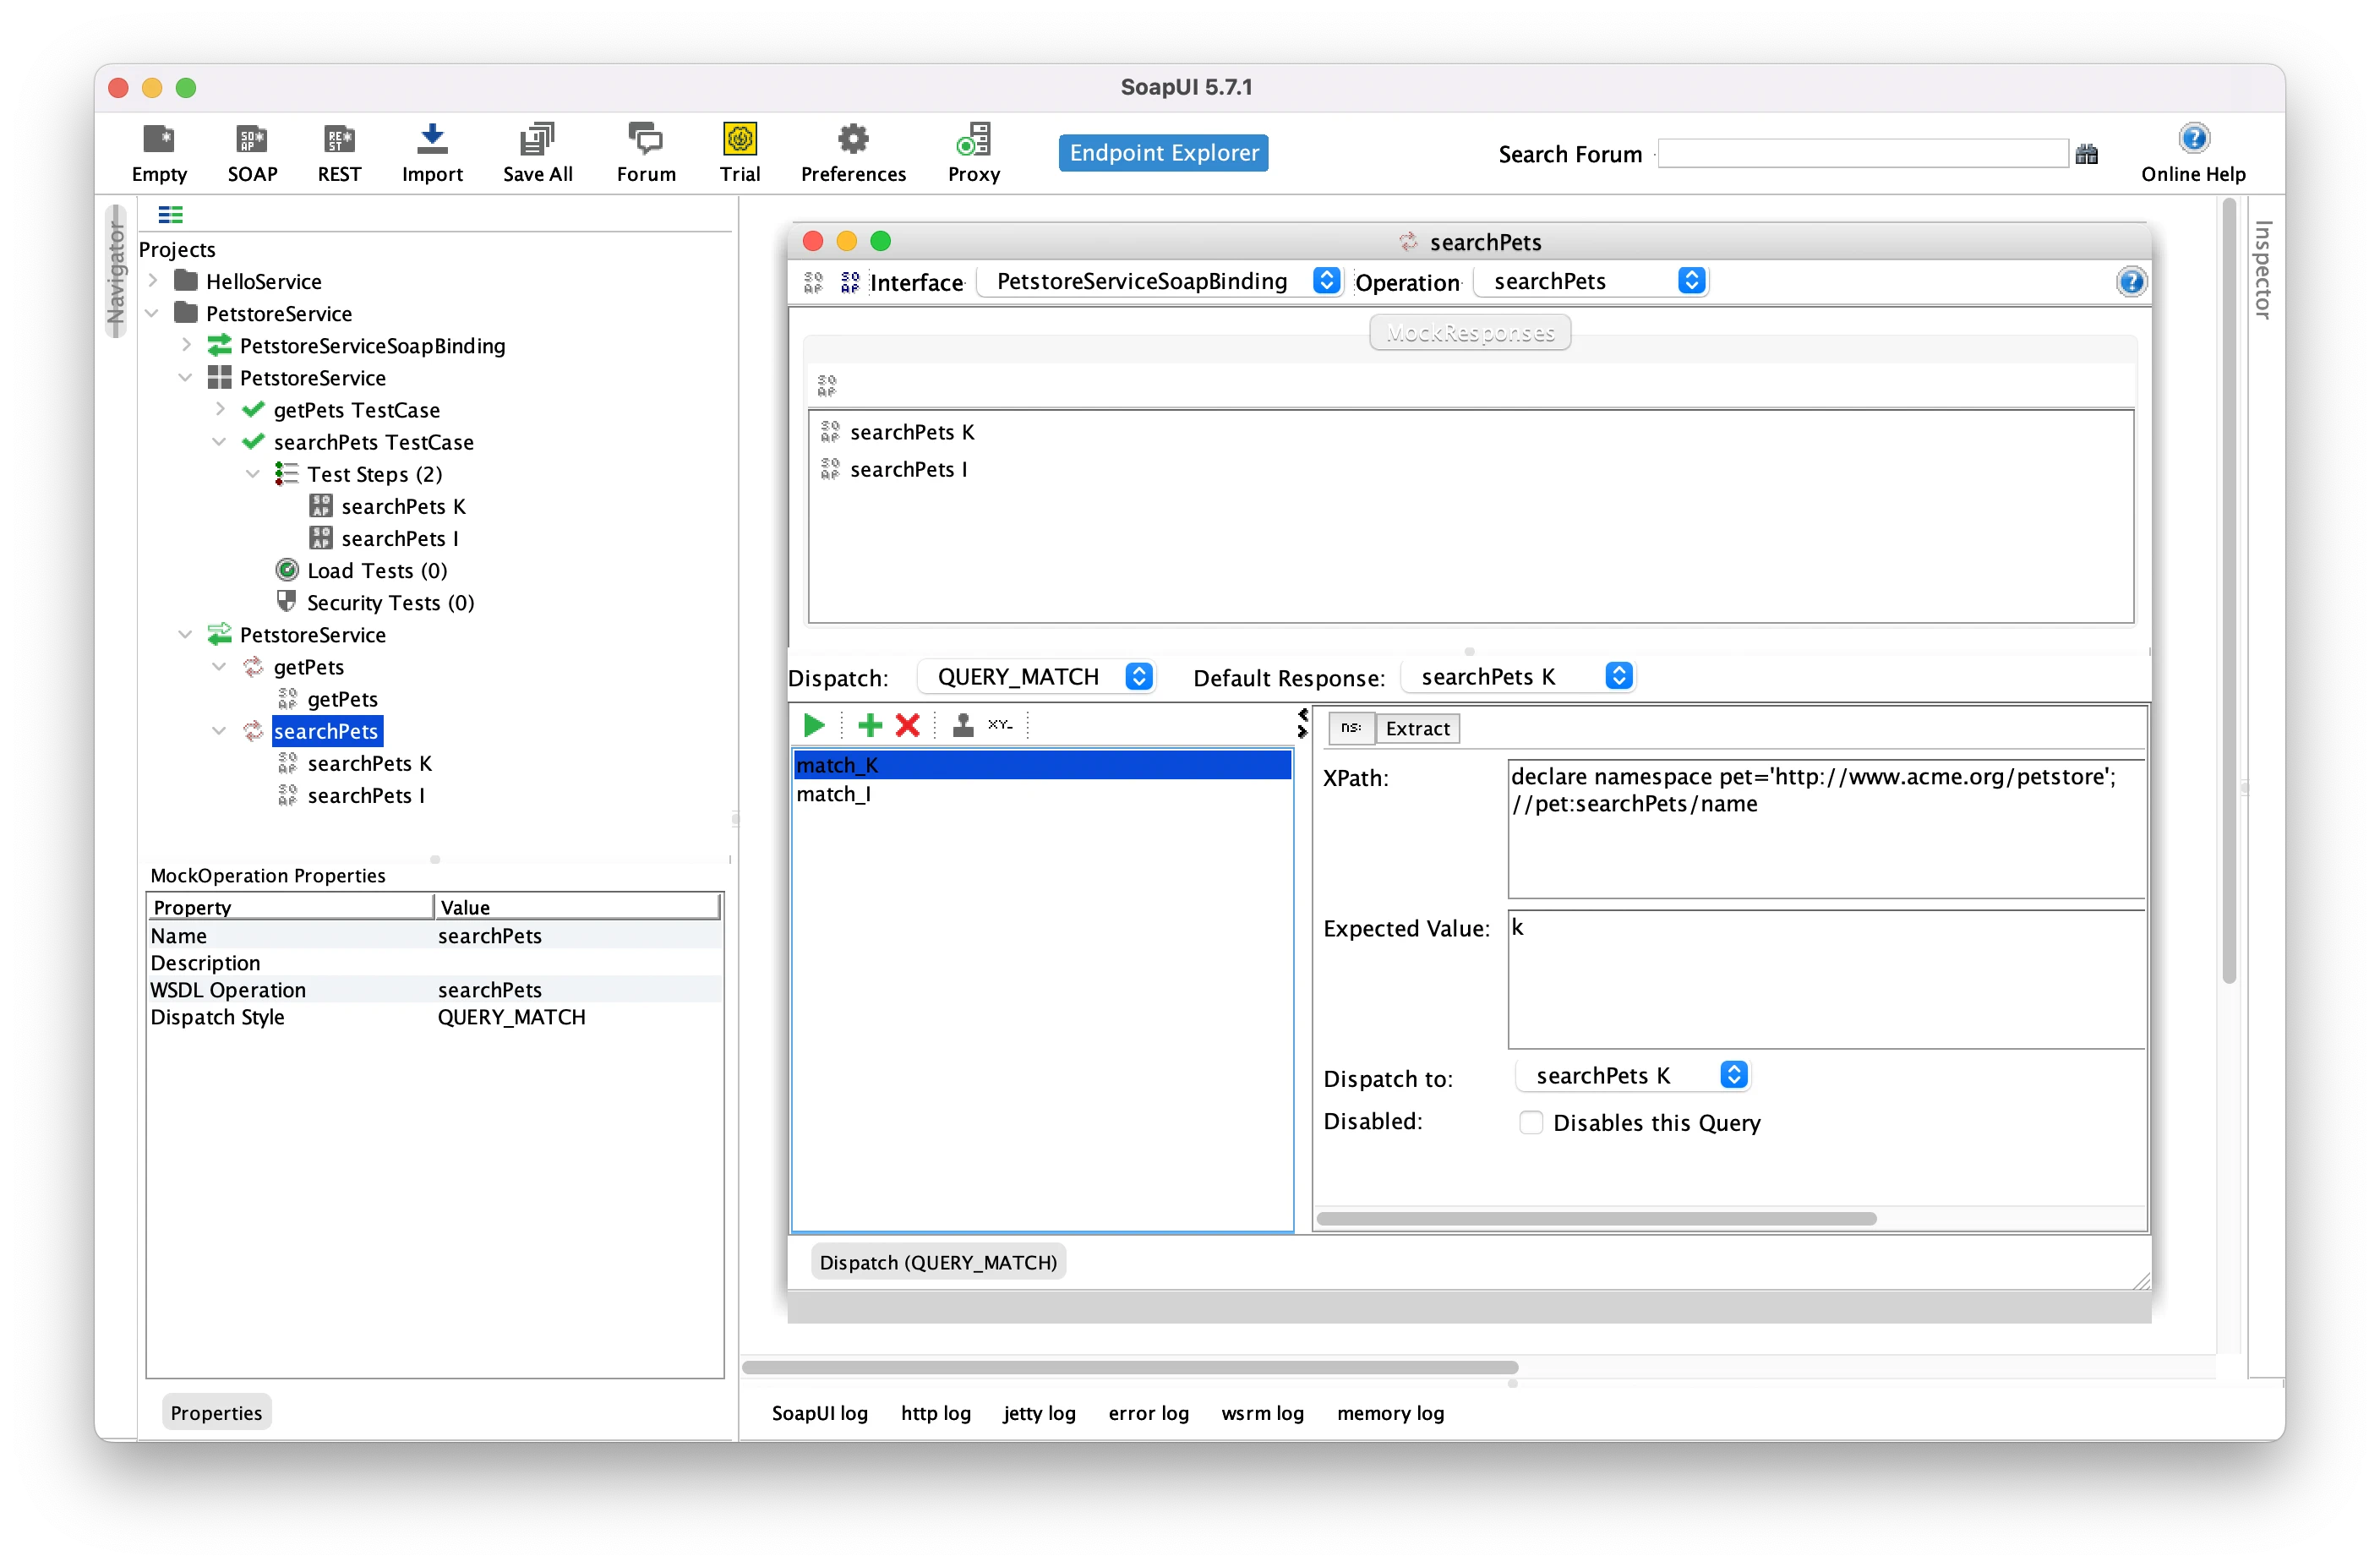
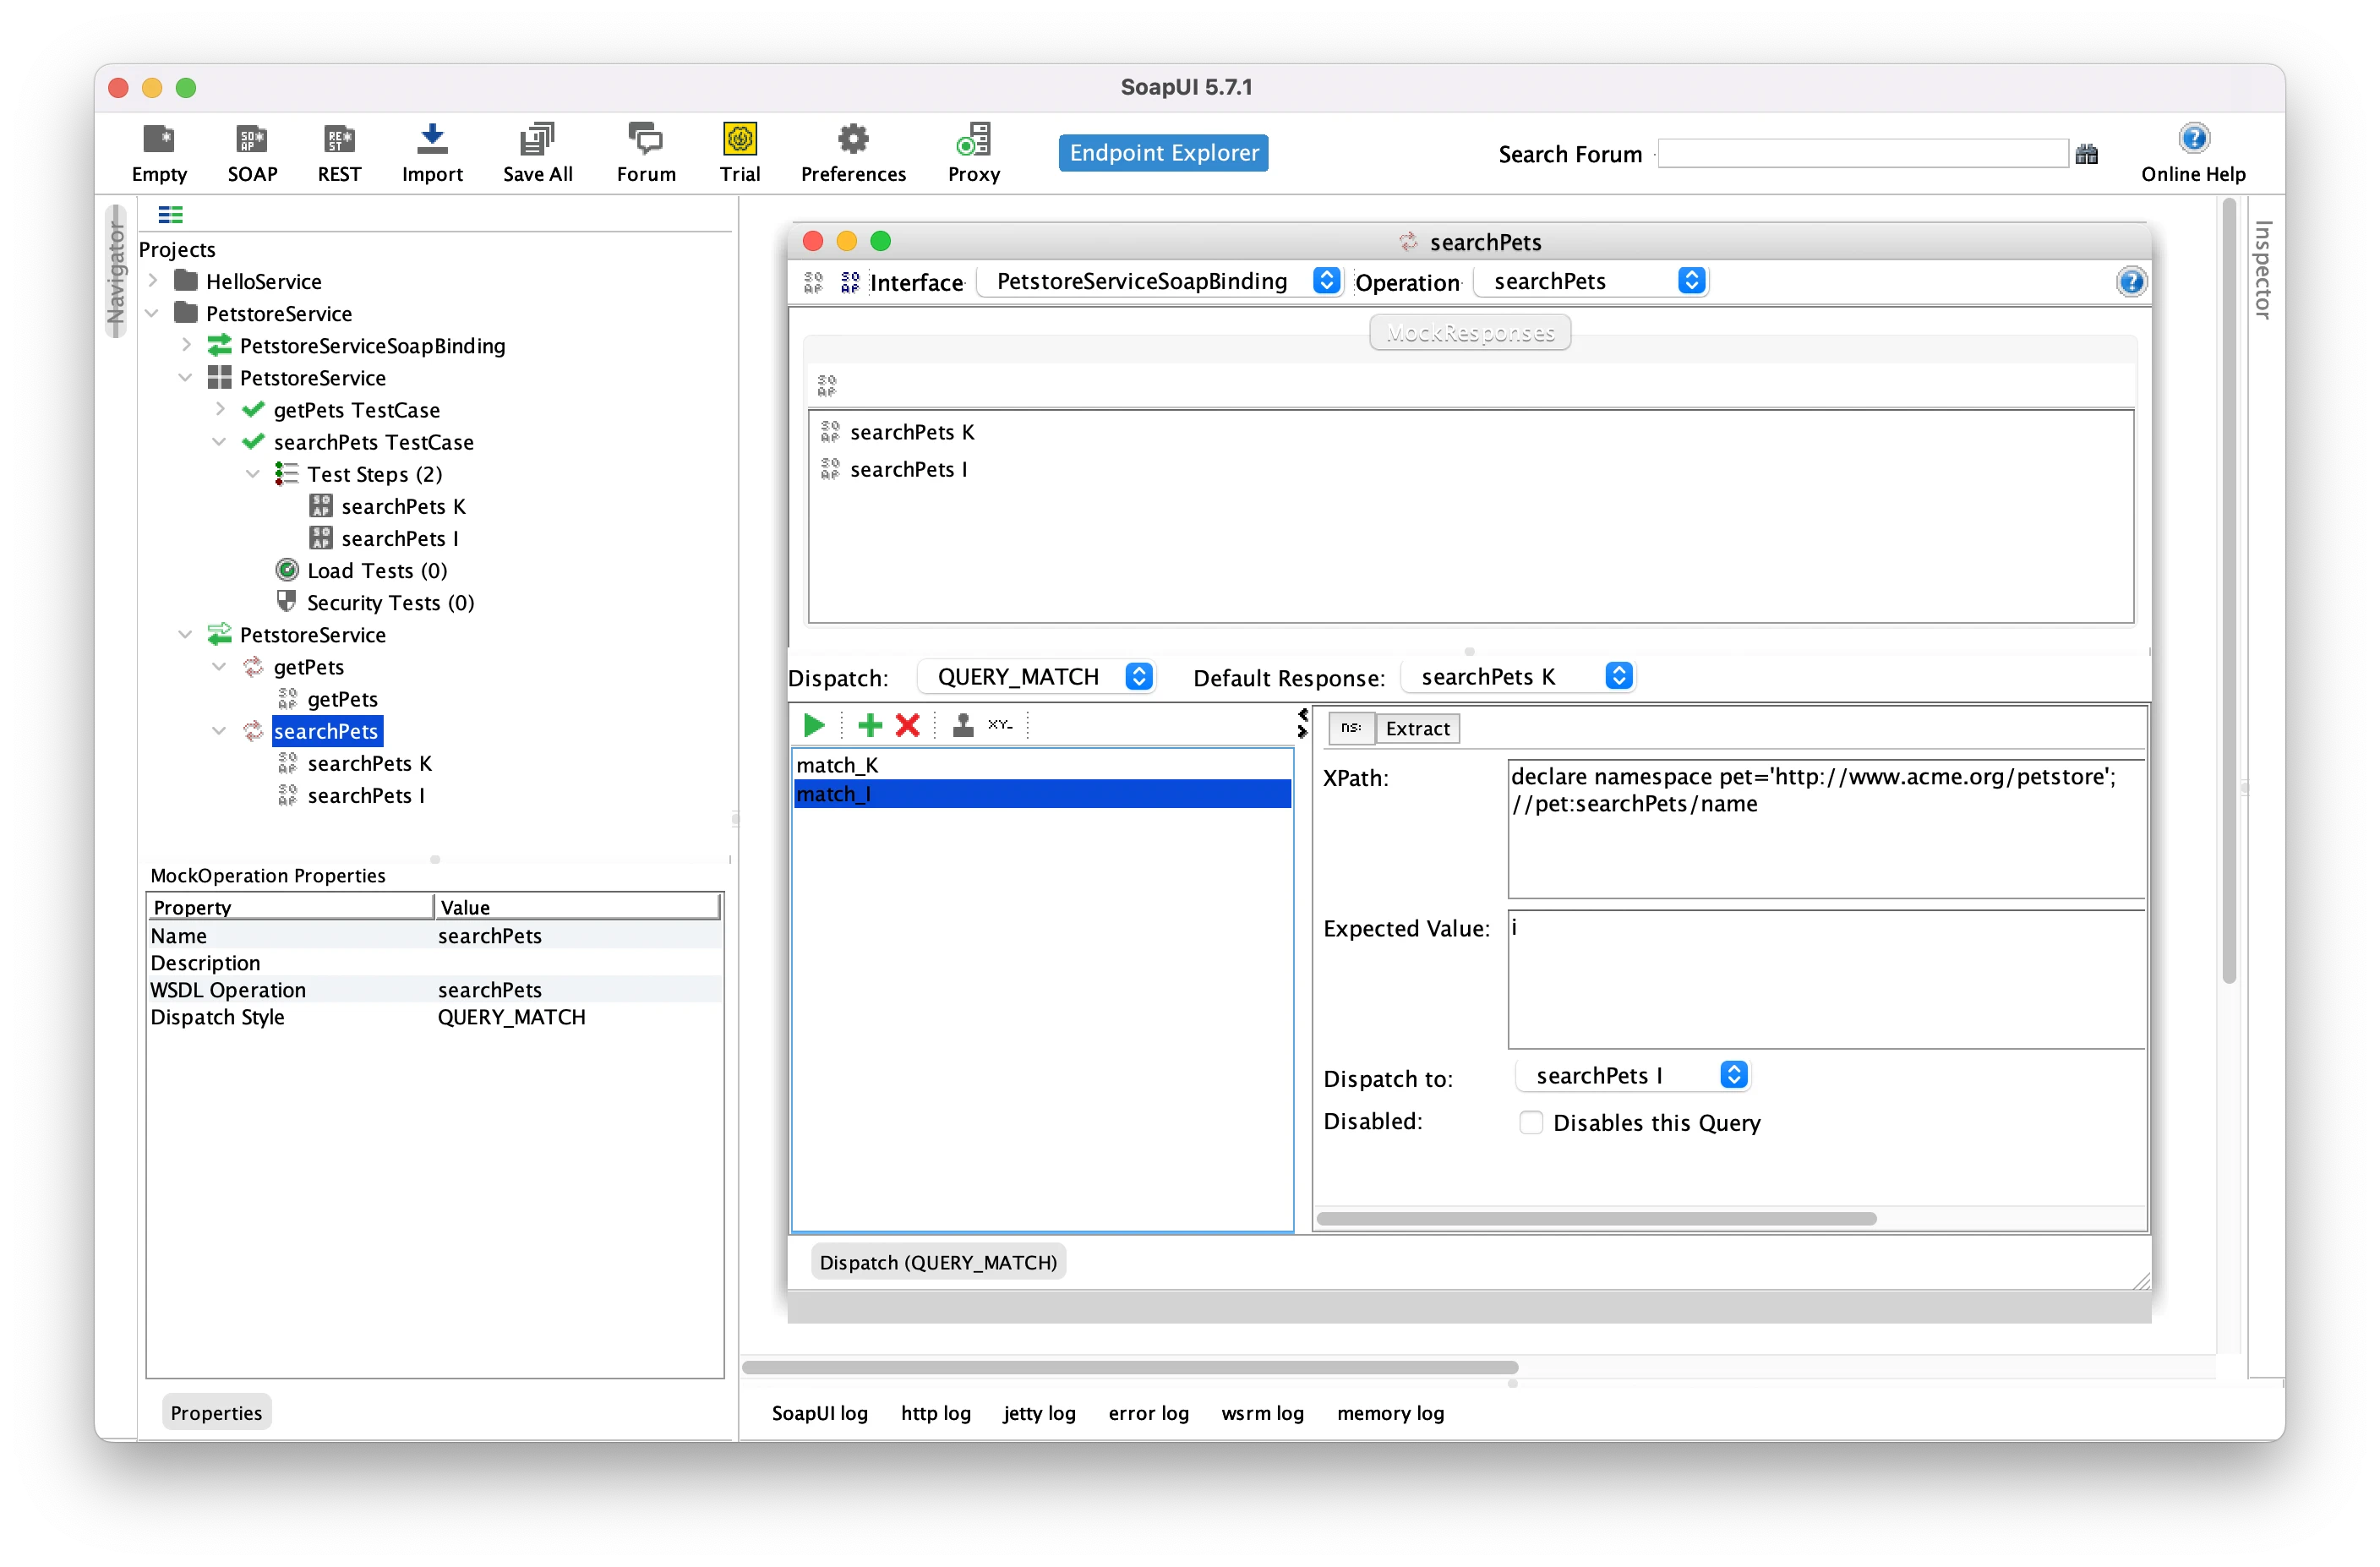
What about the dispatcher property we mentioned earlier? FOr this operation, we’re going to use another dispatcher that allows to analyse the incoming SOAP body to find the correst response. This dispatcher is called QUERY_MATCH and uses XPath expression to extract data from incoming request to get the response.
To set this dispatcher configuration, you will have to go on the Mock Server searchPaets operation properties and select the appropriate QUERY_MATCH option. Then, for each request you’ll have to add a matching rule (let’s name them match_i and match_k for example) and define an XPath expression. You’ll have to use this expression below that declares an alias pet for the Xml namespace of your query and a selector to extract the incoming name property:
declare namespace pet='http://www.acme.org/petstore';
//pet:searchPets/name
Then, based on this property value (k or i), you’ll define to return either the searchPets K or the searchPets I response. You should achieve the following results in SoapUI:
🚨 Take care of saving your edits before exporting!
Import this updated SoapUI Project back in Microcks and see the results:
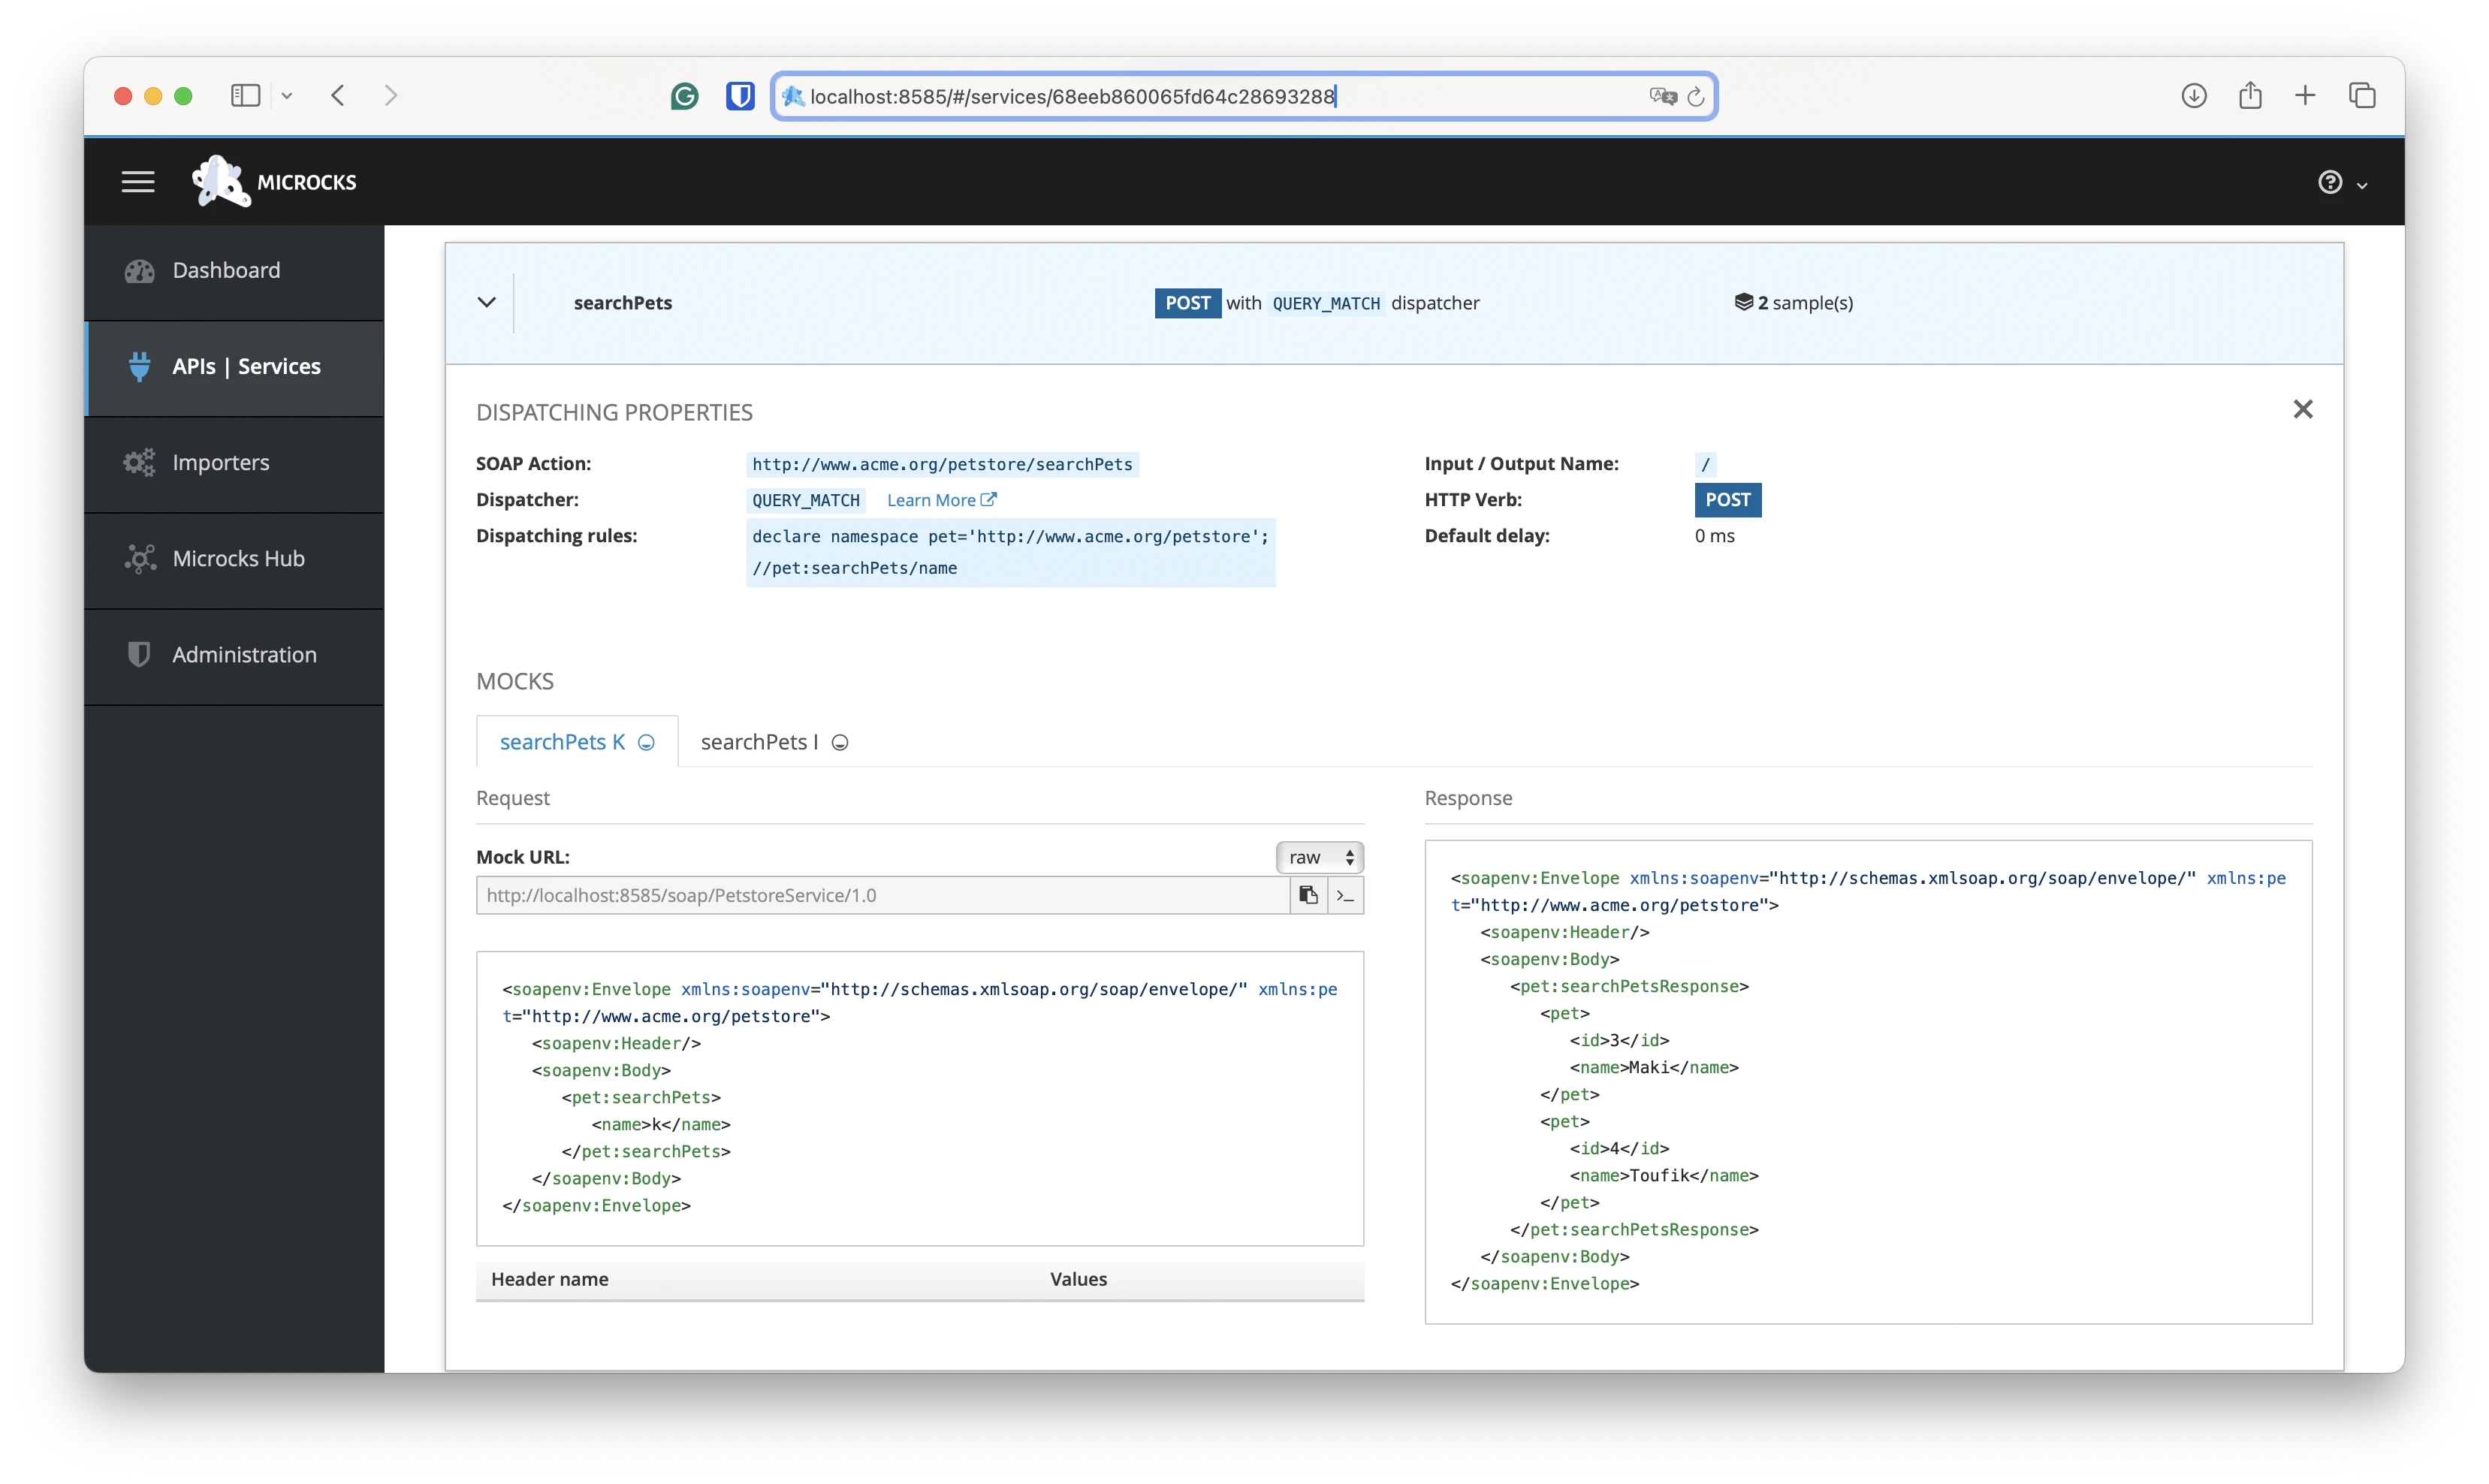
Let’s try the new SOAP operation mock with this command:
curl -X POST 'http://localhost:8080/soap/PetstoreService/1.0' -H 'Content-Type: application/xml' \
   -d '<soapenv:Envelope xmlns:soapenv="http://schemas.xmlsoap.org/soap/envelope/" xmlns:pet="http://www.acme.org/petstore"><soapenv:Header/><soapenv:Body> <pet:searchPets><name>i</name></pet:searchPets></soapenv:Body></soapenv:Envelope>'

<soapenv:Envelope xmlns:soapenv="http://schemas.xmlsoap.org/soap/envelope/" xmlns:pet="http://www.acme.org/petstore">
   <soapenv:Header/>
   <soapenv:Body>
      <pet:searchPetsResponse>
         <pet>
            <id>2</id>
            <name>Tigress</name>
         </pet>
         <pet>
            <id>3</id>
            <name>Maki</name>
         </pet>
         <pet>
            <id>4</id>
            <name>Toufik</name>
         </pet>
      </pet:searchPetsResponse>
   </soapenv:Body>
</soapenv:Envelope
and this one:
curl -X POST 'http://localhost:8080/soap/PetstoreService/1.0' -H 'Content-Type: application/xml' \
   -d '<soapenv:Envelope xmlns:soapenv="http://schemas.xmlsoap.org/soap/envelope/" xmlns:pet="http://www.acme.org/petstore"><soapenv:Header/><soapenv:Body> <pet:searchPets><name>k</name></pet:searchPets></soapenv:Body></soapenv:Envelope>'

<soapenv:Envelope xmlns:soapenv="http://schemas.xmlsoap.org/soap/envelope/" xmlns:pet="http://www.acme.org/petstore">
   <soapenv:Header/>
   <soapenv:Body>
      <pet:searchPetsResponse>
         <pet>
            <id>3</id>
            <name>Maki</name>
         </pet>
         <pet>
            <id>4</id>
            <name>Toufik</name>
         </pet>
      </pet:searchPetsResponse>
   </soapenv:Body>
</soapenv:Envelope
🎉 Fantastic! We now have a mock with routing logic based on request Xml conetnt.
5. Mocking a creation operation
And now the final step! Let’s deal with a new method that allows registering a new pet within the Petstore. For that, you’ll typically have to define a new createPet operation on the PetstoreService. In order to be meaningful to the user of this operation, a mock would have to integrate some logic that reuse contents from the incoming request and/or generate sample data. That’s typically what we’re going to do in this last section 😉
Let’s add such a new operation into the WSDL document file by adding the following elements:
<wsdl:types>
  <xs:schema>
    <!-- [...] -->
    <xs:element name="createPet">
      <xs:complexType>
        <xs:sequence>
          <xs:element minOccurs="1" maxOccurs="1" name="name" type="xs:string" />
        </xs:sequence>
      </xs:complexType>
    </xs:element>
    <xs:element name="createPetResponse" type="tns:Pet" />
  </xs:schema>
</wsdl:types>

<wsdl:message name="createPet">
  <wsdl:part element="tns:createPet" name="parameters" />
</wsdl:message>
<wsdl:message name="createPetResponse">
  <wsdl:part element="tns:screatePetResponse" name="parameters" />
</wsdl:message>

<wsdl:portType name="PetstoreService">
  <!-- [...] -->
  <wsdl:operation name="createPet">
    <wsdl:input message="tns:createPet" name="createPet"/>
    <wsdl:output message="tns:createPetResponse" name="createPetResponse"/>
  </wsdl:operation>
</wsdl:portType>
<!-- [...] -->
<wsdl:binding name="PetstoreServiceSoapBinding" type="tns:PetstoreService">
  <soap:binding style="document" transport="http://schemas.xmlsoap.org/soap/http" />
  <!-- [...] -->
  <wsdl:operation name="createPet">
    <soap:operation soapAction="http://www.acme.org/petstore/createPet" style="document" />
    <wsdl:input>
      <soap:body use="literal" />
    </wsdl:input>
    <wsdl:output>
      <soap:body use="literal" />
    </wsdl:output>
  </wsdl:operation>
</wsdl:binding>
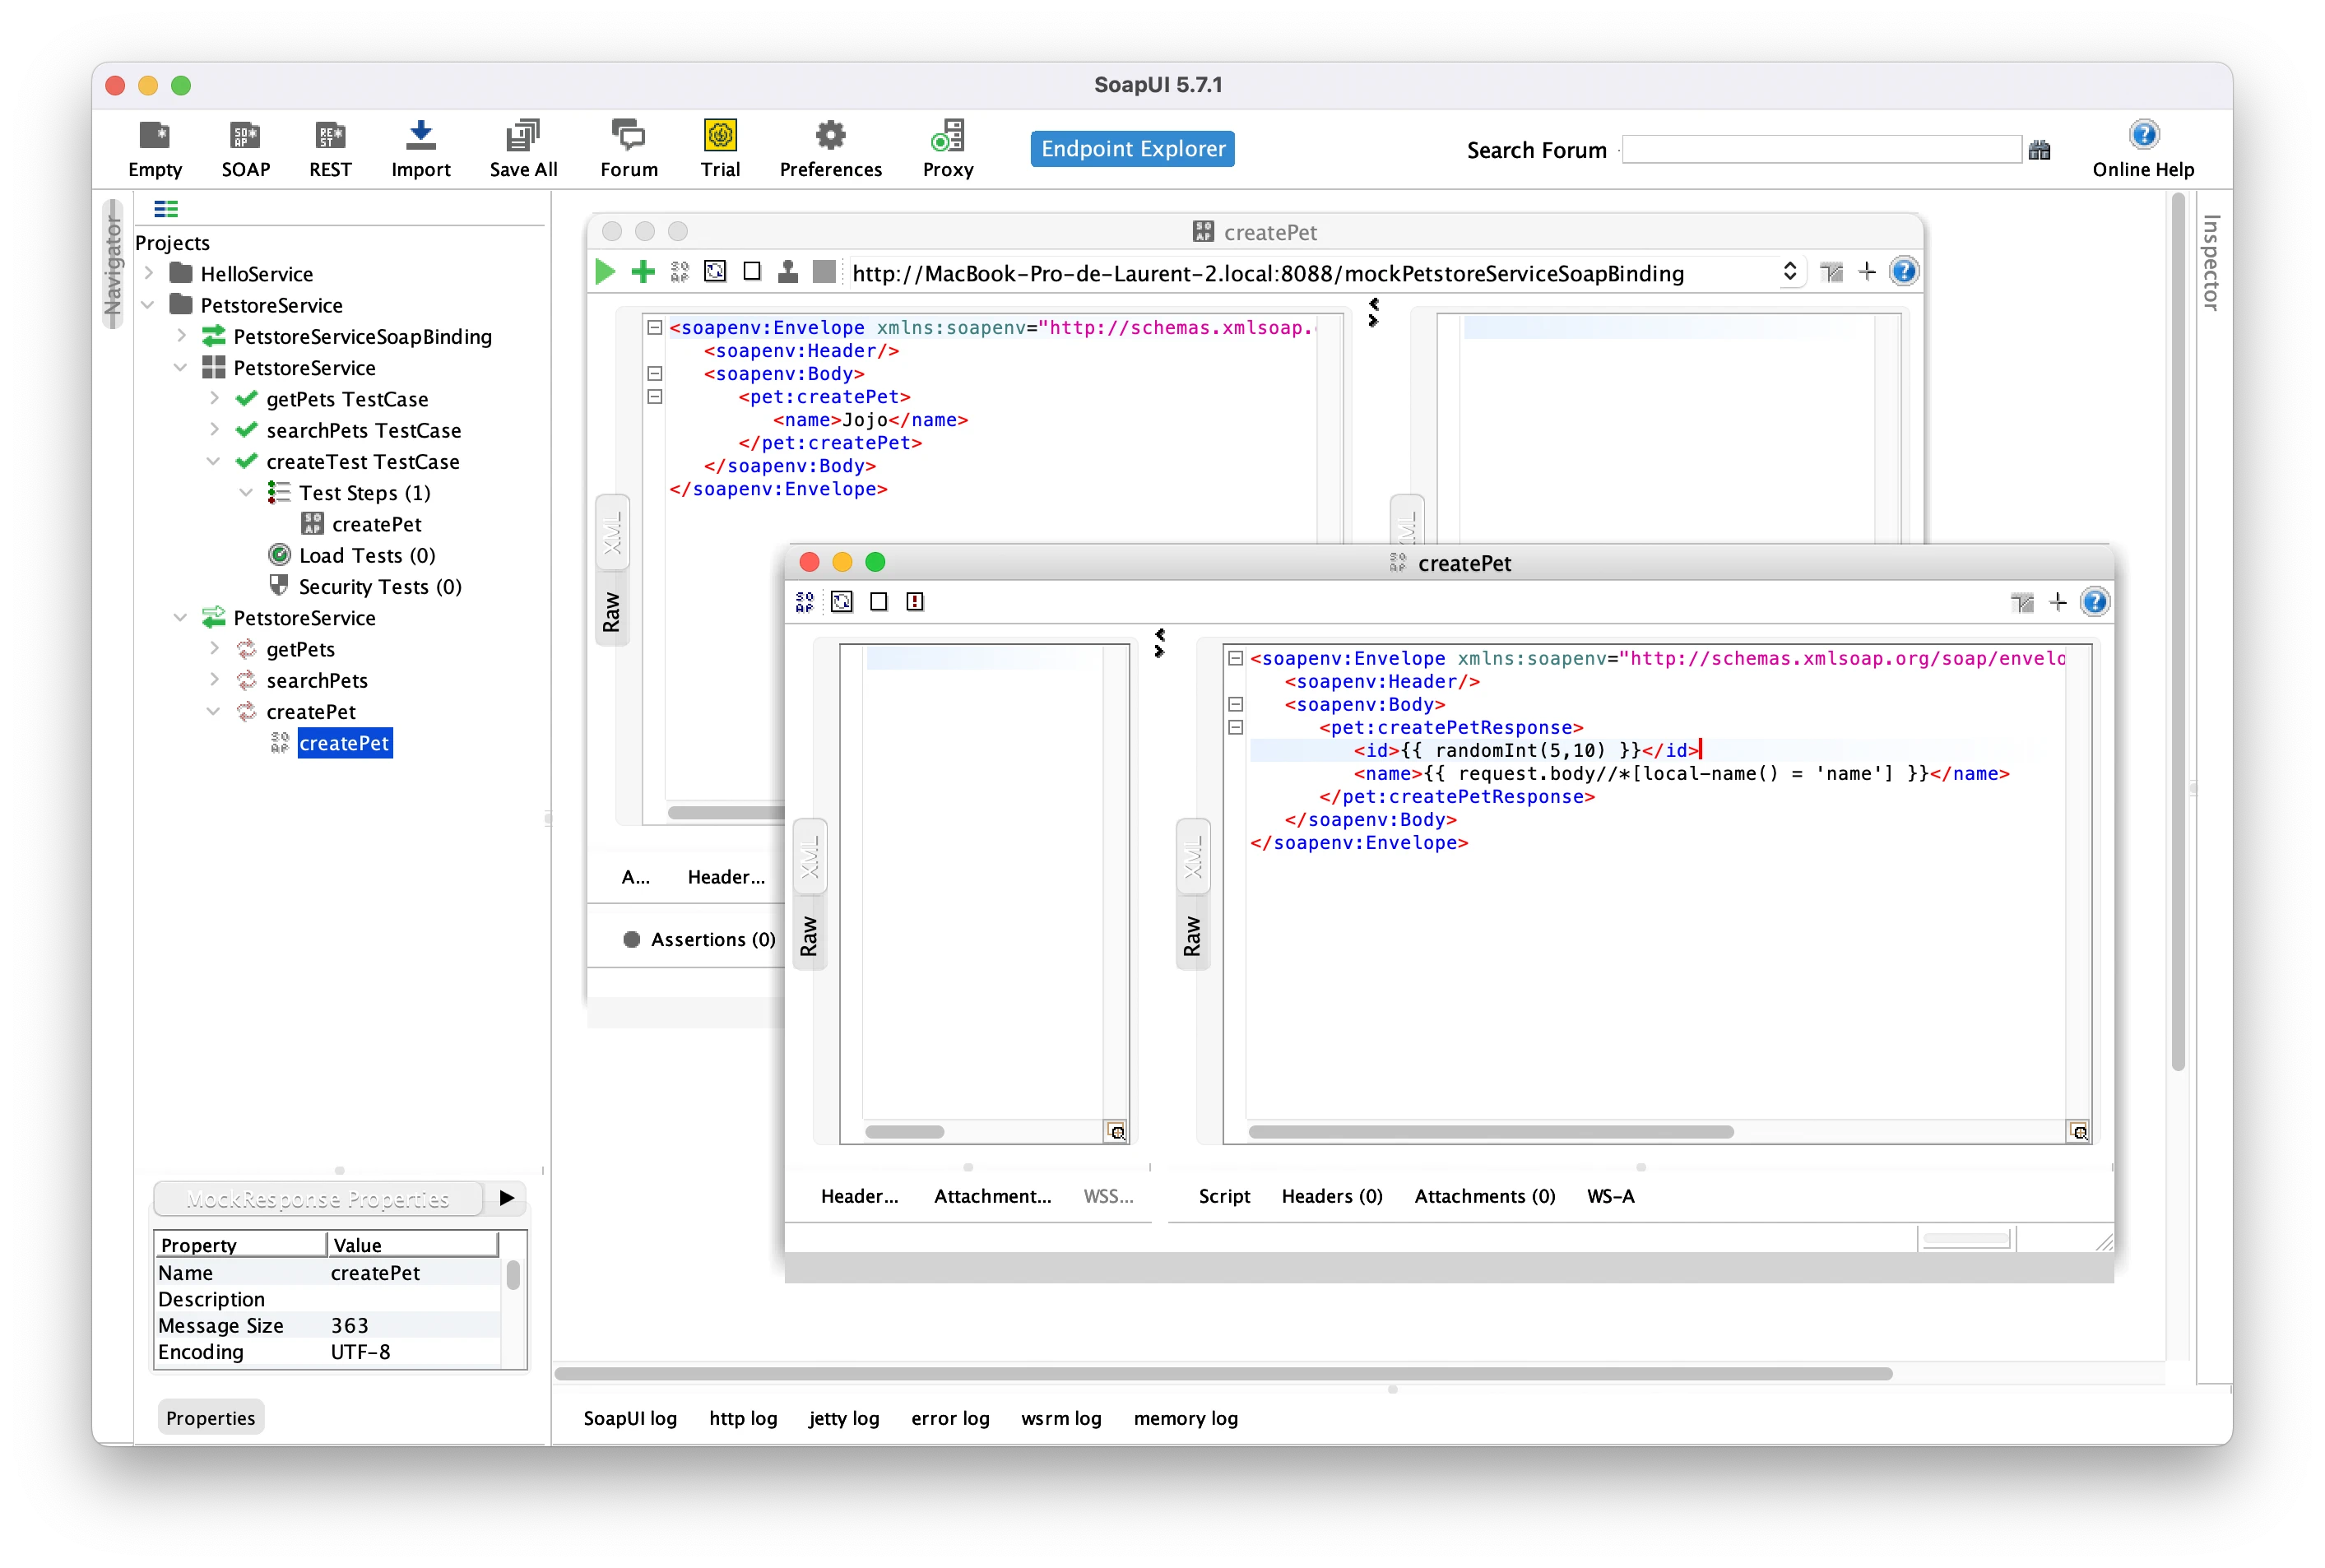
You can then refresh the Service definition in SoapUI to have it detect the new operation. Still in SoapUi, you must now add the new operation to your Mock Server and a new Test Case to the existing Test Suite. Let’s complete our samples data with a new request/response pair for the new createPet operation.
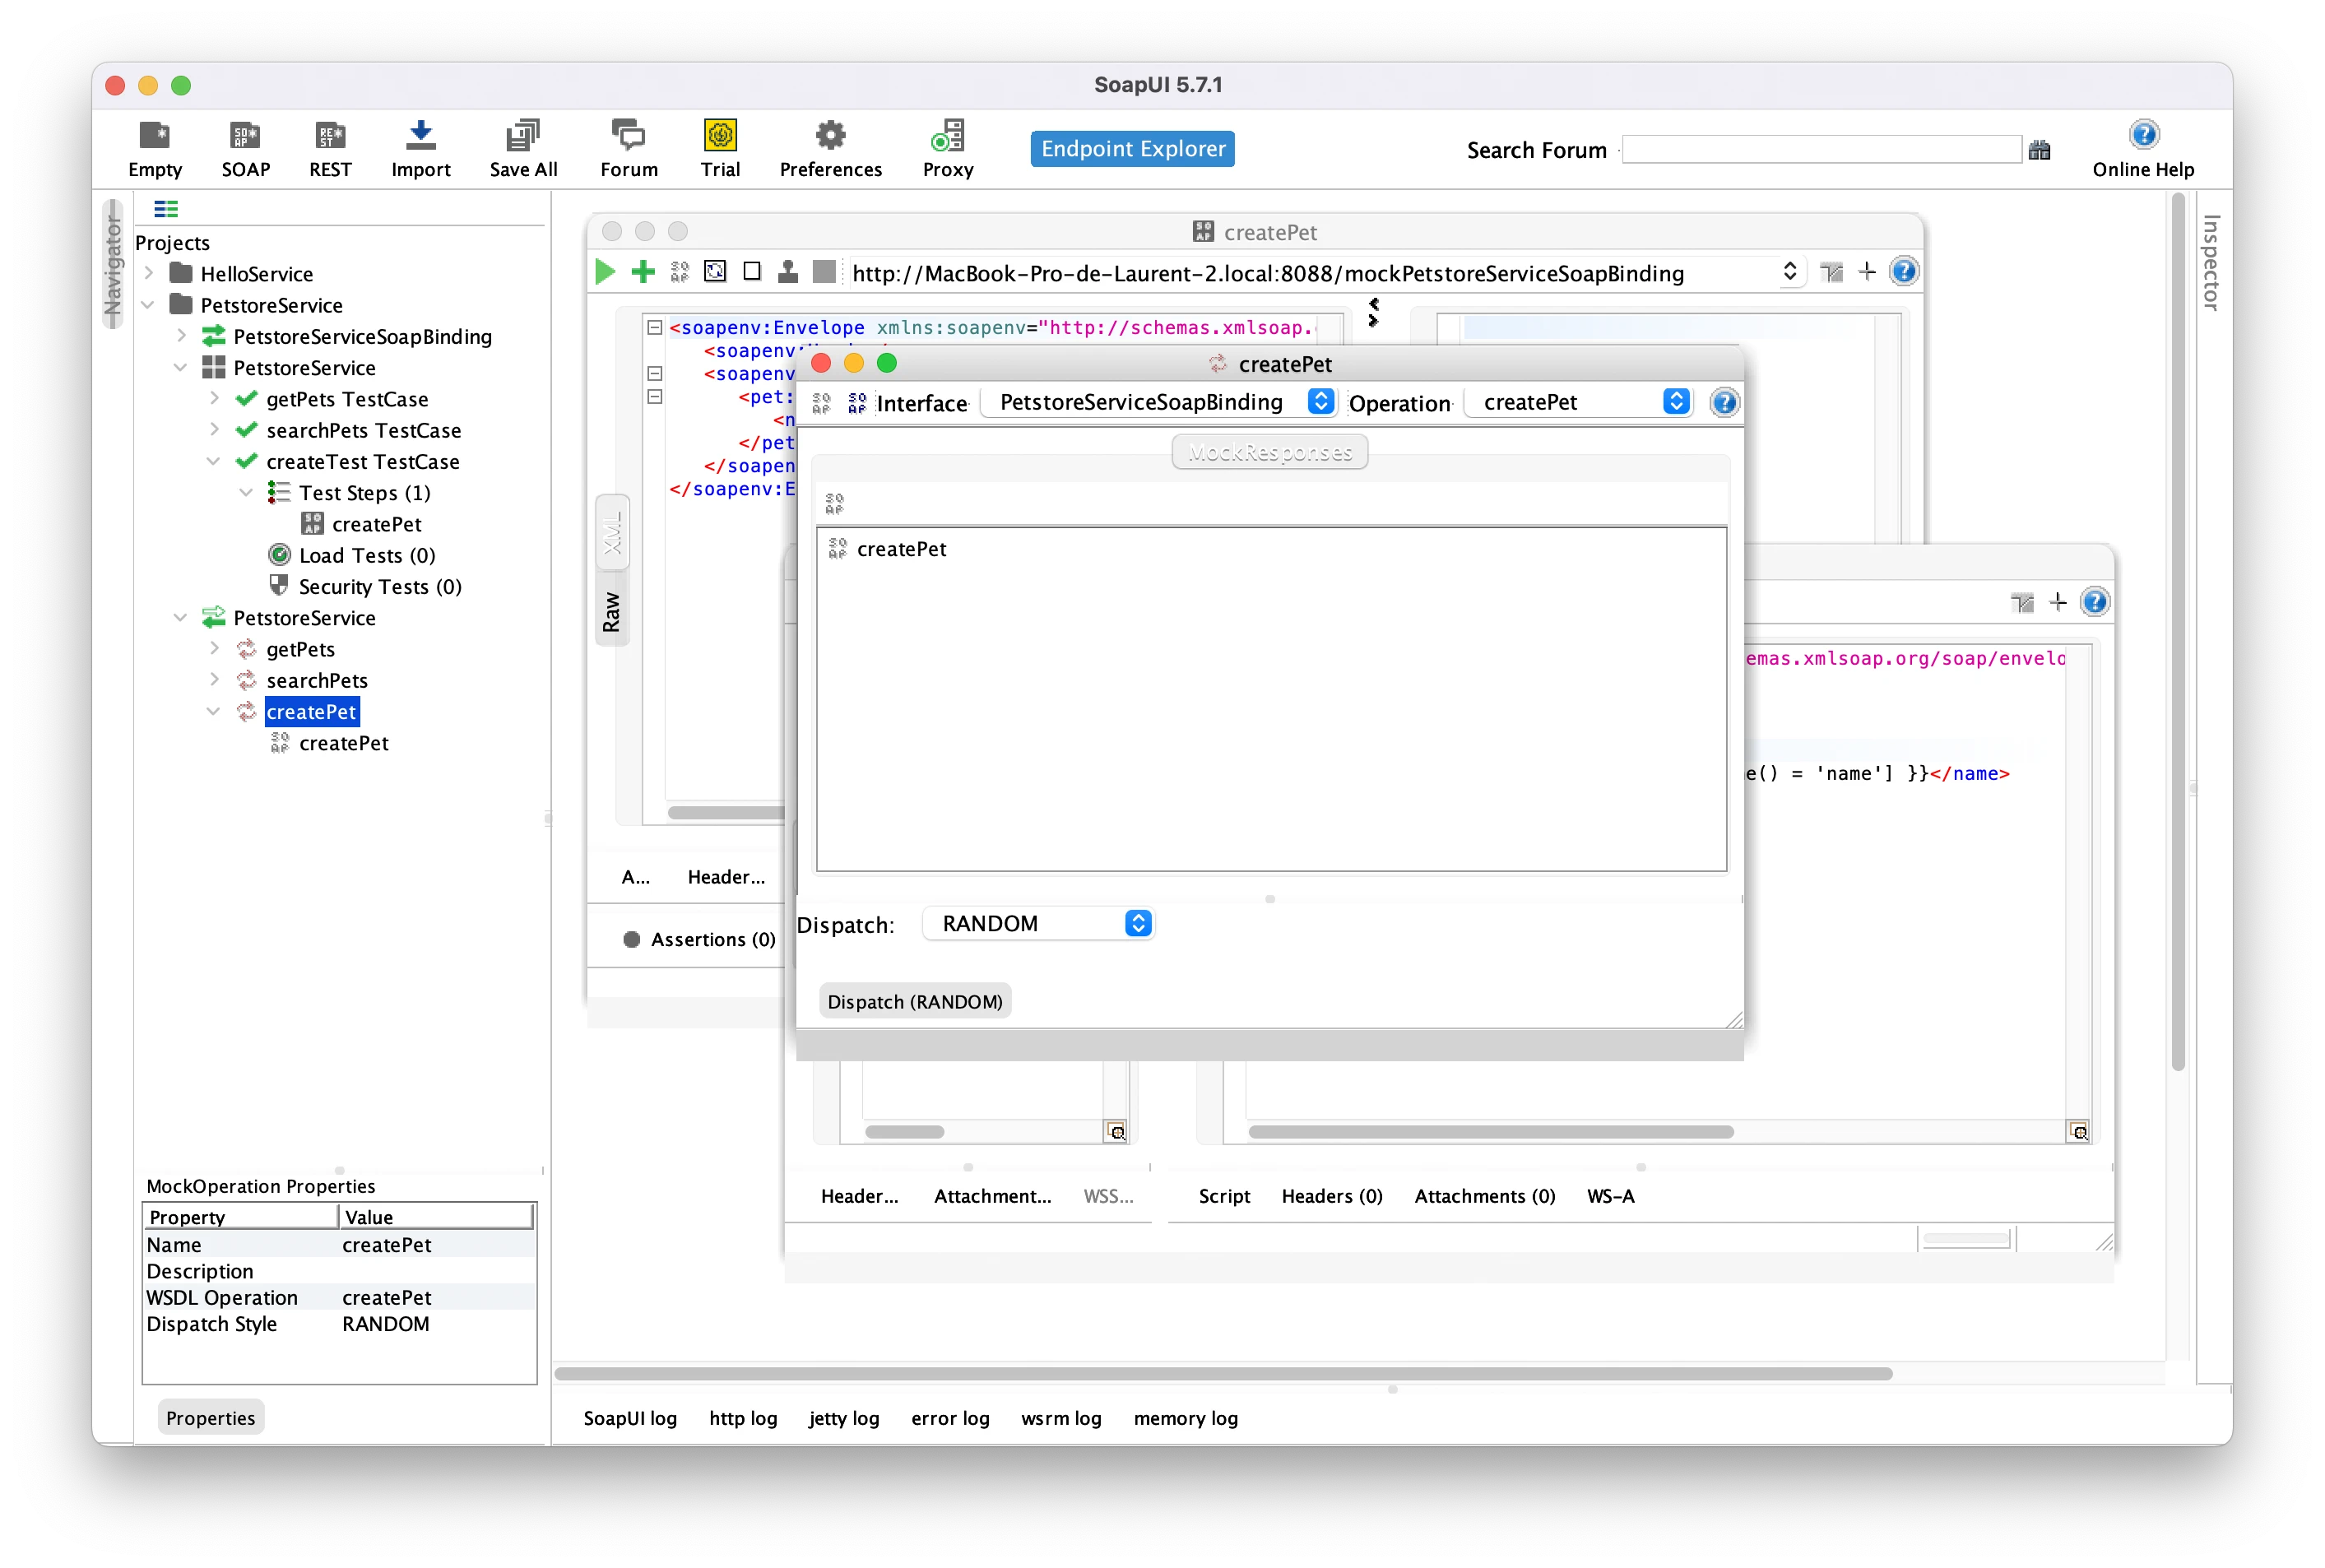
The request will use a statically defined pet name to be created (here Jojo in the screenshot) but, as said above, we want to define a smart mock with some logic. Thankfully, Microcks has this ability to generate dynamic mock content. When defining our example into SoapUI, we’re are going to use two specific notations that are:
{{ randomInt(5,10) }}for asking Microcks to generate a random integer between 5 and 10 for us (remember: the other pets have ids going from 1 to 4),{{ request.body//*[local-name() = 'name'] }}for asking Microcks to reuse here thenameproperty of the request body. Simply.
Let’s complete our SoapUI with a new request and a new response - both named createPet- for the new createPet operation. Do not forget to also update the Disptacher of the Mock Server operation as illustrated below:
🚨 Take care of saving your edits before exporting!
Import this updated SoapUI Project back in Microcks and see the results:
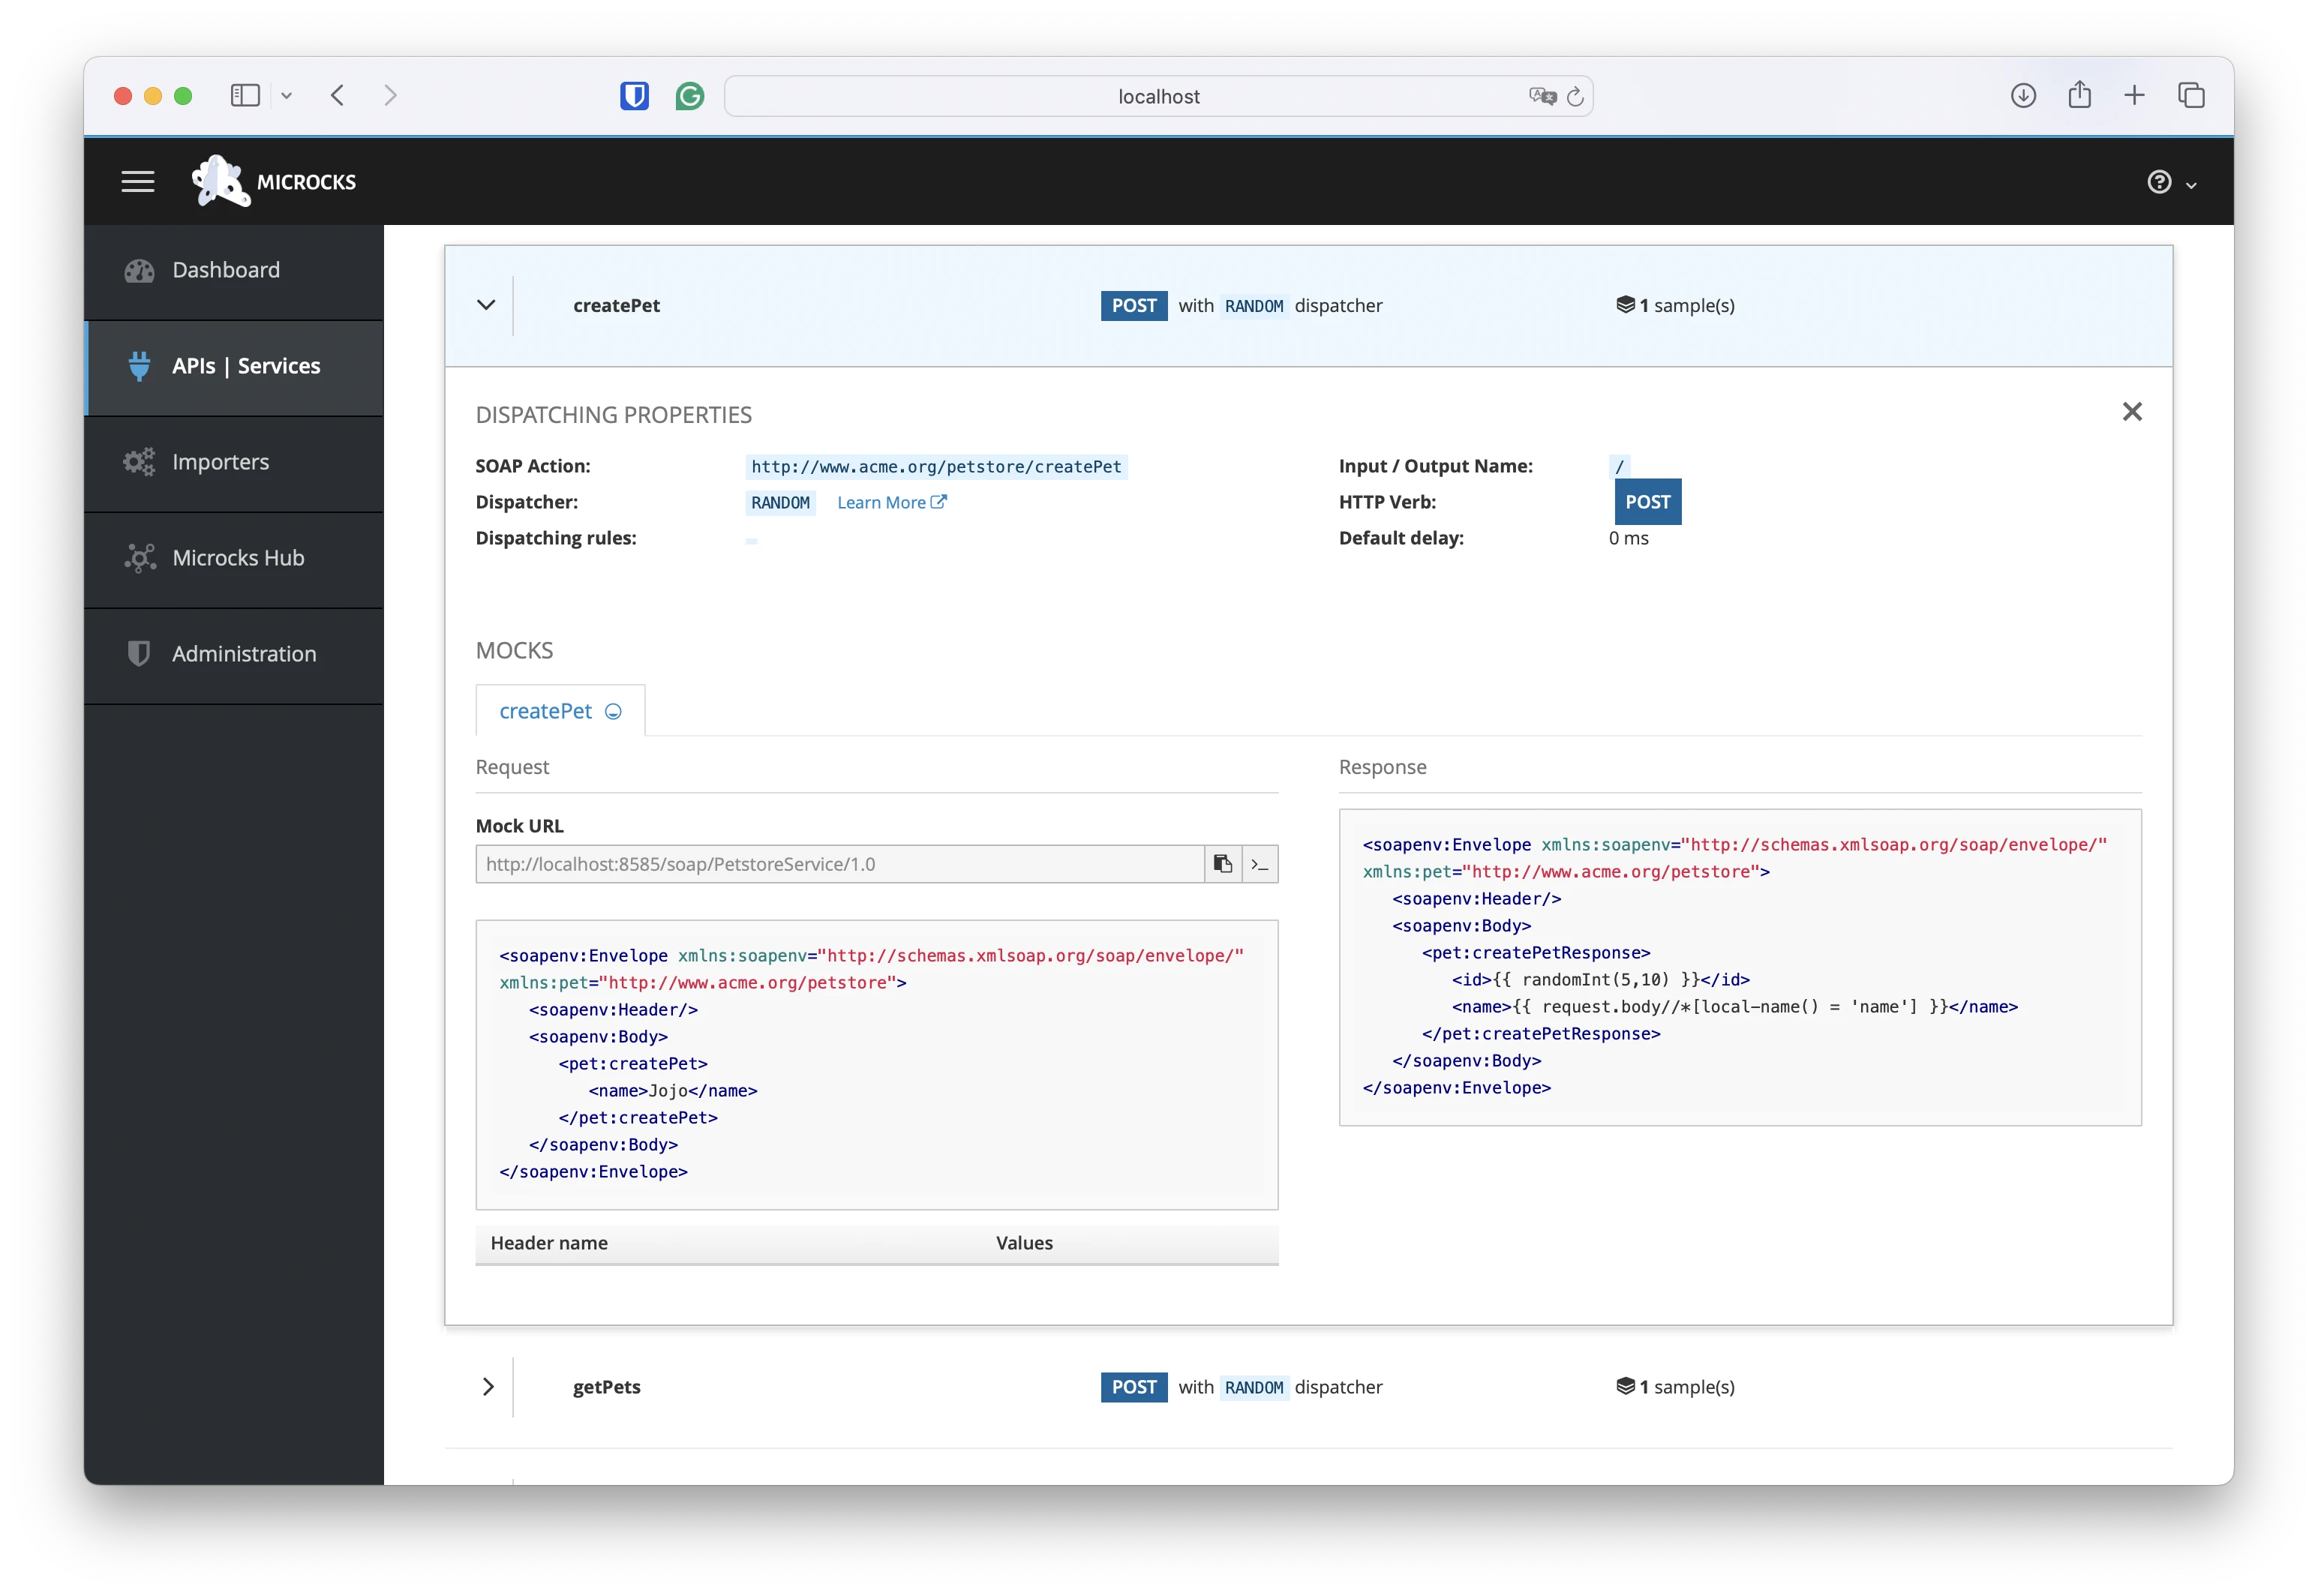
Let’s now finally test this new operation using some content and see what’s going on:
curl -X POST 'http://localhost:8585/soap/PetstoreService/1.0' -H 'Content-Type: application/xml' \
   -d '<soapenv:Envelope xmlns:soapenv="http://schemas.xmlsoap.org/soap/envelope/" xmlns:pet="http://www.acme.org/petstore"><soapenv:Header/><soapenv:Body><pet:createPet><name>Rusty</name></pet:createPet></soapenv:Body></soapenv:Envelope>'

<soapenv:Envelope xmlns:soapenv="http://schemas.xmlsoap.org/soap/envelope/" xmlns:pet="http://www.acme.org/petstore">
   <soapenv:Header/>
   <soapenv:Body>
      <pet:createPetResponse>
         <id>7</id>
         <name>Rusty</name>
      </pet:createPetResponse>
   </soapenv:Body>
</soapenv:Envelope>
As a result we’ve got our pet name Rusty being returned with a new id being generated. Ta Dam! 🥳
🛠️ As a validation, send a few more requests changing your pet name. You’ll check that given name is always returned and the
idis actual random. But you can also go further by defining an advanced dispatcher that will inspect your request body content to decide which response must be sent back. Very useful to describe different creation or error cases!
Wrap-Up
In this tutorial we have seen the basics on how Microcks can be used to mock responses of a SOAP WebService. We introduced some Microcks concepts like examples, dispatchers and templating features that are used to produce a live simulation. This definitely helps speeding-up the feedback loop on the ongoing design as the development of a consumer using this service.
Thanks for reading and let us know what you think on our Discord chat 🐙

Still Didn’t Find Your Answer?
Join our community and get the help you need. Engage with other members, ask questions, and share knowledge to resolve your queries and expand your understanding.
Join the community
