Your 1st AsyncAPI on Kafka mock
🗓️ Last updated on March 19, 2025 | 9 | Improve this pageOverview
This tutorial is a step-by-step walkthrough on how to use AsyncAPI v3 Specification to specify your mocks for your Asynchronous and Event-Driven API. This is hands-on introduction to AsyncAPI Conventions reference that brings all details on conventions being used.
We will go through a practical example based on the famous PetStore API. We’ll build the reference petstore-1.0.0-asyncapi.yaml file by iterations, highlighting the details to get you starting with mocking AsyncAPI on Microcks.
To complete this tutorial, you will need one additional tool that ic kcat, a simple CLI utility that allows you reading messages on a Apache Kafka topic. Please follow the instructions on how to install kcat on your machine.
Ready? Go! 💥
1. Setup Microcks and AsyncAPI skeleton
First mandatory step is obviously to setup Microcks 😉. For AsyncAPI usage, we need a particular setup that embeds an Apache Kafka broker linked to a Microcks instance. Do not worry, we made this available for you as a simple docker compose command!
As an alternative, you could also use our Docker Desktop Extension if you feel more comfortable with graphical tools.
To retrieve and start the docker compose configuration, just execute the following commands, adapting the folder to one of your choice:
cd ~/Development/temp
git clone https://github.com/microcks/microcks
cd microcks/install/docker-compose
docker compose -f docker-compose-devmode.yml up -d
docker pulls the missing container images and starts 5 containers:
[+] Running 11/11
 ✔ async-minion Pulled                                            11.1s
   ✔ dd5796ca49ab Pull complete                                    7.6s
   ✔ e88223f03039 Pull complete                                    8.2s
   ✔ cf8e2e912045 Pull complete                                    8.2s
 ✔ app Pulled                                                      9.0s
   ✔ 3415b32764d8 Already exists                                   0.0s
   ✔ cdcfae6aa8a9 Pull complete                                    5.3s
   ✔ 694f35e17587 Pull complete                                    5.4s
   ✔ 4f4fb700ef54 Pull complete                                    5.4s
   ✔ 93c03d0318cd Pull complete                                    5.4s
   ✔ c2522429d806 Pull complete                                    6.4s
[+] Running 6/6
 ✔ Network docker-compose_default      Created                     0.0s
 ✔ Container microcks-db               Started                     0.9s
 ✔ Container microcks-kafka            Started                     0.9s
 ✔ Container microcks-postman-runtime  Started                     0.9s
 ✔ Container microcks                  Started                     0.4s
 ✔ Container microcks-async-minion     Started                     0.5s
You can check everything is running correctly with the docker ps command that should provide you something like:
docker ps
CONTAINER ID   IMAGE                                             COMMAND                  CREATED         STATUS         PORTS                                                                       NAMES
b2c1ce881983   quay.io/microcks/microcks-async-minion:1.11.0     "/deployments/run-ja…"   3 minutes ago   Up 3 minutes   8080/tcp, 0.0.0.0:8081->8081/tcp                                            microcks-async-minion
274c44597199   quay.io/microcks/microcks:1.11.0                  "/deployments/run-ja…"   3 minutes ago   Up 3 minutes   0.0.0.0:8080->8080/tcp, 0.0.0.0:9090->9090/tcp                              microcks
3076b5034991   redpandadata/redpanda:v24.3.1                     "/entrypoint.sh redp…"   3 minutes ago   Up 3 minutes   8081-8082/tcp, 0.0.0.0:9092->9092/tcp, 9644/tcp, 0.0.0.0:19092->19092/tcp   microcks-kafka
ef28e4b4bbcd   quay.io/microcks/microcks-postman-runtime:0.6.0   "/app/bin/uid_entryp…"   3 minutes ago   Up 3 minutes   3000/tcp                                                                    microcks-postman-runtime
d1c2281c370c   mongo:4.4.29                                      "docker-entrypoint.s…"   3 minutes ago   Up 3 minutes   27017/tcp                                                                   microcks-db
You should now have a Microcks running instance on http://localhost:8080.
Please edit the
docker-compose-devmode.ymlfile to change this port if8080is already used on your machine.
Now let start with the skeleton of our AsyncAPI contract for the PetStore API. We’ll start with general information on this API and with definition of the Pet datatype. Pet will be used directly as our Kafka message and we’ll provide two examples of existing pets.
This is over-simplistic but enough to help demonstrate how to do things. Here’s the YAML representing this part of the AsyncAPI contract:
asyncapi: 3.0.0
info:
  title: Petstore Asynchronous API
  version: 1.0.0
  description: |-
    A sample API that uses a petstore as an example to demonstrate features
    in the AsyncAPI 3.0 specification and Microcks
  contact:
    name: Microcks Team
    url: 'https://microcks.io'
  license:
    name: Apache 2.0
    url: https://www.apache.org/licenses/LICENSE-2.0
defaultContentType: application/json
components:
  messages:
    pet:
      payload:
        $ref: '#/components/schemas/Pet'
      examples:
        - name: Zaza
          payload:
            id: 1
            name: Zaza
        - name: Tigress
          payload:
            id: 2
            name: Tigress
  schemas:
    Pet:
      type: object
      properties:
        id:
          format: int64
          type: integer
        name:
          type: string
      required:
        - id
        - name
2. Basic receive operation in AsyncAPI
Let’s now define a first channel and a first operation to this API. We want give a consumer the ability to receive events when new pets are recorded into the store. Hence, we’ll define a newPetCreated channel in our API. We’ll also define a receive operation that will allow consumers to subscribe to a topic and received new Pet events. Just paste the content below at the end of above skeleton:
channels:
  newPetCreated:
    address: new-pet
    messages:
      newPetCreated:
        $ref: '#/components/messages/pet'
operations:
  receiveNewPetCreateEvent:
    action: receive
    channel:
      $ref: '#/channels/newPetCreated'
    messages:
      - $ref: '#/channels/newPetCreated/messages/newPetCreated'
Because of the application/json content type, we can express examples as JSON or as YAML objects. Examples are really helpful when carefully chosen to represent real-life samples very close to actual functional situation. Here I’ve put my real cats 🐈 names.
As soon as your contract contains examples, you can import it into Microcks and it will use examples to produce real life simulation of your API. Use the Direct Upload method to inject your AsyncAPI file in Microcks. You should get the following result:

Microcks has found Zaza and Tigress as valid samples to build a simulation upon. A Kafka Topic has been made available and you can use it to test the API operation as demonstrated below with a kcat command:
kcat -b localhost:9092 -t PetstoreAsynchronousAPI-1.0.0-receiveNewPetCreateEvent
{"id":1,"name":"Zaza"}
{"id":2,"name":"Tigress"}
{"id":1,"name":"Zaza"}
{"id":2,"name":"Tigress"}
{"id":1,"name":"Zaza"}
{"id":2,"name":"Tigress"}
{"id":1,"name":"Zaza"}
{"id":2,"name":"Tigress"}
{"id":1,"name":"Zaza"}
{"id":2,"name":"Tigress"}
{"id":1,"name":"Zaza"}
{"id":2,"name":"Tigress"}
{"id":1,"name":"Zaza"}
{"id":2,"name":"Tigress"}
% Reached end of topic PetstoreAsynchronousAPI-1.0.0-receiveNewPetCreateEvent [0] at offset 14
{"id":1,"name":"Zaza"}
{"id":2,"name":"Tigress"}
% Reached end of topic PetstoreAsynchronousAPI-1.0.0-receiveNewPetCreateEvent [0] at offset 16
{"id":1,"name":"Zaza"}
{"id":2,"name":"Tigress"}
% Reached end of topic PetstoreAsynchronousAPI-1.0.0-receiveNewPetCreateEvent [0] at offset 18
This is your first AsyncAPI mock 🎉 Nice achievement!
3. Using channel parameters in AsyncAPI
Let’s make things a bit more spicy by adding channel parameters. Now assume we have a lot of events and we want consumers to be able to filter events using a characteristic of our pets - let’s say the color. We want the consumer to be able to select the exact topic she wants and for that we’ll use parameters in channel address.
So we’ll start adding a new PetWithColor datatype to our existing AsyncAPI document. You can copy/paste the following PetWithColor fragment into the components/schemas sction of your file:
components:
  schemas:
    [...]
    PetWithColor:
      allOf:
        - $ref: '#/components/schemas/Pet'
        - properties:
            color:
              type: string
          required:
            - color
Then, we’ll define a new message type named petByColor with a bunch of examples illustrating different cats with different values:
components:
  messages:
    [...]
    petByColor:
      payload:
        $ref: '#/components/schemas/PetWithColor'
      examples:
        - name: Zaza
          payload:
            id: 1
            name: Zaza
            color: blue
        - name: Tigress
          payload:
            id: 2
            name: Tigress
            color: stripped
        - name: Maki
          payload:
            id: 3
            name: Maki
            color: calico
        - name: Toufik
          payload:
            id: 4
            name: Toufik
            color: stripped
Finally, we’ll have to define a new channel with parameter for exchanging petByColor messages and a new operation that allows consumers to receive those pets with color events:
channels:
  [...]
  petByColor:
    address: pet-{color}
    messages:
      petByColor:
        $ref: '#/components/messages/petByColor'
    parameters:
      color:
        location: $message.payload#/color
operation:
  [...]
  receivePetByColorEvent:
    action: receive
    channel:
      $ref: '#/channels/petByColor'
    messages:
      - $ref: '#/channels/petByColor/messages/petByColor'
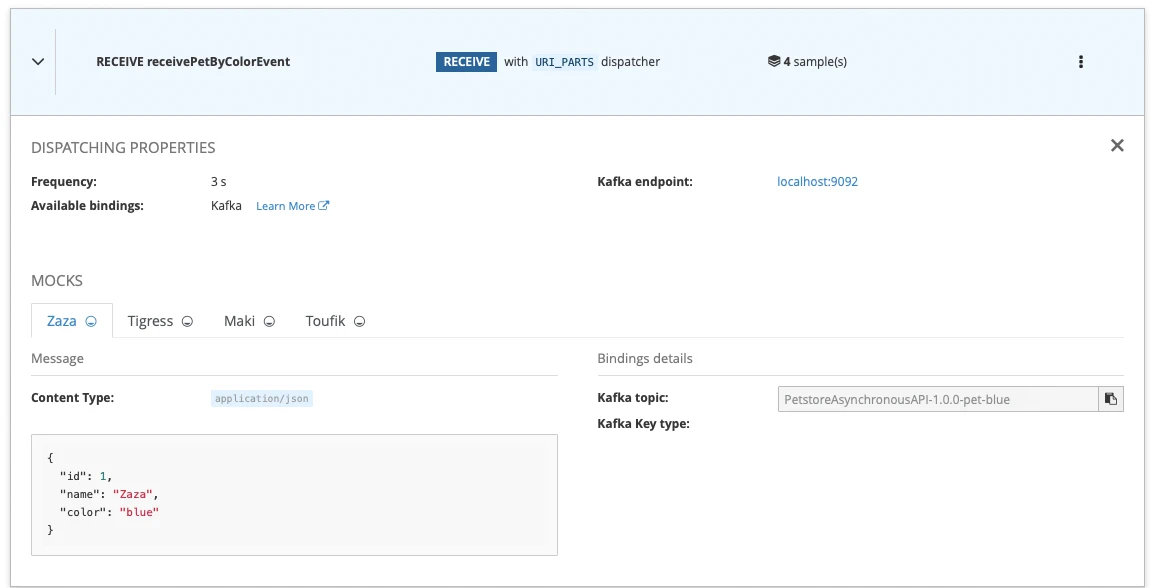
The important thing to notice here is the location of the new channel. In fact, AsyncAPI specification allows to specify which element of the message should be used as a discriminator to route messages to specific channel. Here the location is $message.payload#/color which means that the color property of the message payload will match the {color} placeholder in the channel address. When imported into Microcks, you should have following result:

You can see two important changes from the previous operation we created:
- The operation has now a dispatcher named
URI_PARTSthat means that Microcks will create dynamic endpoints/topic having templatized parts (likepet-{color}in our case), - Each example may have a different Kafka Topic associated with. Microcks will dynamically create them and produce mock messages in the correct ones.
Let’s try this on the different topics corresponding to the differnet colors:
kcat -b localhost:9092 -t PetstoreAsynchronousAPI-1.0.0-pet-blue
% Auto-selecting Consumer mode (use -P or -C to override)
{"id":1,"name":"Zaza","color":"blue"}
{"id":1,"name":"Zaza","color":"blue"}
{"id":1,"name":"Zaza","color":"blue"}
% Reached end of topic PetstoreAsynchronousAPI-1.0.0-pet-blue [0] at offset 3
Looks good! Only Zaza is a blue cat. Let’s check the others:
kcat -b localhost:9092 -t PetstoreAsynchronousAPI-1.0.0-pet-stripped
% Auto-selecting Consumer mode (use -P or -C to override)
{"id":2,"name":"Tigress","color":"stripped"}
{"id":4,"name":"Toufik","color":"stripped"}
{"id":2,"name":"Tigress","color":"stripped"}
{"id":4,"name":"Toufik","color":"stripped"}
{"id":2,"name":"Tigress","color":"stripped"}
{"id":4,"name":"Toufik","color":"stripped"}
{"id":2,"name":"Tigress","color":"stripped"}
{"id":4,"name":"Toufik","color":"stripped"}
{"id":2,"name":"Tigress","color":"stripped"}
{"id":4,"name":"Toufik","color":"stripped"}
% Reached end of topic PetstoreAsynchronousAPI-1.0.0-pet-stripped [0] at offset 10
^C%
Correct! Tigress and Toufik are the stripped ones. Just confirm with the calico color:
kcat -b localhost:9092 -t PetstoreAsynchronousAPI-1.0.0-pet-calico
% Auto-selecting Consumer mode (use -P or -C to override)
{"id":3,"name":"Maki","color":"calico"}
{"id":3,"name":"Maki","color":"calico"}
{"id":3,"name":"Maki","color":"calico"}
{"id":3,"name":"Maki","color":"calico"}
{"id":3,"name":"Maki","color":"calico"}
{"id":3,"name":"Maki","color":"calico"}
{"id":3,"name":"Maki","color":"calico"}
% Reached end of topic PetstoreAsynchronousAPI-1.0.0-pet-calico [0] at offset 7
🎉 Fantastic! We now have asynchronous mock messages with routing logic based on message elements.
💡 Microcks dispatcher can support multiple path elements to find appropriate destination to route messages to. It’s up to you to use addresses like
static-{part_1}/hello/{part_2}/worldas long as your define all the locations for those parameters.
4. Mocking dynamic data
And now the final step! Let’s enrich our first operation with more examples. We see how easy it is to add new examples but it can became cumbersome to manage a lot of them. Hopefully, Microcks has this ability to generate dynamic mock content. Thanks to a templating language, you can add more dyanmic examples very quickly. Let’s add the folowwing Random YAML fragment to our existing examples list:
components:
  messages:
    pet:
      payload:
        $ref: '#/components/schemas/Pet'
      examples:
        [...]
        - name: Random
          payload: |-
            {
              "id": {{ randomInt(5,10) }},
              "name": "{{ randomValue(Rusty,Poppy,Bella) }}"
            }
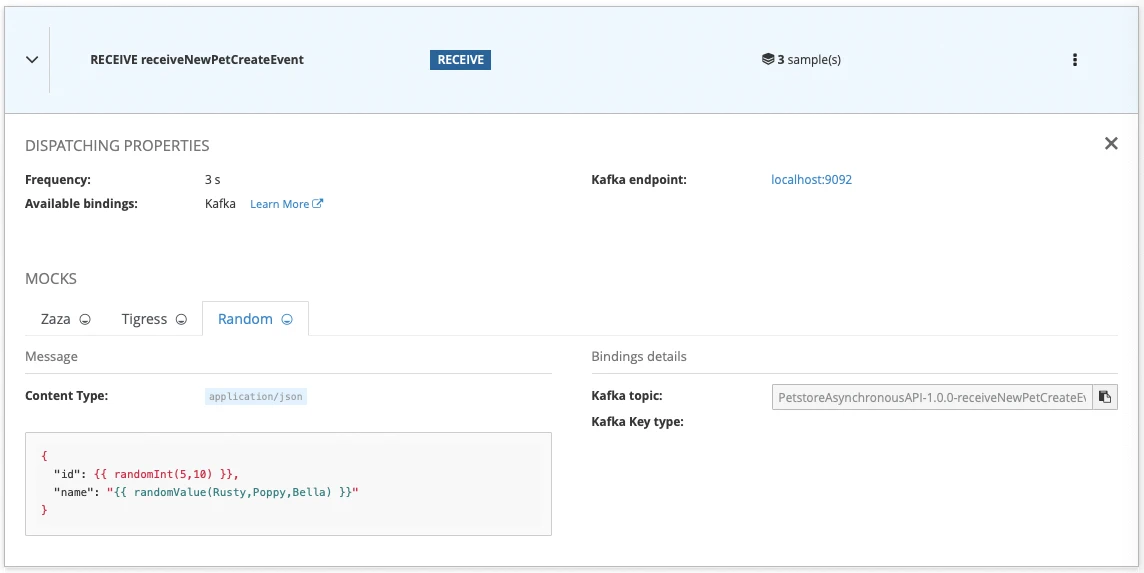
The Random example fragment above embeds two specific notations that are:
{{ randomInt(5,10) }}for asking Microcks to generate a random integer between 5 and 10 for us (remember: the other pets have ids going from 1 to 4),{{ randomValue(Rusty,Poppy,Bella) }}for asking Microcks to pick a random value among the ones that are provided, separated by a coma. Simply.
When imported into Microcks, you should have following result:

Let’s now finally test the first Kafka topic again and see what’s going on:
kcat -b localhost:9092 -t PetstoreAsynchronousAPI-1.0.0-receiveNewPetCreateEvent
[...]
{"id":1,"name":"Zaza"}
{"id":2,"name":"Tigresse"}
{
  "id": 6,
  "name": "Poppy"
}
{"id":1,"name":"Zaza"}
{"id":2,"name":"Tigresse"}
{
  "id": 6,
  "name": "Bella"
}
{"id":1,"name":"Zaza"}
{"id":2,"name":"Tigresse"}
{
  "id": 7,
  "name": "Bella"
}
{"id":1,"name":"Zaza"}
{"id":2,"name":"Tigresse"}
{
  "id": 5,
  "name": "Rusty"
}
% Reached end of topic PetstoreAsynchronousAPI-1.0.0-receiveNewPetCreateEvent [0] at offset 1373
As a result we’ve got now pets with random id and names mixed with our first two static examples. Ta Dam! 🥳
Wrap-Up
In this tutorial we have seen the basics on how Microcks can be used to mock responses of an AsyncAPI. We introduced some Microcks concepts like examples, dispatchers and templating features that are used to produce a live simulation. This definitely helps speeding-up the feedback loop on the ongoing design as the development of an application consuming this API.
Thanks for reading and let us know what you think on our Discord chat 🐙
♻️ Do not forget to docker compose -f docker-compose-devmode.yml down Microcks if you no longer need it!

Still Didn’t Find Your Answer?
Join our community and get the help you need. Engage with other members, ask questions, and share knowledge to resolve your queries and expand your understanding.
Join the community