
-
Using
- Importing Services & APIs
- Comparison to alternatives
- OpenAPI Mocking and Testing
- Swagger Mocking and Testing
- AsyncAPI Mocking and Testing
- Postman usage for Microcks
- gRPC Mocking and Testing
- GraphQL Mocking and Testing
- SoapUI Mocking and Testing
- Http Archive usage for Microcks
- Using exposed mocks
- Getting direct API
- Testing with Microcks
- Advanced topics
- Organizing repository
- Templating mock responses
- Dispatcher & dispatching rules
- Microcks APIMetadata
- Monitoring & Observability
- Installing
- Automating
- Administrating
- Guides
Architecture & deployment options
🗓️ Last updated on April 19, 2023 | 8 | Improve this pageIntroduction
Now that you have looked at the different installation methods of Microcks, you may want to have a high-level view of its architecture and deployment options. This page will go through these topics, showing the different choices and options you may have depending on your target environment.
High-level Architecture
In its simplest form, Microcks architecture is made of 4 components which are:
- The Microcks main web application (also called
webapp) that holds the UI resources as well as API endpoints, - Its associated MongoDB database for holding your data such as the repository of APIs | Services and Tests,
- A Microcks Postman runtime (
microcks-postman-runtime) that allows the execution of Postman Collection tests and calls back Microcks for storing results, - A Keycloak instance that holds the authentication mechanisms and identity provider integration.
The schema below illustrates this architecture and the relations between components. You’ll see that users access the main webapp either from their browser to see the console or from the CLI
or any other application using the API endpoints.

For sake of simplicity we do not represent here the PostgreSQL (or other database) that may be associated with Keycloak.
You can deploy this simple architecture whatever installation method you pick: from Docker Compose to fully featured Operator .
Architecture for Async API
If you want to enable asynchronous API features, 2 additional components will be required:
- The Microcks Async Minion (
microcks-async-minion) is a component responsible for publishing mock messages corresponding to AsyncAPI definitions as well as testing asynchronous endpoints. It retrieves these definitions from Microckswebappat startup and then listens to a Kafka topic for changes on these definitions, - An Apache Kafka
broker that holds our private topic for changes and the public topics that will be used to publish mock messages by the
microcks-async-minion.
The schema below represents this full-featured architecture with connection to outer brokers. We represented Kafka ones (X broker) as well as brokers (Y and Z) from other protocols with respect to our roadmap. 😉
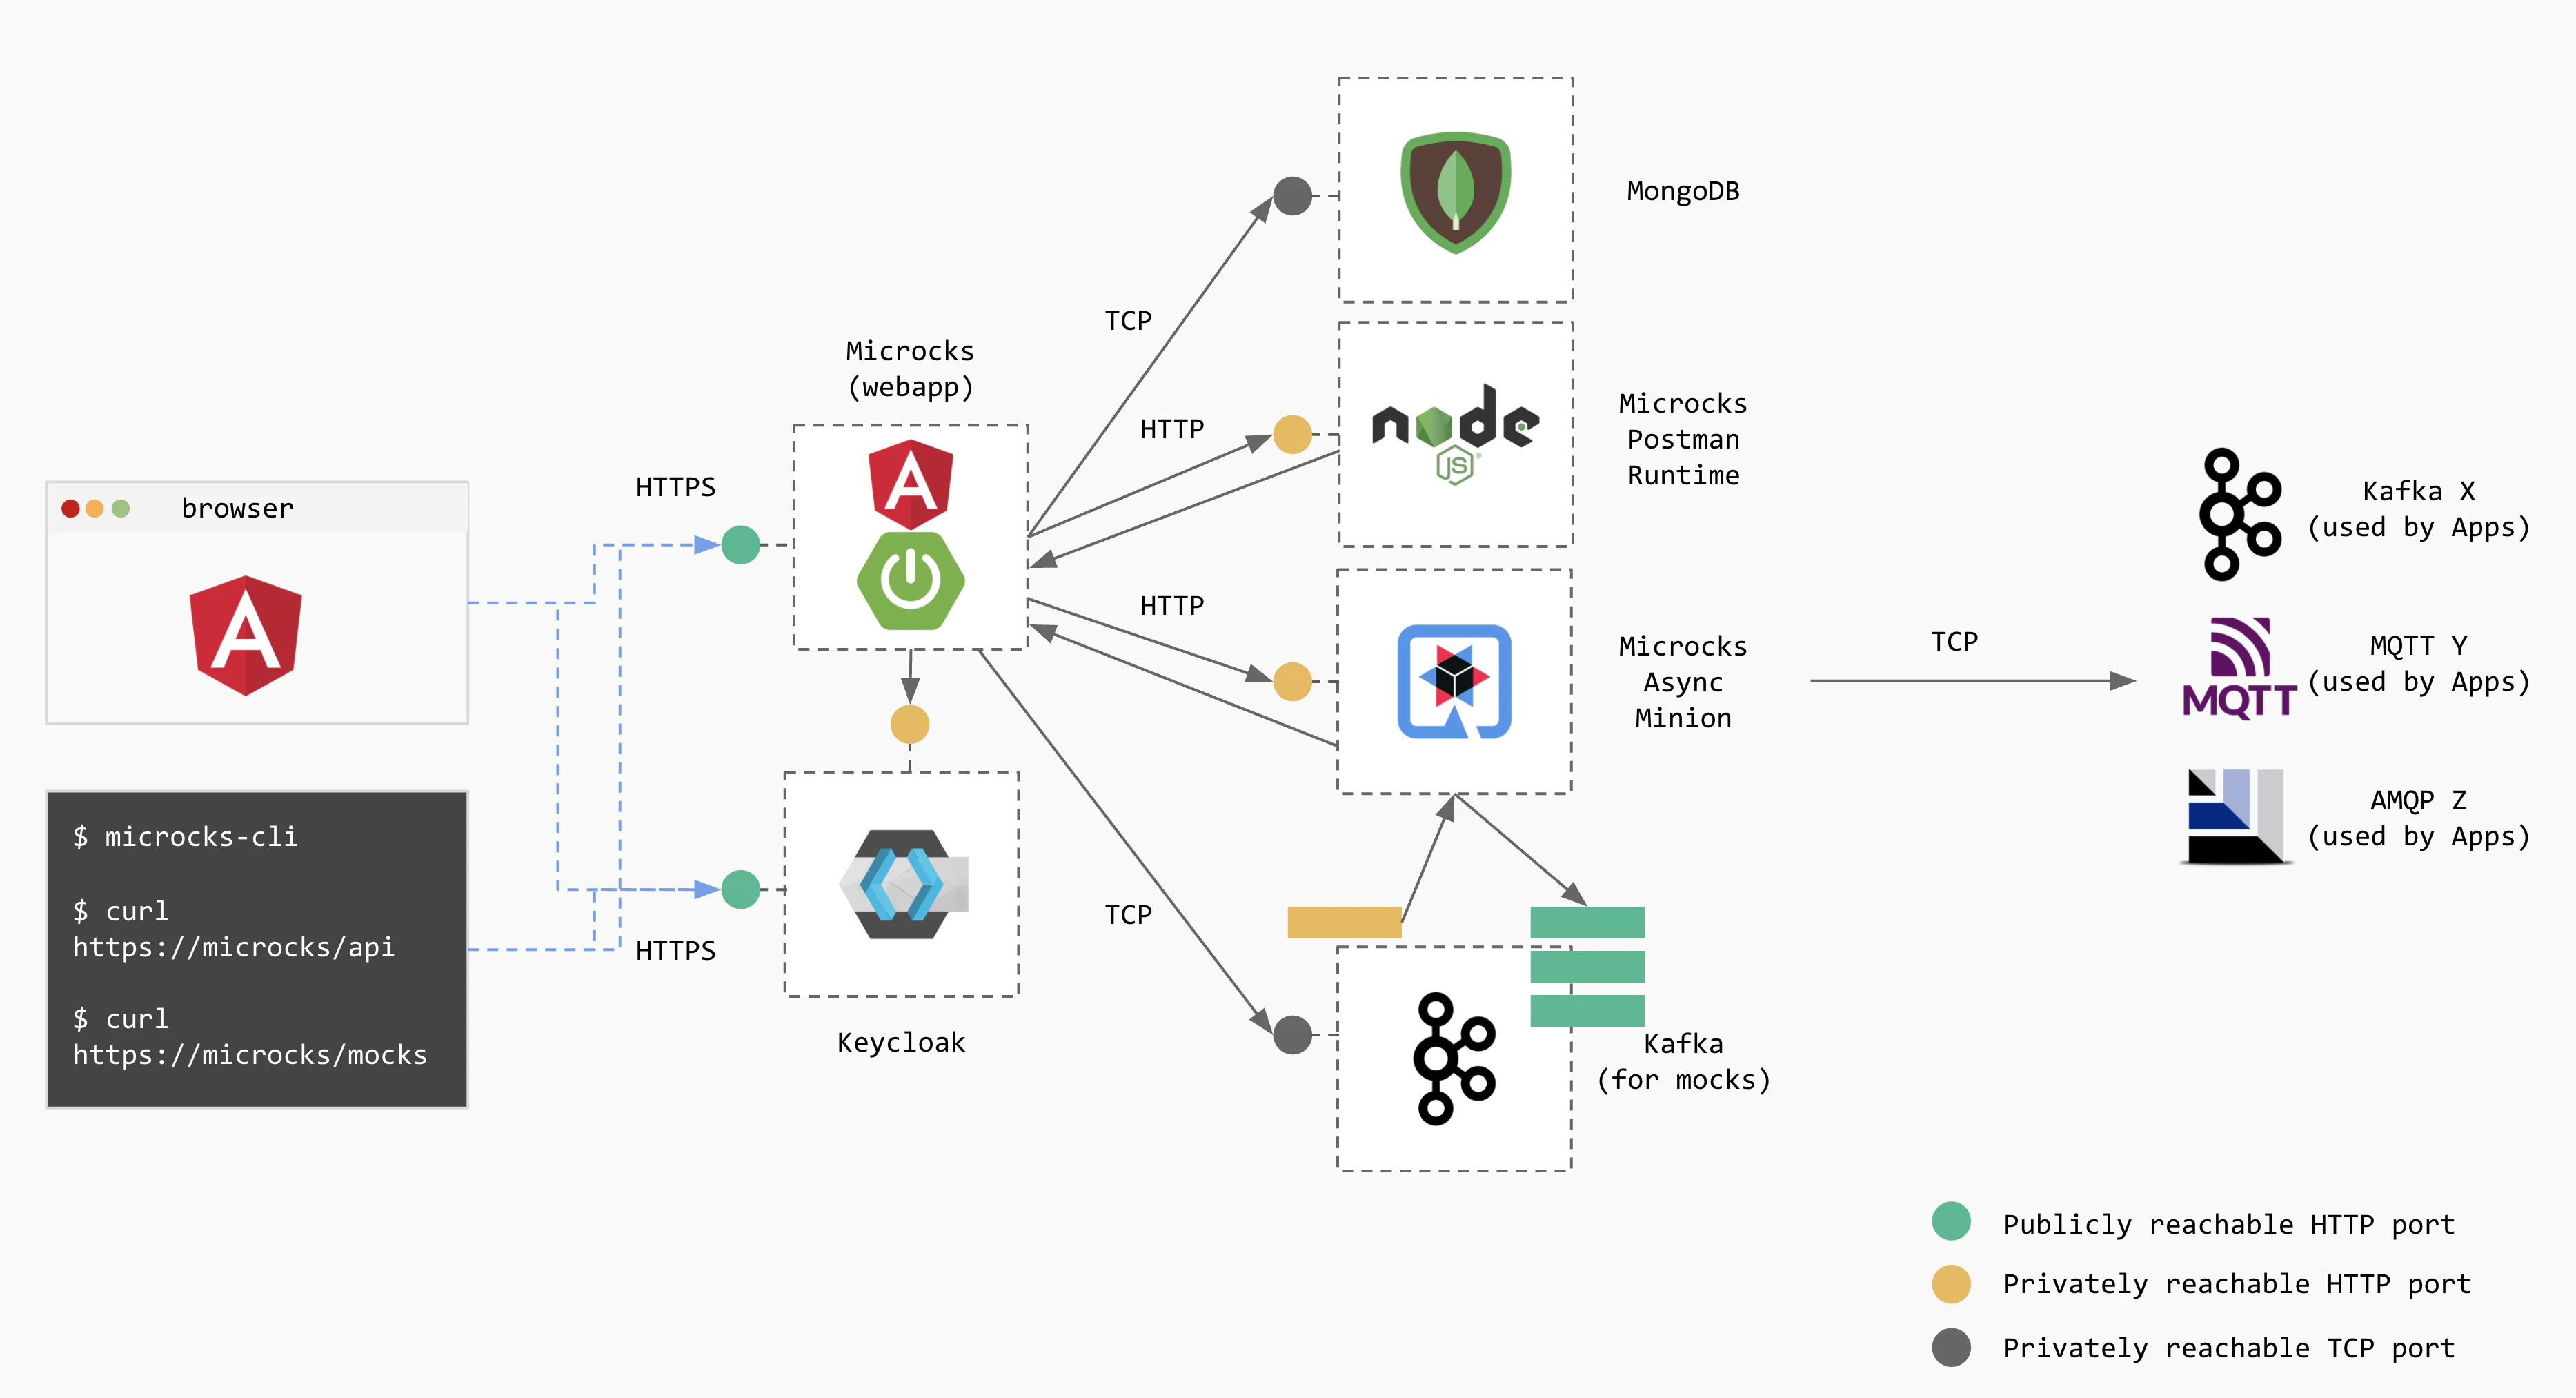
For sake of simplicity we do not represent here the Zookeeper ensemble that may be associated with Kafka.
When deploying on Kubernetes you will have to use our Helm Chart
or Operator
installation methods for that. This architecture can also be deployed using Docker Compose using the docker-compose-async-addon file as described in enabling asynchronous features
.
Deployment Options
At this point, you should have a better vision on Microcks architecture and should be wondering: should I deploy this as a monolith? Not at all, we provide different deployment options to better suit your environment.
Everything managed by Microcks
Of course - when starting from scratch - the simplest way of deploying Microcks is to use our Helm Chart or Operator that will handle the setup of all required dependencies for you. All the components from the architecture are setup through community container images or operators like the excellent Strimzi Operator .
This setup makes things easy to start and easy to drop: everything is placed under a single Kubernetes namespace as illustrated into the schema below:
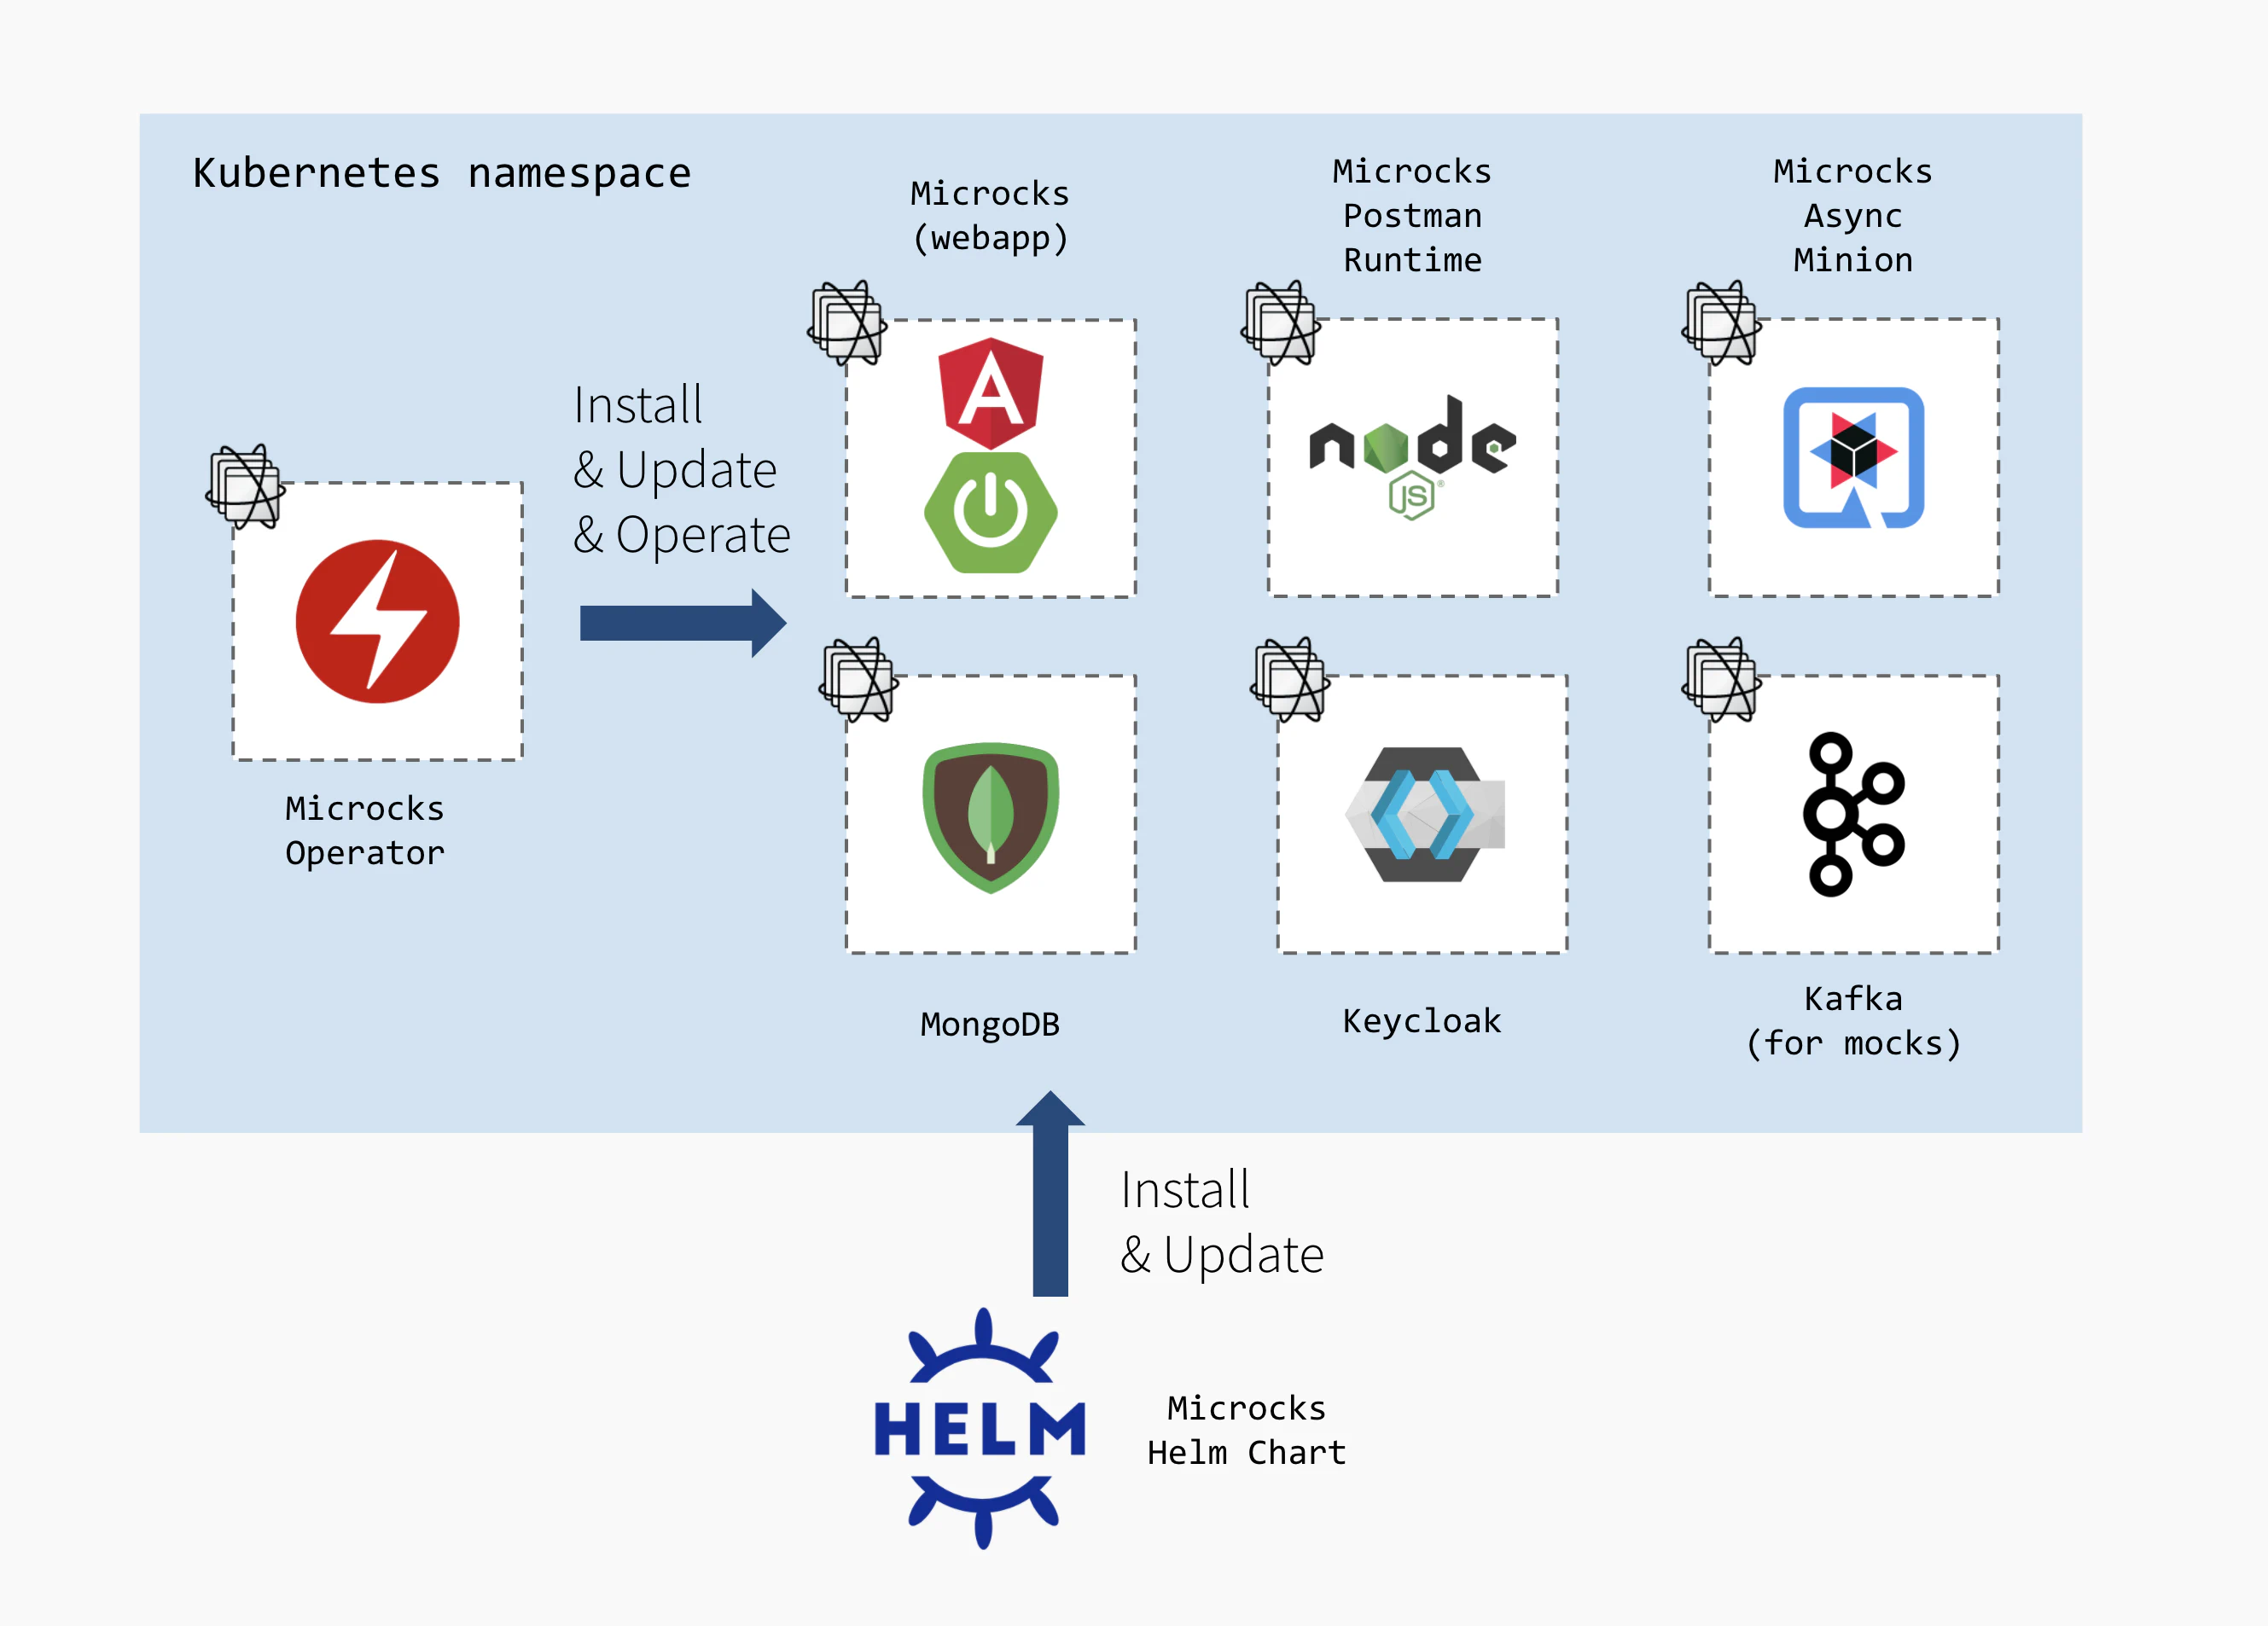
Helm Chart or Operator? I would say it depends… 😉 Operator will handle more complex lifecycle and update procedures as weel as tuning operations in the future. While Helm Chart will remain easier for simple “throwable” setup.
Partially managed by Microcks
Besides this all-in-one approach, you may also use both installation methods to pick the components you want Microcks to install and the other existing ones you may want Microcks to connect to. You will have the following options:
- Do not deploy a MongoDB database and reuse an existing one. For that, put the
mongodb.installflag tofalseand specify amongodb.url, amongodb.databaseas well as credentials and that’s it! - Do not deploy a Keycloak instance and reuse an existing one. For that, put the
keycloak.installflag tofalseand specify akeycloak.urland akeycloak.realmand that’s it! Optionally, you may want to specify akeycloak.privateUrlso that security token trusting will be done without hopping through a publicly reachable URL. - Do not deploy a Kafka instance and reuse an existing one. For that, put the
kafka.installflag tofalseand specify akafka.urland that’s it!

Reusing already deployed components may allow you to lower operational costs if you’re using shared instances. It can also allow you to use managed services that may be provided by your favorite cloud vendor.
Reusing existing Keycloak
Microcks Helm Chart and Operator can also be configured to reuse an already existing Keycloak instance for your organization.
First, you have to prepare your Keycloak instance to host and secure future Microcks deployment. Basically you have 2 options for this:
- Create a new realm using Keycloak documentation and choosing Microcks realm full configuration as the file to import during creation,
- OR Re-use an existing realm, completing its definition with Microcks realm addons configuration by simply importing this file within realm configuration.
You might want to change the
redirectUrisin the Microcks realm configuration file to the corresponding URI of the Microcks application, by default it is pointing to localhost.
Importing one or another of the Microcks realm configuration file will bring all the necessary clients, roles, groups and scope mappings. If you created a new realm, the Microcks configuration also brings default users you may later delete when configuring your own identity provider in Keycloak .
Then, you actually have to deploy the Microcks instance configured for using external Keycloak. Depending whether you’ve used Helm or Operator to install Microcks, you’ll have to customize your values.yml file or the MicrocksInstall custom resource but the properties have the same names in both installation methods:
keycloak:
  install: false
  realm: my-own-realm
  url: keycloak.example.com:443
  privateUrl: http://keycloak.namespace.svc.cluster.local:8080/auth  # Optional
  serviceAccount: microcks-serviceaccount
  serviceAccountCredentials: ab54d329-e435-41ae-a900-ec6b3fe15c54    # Change recommended
The privateUrl is optional and will allow to prevent trusting requests from webapp component to Keycloak to go through a public address and network. In a Kubernetes -deployment, you’ll typically put there the cluster internal Service name.
The serviceAccountCredentials should typically be changed as this is the default value that comes with your realm setup. For an introduction on the purpose of service accounts in Microcks, check this page
.
Reusing existing Kafka
Whilst it may seem obvious to certain people, it can be useful to recall that Microcks-Kafka interactions are not tied to a particular Kafka vendor. Whatever your Kafka vendor or your different Kafka vendors - be it vanilla Kafka, Confluent platform, Amazon MSK or Red Hat AMQ - Microcks will be able to connect and use them.
For mocking purposes
In that case, Kafka is used by both the webapp component to publish updates of API and the microcks-async-minion to publish mock messages.
Depending whether you’ve used Helm or Operator to install Microcks, you’ll have to customize your values.yml file or the MicrocksInstall custom resource but the properties have the same names in both installation methods.
To reuse an external Kafka cluster, here are the basic properties you’ll have to change:
features:
  async:
    kafka:
      install: false
      url: my-kafka-cluster-bootstrap.example.com:443
As of today, Microcks supports connecting to SASL using JAAS and Mutual TLS secured Kafka brokers. For an introduction on these, please check Authentication Methods .
For SASL using JAAS, you’ll have to configure additional properties for accessing cluster CA cert and depending on SASL mechanism. The truststoreSecrefRef is actually a reference to a Kubernetes Secret that should be created first and reachable from Microcks instance:
features:
  async:
    kafka:
      authentication:
        type: SASL_SSL            # SASL using JAAS authentication
        truststoreType: PKCS12    # JKS also possible.
        truststoreSecretRef:
          secret: my-kafka-cluster-ca-cert   # Name of Kubernetes secret holding cluster ca cert.
          storeKey: ca.p12                   # Truststore ca cert entry in Secret.
          passwordKey: ca.password           # Truststore password entry in Secret.
        saslMechanism: SCRAM-SHA-512
        saslJaasConfig: org.apache.kafka.common.security.scram.ScramLoginModule required username="scram-user" password="tDtDCT3pYKE5";
For mutual TLS, you’ll have to configuration additional properties for accessing the client certificate. The keystoreSecretRef is actually a reference to a Kubernetes Secret that should be created first and reachable from Microcks instance:
features:
  async:
    kafka:
      authentication:
        type: SSL                 # Mutual TLS authentication
        truststoreType: PKCS12    # JKS also possible.
        truststoreSecretRef:
          secret: my-kafka-cluster-ca-cert   # Name of Kubernetes secret holding cluster ca cert.
          storeKey: ca.p12                   # Truststore ca cert entry in Secret.
          passwordKey: ca.password           # Truststore password entry in Secret.
        keystoreType: PKCS12      # JKS also possible.
        keystoreSecretRef:
          secret: my-mtls-user        # Name of Kubernetes secret holding user client cert.
          storeKey: user.p12          # Keystore client cert entry in Secret.
          passwordKey: user.password  # Keystore password entry in Secret.
We recommend having a in-depth look at the Helm Chart README and the Operator README to get the most up-to-date informations on detailed configuration.
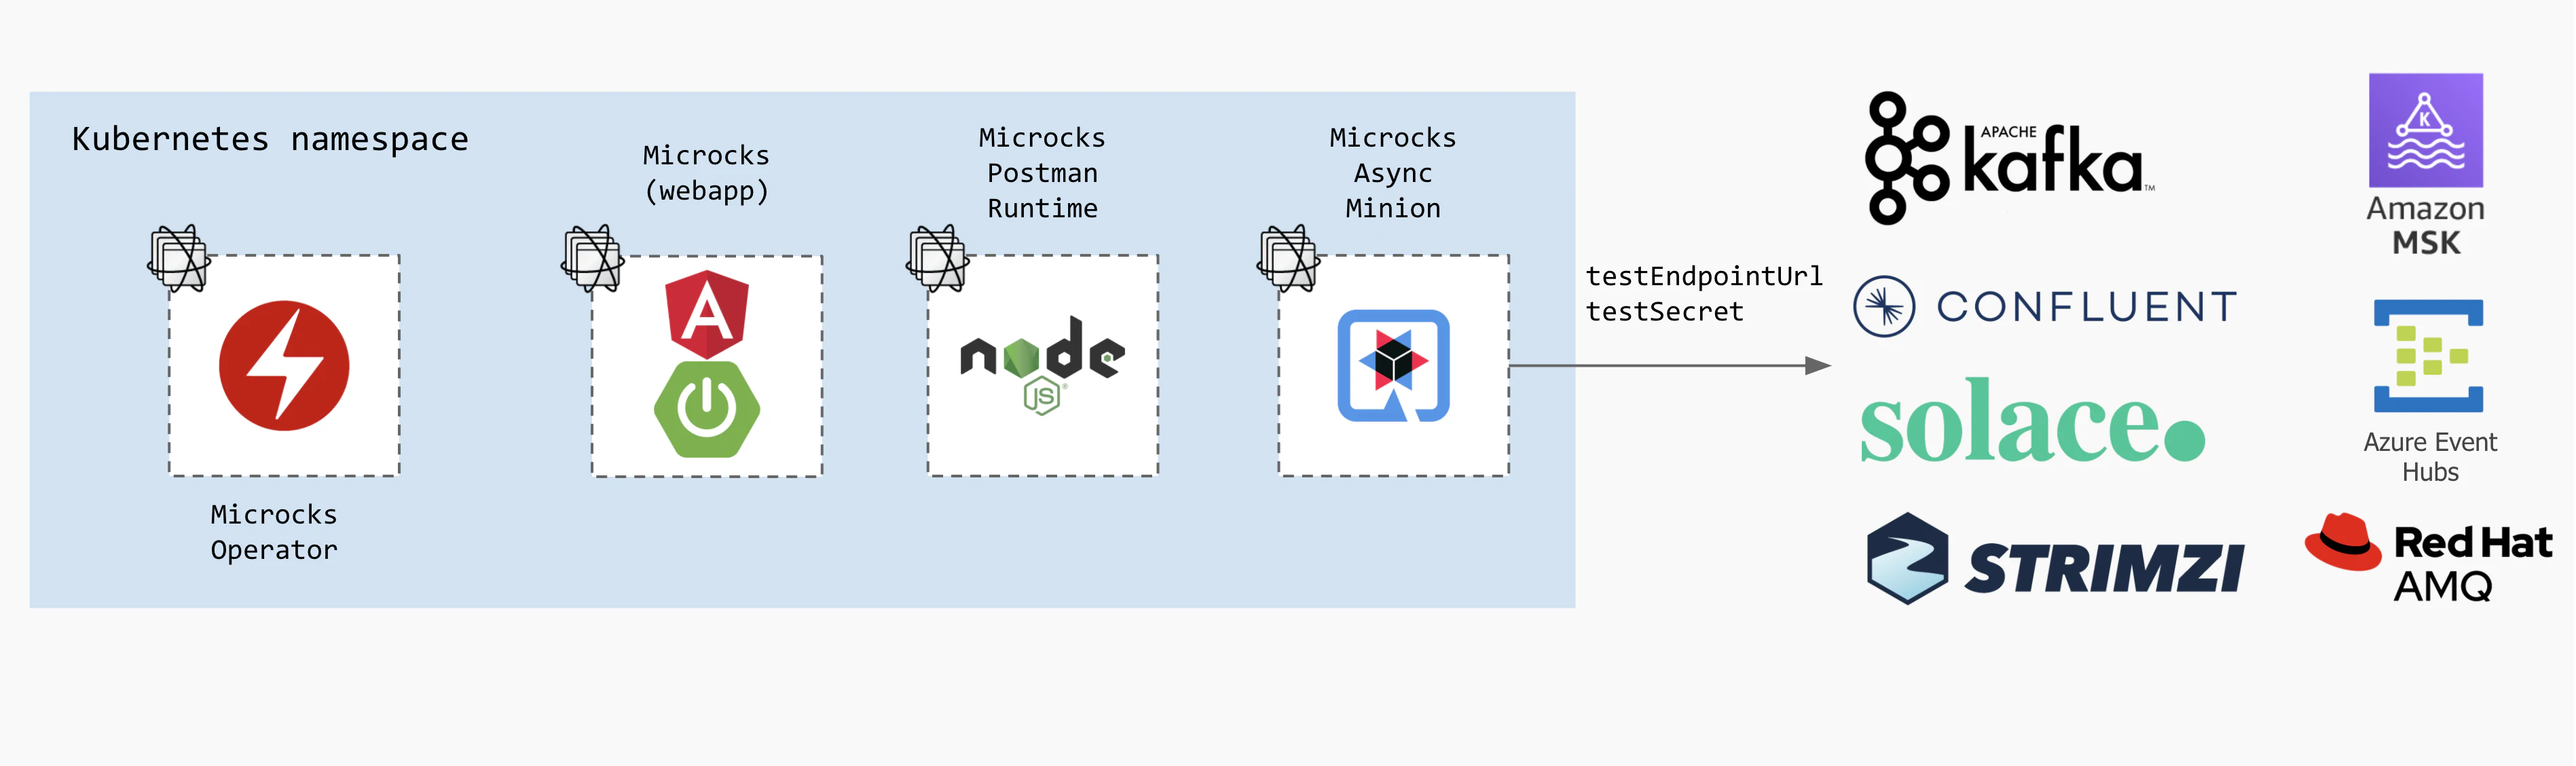
For testing purposes
In that case, Kafka is considered as source for testing your event-driven API. We will just need 2 parameters specified at test launch-time for that:
testEndpointUrl: a connection string to a remote broker including destination and authentication options,testSecret: a Secret provided by Microcks administrator that will provide authentication credentials such as user, password and certificates.
The schema below illustrates non exhaustive options:
Advanced deployment options
Handling proxies for Keycloak access
Depending on your network configuration, authentication of request with Keycloak can be a bit tricky as Keycloak requires some specific load-balancer or proxy settings . Typically, you way need to configure specific address ranges for proxies if you’re not using the usual private IPv4 blocks.
This can be done specifying additional extraProperties into the microcks part of your configuration - either within spec.microcks path if you’re using the Operator MicrocksInstall custom resource or from direct microcks path in values.yml when using the Helm chart. The configuration below typically declare a new IP range to treat as proxy in order to propertly forward proxy headers to the application code:
extraProperties:
  server:
    tomcat:
      remoteip:
        internal-proxies: 172.16.0.0/12
This feature is not yet released and available only for
nightlytagged Operator and Helm Chart that is located on the1.6.xgit branch of the source repository.

Still Didn’t Find Your Answer?
Join our community and get the help you need. Engage with other members, ask questions, and share knowledge to resolve your queries and expand your understanding.
Join the community