
Simulating OpenAPI Callbacks
🗓️ Last updated on February 6, 2026 | 7 | Improve this pageOverview
In OpenAPI v3 specs, you can define callbacks – asynchronous, out-of-band requests that your service will send to some other service in response to certain events. These notifications will be “out-of-band”, that is, they will go through a connection other than the connection through which a visitor works, and they will be asynchronous, as they will be out of the regular request-response flow.
Callbacks are useful when an asynchronous and long-running process is triggered by an initial API interaction and you want to notity progress to the caller. Typical examples are:
- Payment services process: the provider sends you a callback when payment is either processed or refused,
- Registration process: the service can go through verification steps before sending back result the result.
💡 OpenAPI Callbacks support is available starting with Microcks
1.14.0.
This guide will walk-through an example of simulating OpenAPI Callbacks in Microcks. We’ll go through an OpenAPI specifiation, explain how callbacks are specified, then explore how the Microcks UI displays these information and finally test our simulation.
Let’s take the example of a User registration process! 🛎️
1. An Example
The UserRegistration API must be used so that people post their User profile information (identity, preferences, etc.) to register. This API responds immediately to confirm it receives the request and returns a PENDING status. Then, an asynchronous process starts to validate User registration (it could be identity verification, KYC checks, etc.). Once this process is running, it sends notifications back to the initial caller (via callbacks) with information on process stages. Three notifications are expected:
- one after the User is
VERIFIED, - one after the User is
REGISTERED, and - one at the end of the process with the
COMPLETEstatus.
These callbacks are expected to be received in exactly this order.
Bolow is an example on how you would define this with OpenAPI Spec. You can get our full UserRegistration-callbacks-openapi.yaml file from our samples.
openapi: 3.1.0
info:
  title: UserRegistration
  version: 2.0.0
  # [...]
paths:
  /user:
    post:
      requestBody:
        content:
          application/json:
            schema:
              $ref: '#/components/schemas/UserWithCallbackUrl'
            examples:
              John Doe:
                # [...]
      responses:
        201:
          # [...]
      callbacks:
        onVerified:
          '{$request.body#/callbackUrl}':
            post:
              x-microcks-callback:
                order: 100
              requestBody:
                content:
                  application/json:
                    schema:
                      $ref: '#/components/schemas/UserCreationStatus'
                    examples:
                      John Doe:
                        value:
                          firstName: '{{ request.body/user/firstName }}'
                          lastName: '{{ request.body/user/lastName }}'
                          status: VERIFIED
              responses:
                200:
                  description: Callback received
                  x-microcks-refs:
                    - John Doe
        onRegistered:
          '{$request.body#/callbackUrl}':
            post:
              x-microcks-callback:
                order: 150
              requestBody:
                content:
                  application/json:
                    schema:
                      $ref: '#/components/schemas/UserCreationStatus'
                    examples:
                      John Doe:
                        value:
                          firstName: '{{ request.body/user/firstName }}'
                          lastName: '{{ request.body/user/lastName }}'
                          status: REGISTERED
              responses:
                200:
                  description: Callback received
                  x-microcks-refs:
                    - John Doe
        onCompleted:
          '{$request.body#/callbackUrl}':
            post:
              x-microcks-callback:
                order: 199
              requestBody:
                content:
                  application/json:
                    schema:
                      $ref: '#/components/schemas/UserCreationStatus'
                    examples:
                      John Doe:
                        value:
                          firstName: '{{ request.body/user/firstName }}'
                          lastName: '{{ request.body/user/lastName }}'
                          status: COMPLETE
              responses:
                200:
                  description: Callback received
                  content:
                    application/json:
                      schema:
                        type: object
                      examples:
                        John Doe:
                          value:
                            status: COMPLETE
components:
  schemas:
    UserWithCallbackUrl:
      type: object
      properties:
        user:
          $ref: '#/components/schemas/User'
        callbackUrl:
          type: string
    User:
      type: object
      properties:
        firstName:
          type: string
        lastName:
          type: string
    # [...]
The important things to notice here:
- The
callbackUrlis provided as part of the initial request body (it could also have been in a query parameter or a header) - We defined the three callbacks:
onVerified,onRegisteredandonCompleted. These callbacks are defined using the{$request.body#/callbackUrl}callback URL location expression - In the
requestBodyof those callbacks (the part that is sent back to the caller), we used the{{ request.body/user/firstName }}template expression, which means “the firstName property of the user from the initial request”. The initial request is captured once and transferred to each callback - Callback examples have the same
John Doename as the initial request/response pair examples. This allows Microcks to gather things together and to dterminer that these callbacks messages will be associated with the matched initial request/response.- For callback where no response body is expected, we used the
x-microcks-refsextension to explicitly attach the response with matching request.
- For callback where no response body is expected, we used the
🚨 In the OpenAPI callback spec, there’s actually no way to specify an order/sequence between different callbacks. We propose to do this by adding a specific
x-microcks-callback.orderproperty on the callback. This must be an integer ; callbacks will be sorted by natural growing order of this order property. If not provided, the callback order will be random.
2. Exploring the UI
If you haven’t started a Microcks instance yet, you can do so using the following command - maybe replacing 8585 by another port of your choice if this one is not free:
docker run -p 8585:8080 -it --rm quay.io/microcks/microcks-uber:nightly
You can then import our sample UserRegistration-callbacks-openapi.yaml file after having downloaded it.
Once imported, you should get access to its details in Microcks UI. Let explore together what it looks like:
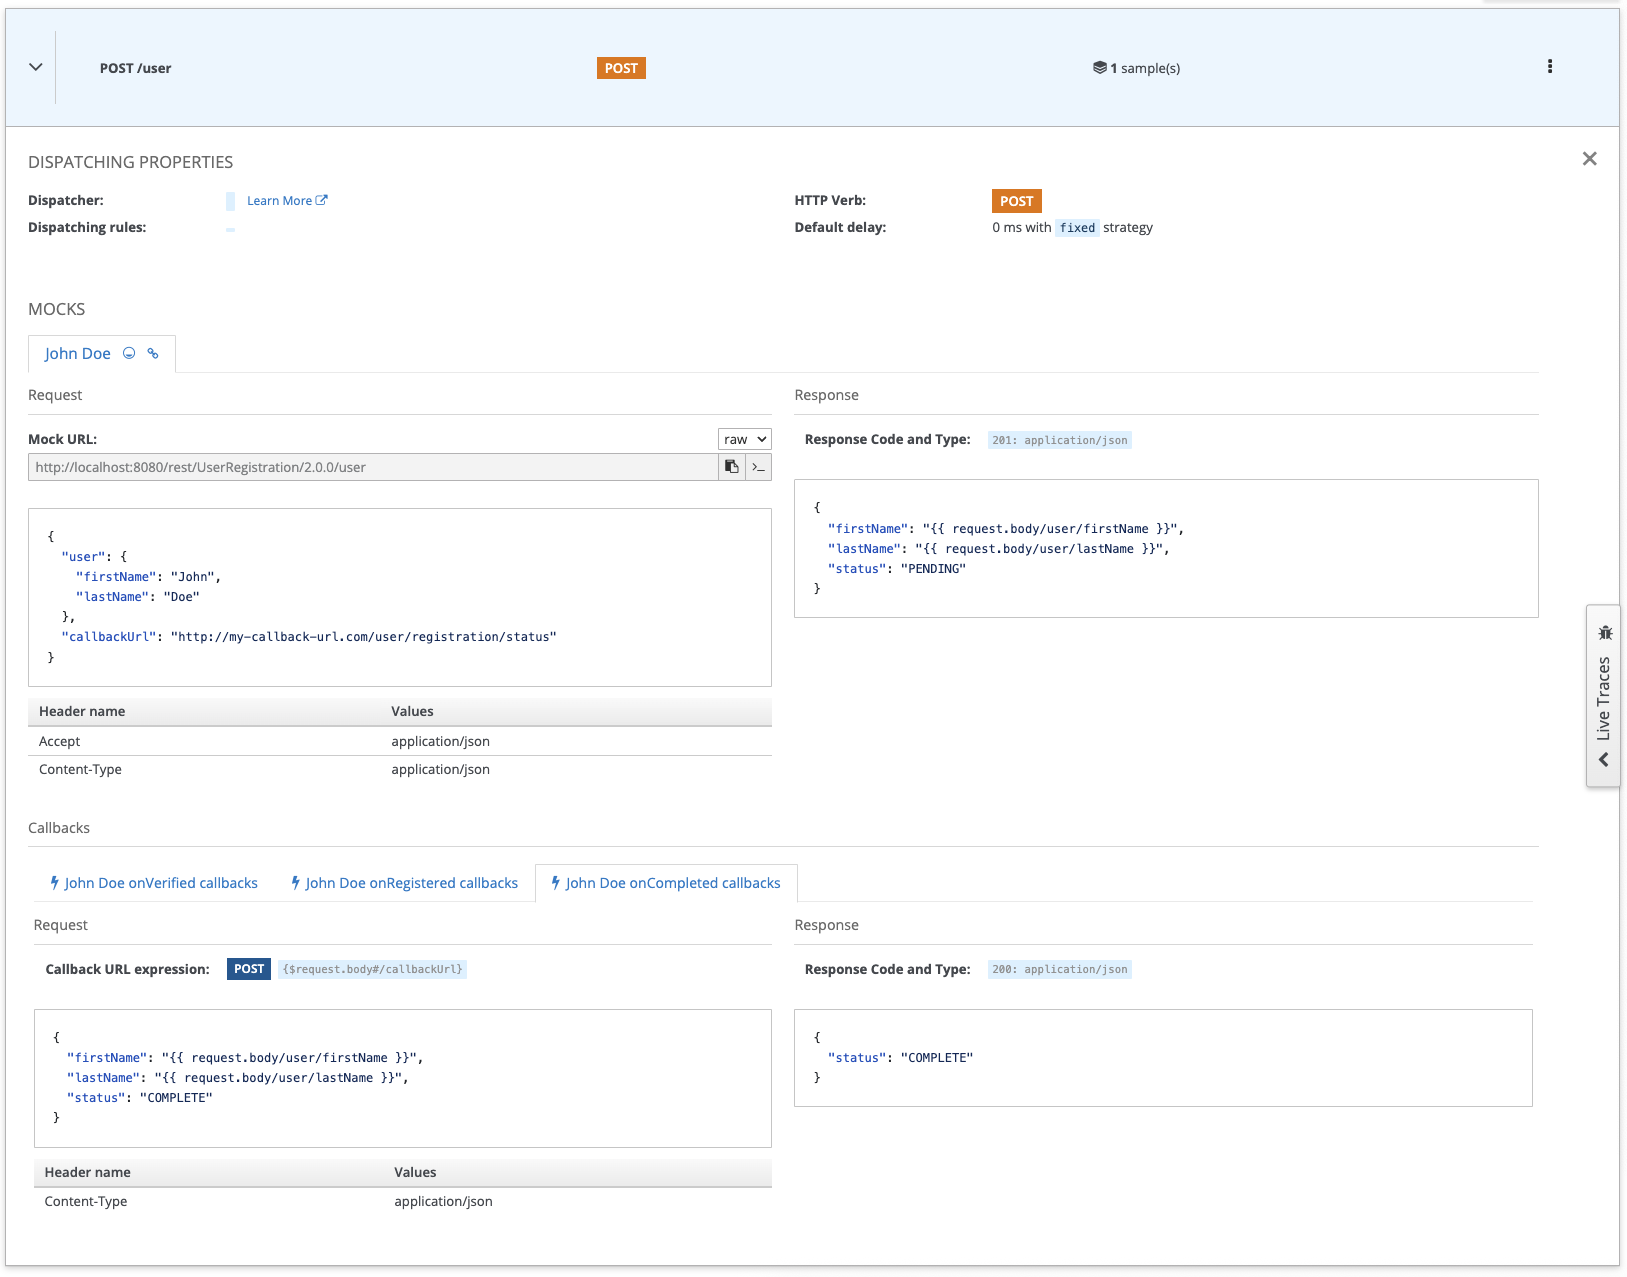
Within a mock thumb (here the John Doe sample), you can now see a new Callbacks section below the traditional Request and Response section. For better usability, the callback details are not displayed by default, you have to click on a callback thumb to make the details appear. We find here our three callback definitions.
On the above screenshot, we can see the details of the onComplete callback for the John Doe sample, and you can see that it’s more or less a traditional Request/Response display. The only difference here is the presence of the Callback URL expression that informs you that callback will be sent using the POST HTTP method, to the callbackUrl argument found in the request body.
3. Testing Callbacks
It’s time to test and illustrate how all of this is working!
To test the callbacks, you’ll need a local HTTP server. Of course, if you’re developing an application and directly pluging this into your app, you may use the built-in app server. Here, for a quick and loca test, you may want to use a simple Echo web server like the one below:
const http = require("http");
const port = 3000;

http
  .createServer((req, res) => {
    const headers = {
      "Access-Control-Allow-Origin": "*",
      "Access-Control-Allow-Methods": "OPTIONS, POST, GET, PUT",
      "Access-Control-Max-Age": 2592000, // 30 days
      "Access-Control-Allow-Headers": "*",
      /** add other headers as per requirement */
    };

    if (req.method === "OPTIONS") {
      res.writeHead(204, headers);
      res.end();
      return;
    }

    if (["GET", "POST", "PUT"].indexOf(req.method) > -1) {
      res.writeHead(200, headers);
      let body = [];
      req.on('data', (chunk) => {
        body.push(chunk);
      }).on('end', () => {
        body = Buffer.concat(body).toString();
        console.log(`==== ${req.method} ${req.url}`);
        console.log('> Headers');
        console.log(req.headers);

        console.log('> Body');
        console.log(body);

        res.write(body);
        res.end();
      });
      return;
    }

    res.writeHead(405, headers);
    res.end(`${req.method} is not allowed for the request.`);
  })
  .listen(port);
console.log("listening on port " + port)
Basically, you can copy/paste the code above into a file like node-http-server.js and then run node node-http-server.js to have a server running in a terminal window like this:
node node-http-server.js
listening on port 3000
💡 As our Http server is running on port 3000, it will be accessible at
http://localhost:3000from our machine network. However, from the Microcks container perspective it will be accessible using thehttp://host.docker.internal:3000alias that allow accessing the machine network from inside a container.
Now, back to the Microcks UI, you can copy the curl command of the John Doe request before pasting it into another terminal session. To better illustrate the request content capture mechanism, you can change the first and last names of the incoming request. You also absolutely need to change the callback url so that it references your running Http server.
When using the default from above script, it is http://host.docker.internal:3000
curl -X POST 'http://localhost:8585/rest/UserRegistration/2.0.0/user' \
  -H 'Accept: application/json' -H 'Content-Type: application/json' \
  -d '{"user":{"firstName":"Laurent","lastName":"Broudoux"},"callbackUrl":"http://host.docker.internal:3000"}'
Hit enter. What shoud happen now?
On the terminal where you executed the curl command, you should get the immediate result of your command:
{"firstName":"Laurent","lastName":"Broudoux","status":"PENDING"}
But now, let quickly switch to the terminal where you started the Http server, wait for about 10 seconds and you should get the following output:
==== POST /
> Headers
{
  'content-length': '65',
  host: 'localhost:3000',
  'user-agent': 'Java-http-client/21.0.9',
  accept: '*/*',
  'content-type': 'application/json'
}
> Body
{"firstName":"Laurent","lastName":"Broudoux","status":"VERIFIED"}
==== POST /
> Headers
{
  'content-length': '67',
  host: 'localhost:3000',
  'user-agent': 'Java-http-client/21.0.9',
  accept: '*/*',
  'content-type': 'application/json'
}
> Body
{"firstName":"Laurent","lastName":"Broudoux","status":"REGISTERED"}
==== POST /
> Headers
{
  'content-length': '65',
  host: 'localhost:3000',
  'user-agent': 'Java-http-client/21.0.9',
  accept: '*/*',
  'content-type': 'application/json'
}
> Body
{"firstName":"Laurent","lastName":"Broudoux","status":"COMPLETE"}
So you just received, asynchronously, in the correct order, with the data captured from the original request, the three different callback messages sent back by Microcks. You should have notived a small delay (~3sec) between each message - this is the default simulated delay. After having sent these 3 messages, the callabck chain has stopped and you will not receive any new message, until your send a curl command again. 😉
You have run your first OpenAPI Callback simulation! 🎉
Wrap-up
Starting with 1.14.0 release, Microcks can now simulate asynchronous, ordered and contextual OpenAPI callbacks. Callbacks support offer richer simulations capabilities that allows you to represent more complex interaction scenarios between an API provider and its consumers.
Happy mocking! 🤡

Still Didn’t Find Your Answer?
Join our community and get the help you need. Engage with other members, ask questions, and share knowledge to resolve your queries and expand your understanding.
Join the community