
- Overview
- Tutorials
- How-To Guides
- Installation
- Usage
- Automation
- Integration
- Administration
- Troubleshooting
- Explanations
- References
NATS Mocking & Testing
🗓️ Last updated on May 13, 2024 | 7 | Improve this pageOverview
This guide shows you how to use a NATS protocol with Microcks. NATS is a Cloud Native, Open Source and High-performance Messaging technology. It is a single technology that enables applications to securely communicate across any combination of cloud vendors, on-premise, edge, web and mobile, and devices. Client APIs are provided in over 40 languages and frameworks and you can check out the full list of clients.
Microcks supports NATS as a protocol binding for AsyncAPI. That means that Microcks can connect to a NATS broker for publishing mock messages as soon as it receives a valid AsyncAPI Specification and to any NATS broker in your organization to check that flowing messages are compliant with the schema described within your specification.
Let’s go! 🚀
1. Set up NATS broker connection
The first mandatory step is to set up Microcks so that it can connect to a NATS broker for sending mock messages. Microcks has been tested successfully with NATS version 2.9.8. It can be deployed as a containerized workload on your Kubernetes cluster. Microcks does not provide any installation scripts or procedures; please refer to the documentation for projects or related products.
If you have used the Operator based installation of Microcks, you’ll need to add some extra properties to your MicrocksInstall custom resource. The fragment below shows the important ones:
apiVersion: microcks.github.io/v1alpha1
kind: MicrocksInstall
metadata:
  name: microcks
spec:
  [...]
  features:
    async:
      enabled: true
      [...]
      nats:
        url: nats-broker.app.example.com:4222
        username: microcks
        password: microcks
The async feature should, of course, be enabled, and then the important things to notice are located in the nats block:
urlis the hostname + port where the broker can be reached by Microcks,usernameis simply the user to use for authenticating the connection,passwordrepresents this user’s credentials.
If you have used the Helm Chart based installation of Microcks, this is the corresponding fragment put in a Values.yml file:
[...]
features:
  async:
    enabled: true
    [...]
    nats:
      url: nats-broker.app.example.com:4222
      username: microcks
      password: microcks
The actual connection to the NATS broker will only be made once Microcks sends mock messages to it. Let’s see below how to use NATS binding with AsyncAPI.
2. Use NATS in AsyncAPI
As NATS is not the default binding in Microcks, you should explicitly add it as a valid binding within your AsyncAPI contract. Below is a fragment of the AsyncAPI specification file that shows the important things to notice when planning to use NATS and Microcks with AsyncAPI. It comes with one sample you can find on our GitHub repository.
asyncapi: '2.0.0'
id: 'urn:io.microcks.example.user-signedup'
[...]
channels:
  user/signedup:
    [...]
    subscribe:
      [...]
      bindings:
        nats:
          queue: my-nats-queue
      message:
        [...]
        payload:
          [...]
You’ll notice that we just have to add a nats non empty block within the operation bindings. Just define one property (like queue for example) and Microcks will detect that this binding has been specified. See the full binding spec for details.
As usual, as Microcks internal mechanics are based on examples, you will also have to attach examples to your AsyncAPI specification.
asyncapi: '2.0.0'
id: 'urn:io.microcks.example.user-signedup'
[...]
channels:
  user/signedup:
    [...]
    subscribe:
      [...]
      message:
        [...]
        examples:
          - laurent:
              summary: Example for Laurent user
              headers: |-
                {"my-app-header": 23}
              payload: |-
                {"id": "{{randomString(32)}}", "sendAt": "{{now()}}", "fullName": "Laurent Broudoux", "email": "laurent@microcks.io", "age": 41}
          - john:
              summary: Example for John Doe user
              headers:
                my-app-header: 24
              payload:
                id: '{{randomString(32)}}'
                sendAt: '{{now()}}'
                fullName: John Doe
                email: john@microcks.io
                age: 36
If you’re not yet accustomed to it, you may wonder what this {{randomFullName()}} notation is? These are just Templating functions that allow the generation of dynamic content! 😉
Now simply import your AsyncAPI file into Microcks either using a Direct upload import or by defining an Importer Job. Both methods are described in this page.
3. Validate your mocks
Now it’s time to validate that the mock publication of messages on the connected broker is correct. In a real-world scenario, this means developing a consuming script or application that connects to the topic where Microcks is publishing messages.
For our User signed-up API, we have such a consumer in one GitHub repository.
Follow the following steps to retrieve it, install dependencies and check the Microcks mocks:
git clone https://github.com/microcks/api-tooling.git
cd api-tooling/async-clients/natsjs-client
npm install

node consumer.js nats-broker.app.example.com:4222 UsersignedupAPI-0.1.30-user/signedup microcks microcks
Connecting to nats-broker.app.example.com:4222 on topic UsersignedupAPI-0.1.30-user/signedup
{
  "id": "eyN7TbotUwN6RTPD4mRwwStS8gBA7tI6",
  "sendAt": "1675085731224",
  "fullName": "Laurent Broudoux",
  "email": "laurent@microcks.io",
  "age": 41
}
{
  "id": "IsjSzI7o910s30QXrJGeAfqgGEsPw9uO",
  "sendAt": "1675085731227",
  "fullName": "John Doe",
  "email": "john@microcks.io",
  "age": 36
}
[...]
🎉 Fantastic! We are receiving the two different messages corresponding to the two defined examples, each and every 3 seconds, that is the default publication frequency. You’ll notice that each id and sendAt properties have different values thanks to the templating notation.
4. Run AsyncAPI tests
Now the final step is to perform some tests of the validation features in Microcks. As we will need API implementation for that, it’s not as easy as writing an HTTP-based API implementation; we have some helpful scripts in our api-tooling GitHub repository. These scripts are made for working with the User signed-up API sample we used so far, but feel free to adapt them for your own use.
Imagine that you want to validate messages from a QA environment with a dedicated NATS broker. Still being in the natsjs-client folder, now use the producer.js utility script to publish messages on a user-signedups queue:
node producer.js nats-broker-qa.app.example.com:4222 user-signedups qa-user qa-password
Connecting to nats-broker-qa.app.example.com:4222 on topic user-signedups
Sending {"id":"itq382xi2usbz41nwel888","sendAt":"1675089667454","fullName":"Laurent Broudoux","email":"laurent@microcks.io","age":41}
Sending {"id":"qfb0fn4yrff06ylrge5fh75","sendAt":"1675089670454","fullName":"Laurent Broudoux","email":"laurent@microcks.io","age":41}
[...]
Do not interrupt the execution of the script for now.
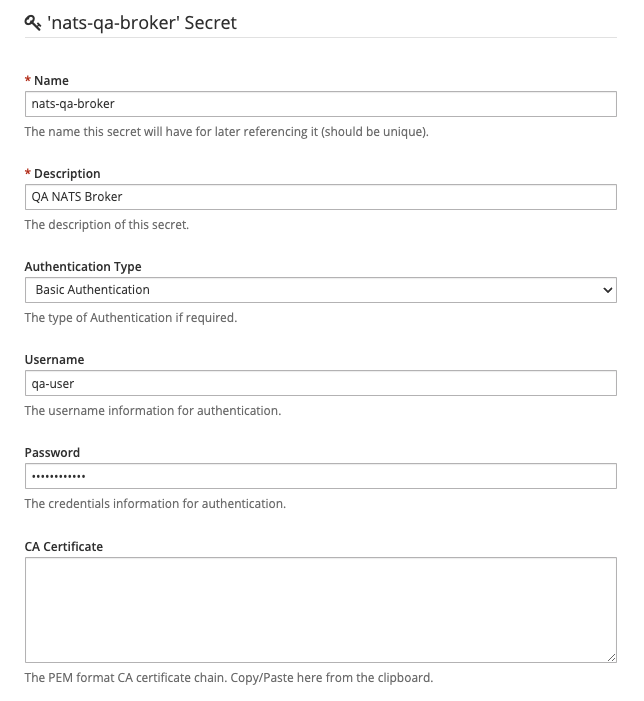
If the QA broker access is secured, let’s say with credentials and custom certificates, we will first have to manage a Secret in Microcks to hold this information. Within the Microcks console, first go to the Administration section and the Secrets tab.
Administration and Secrets will only be available to people having the
administratorrole assigned. Please check this documentation for details.
The screenshot below illustrates how to create a secret for your QA NATS Broker with a username and credentials.
Once saved, we can go create a New Test within the Microcks web console. Use the following elements in the Test form:
- Test Endpoint:
nats://nats-broker-qa.app.example.com:4222/user-signedupsthat is referencing the NATS broker endpoint, - Runner:
ASYNC API SCHEMAfor validating against the AsyncAPI specification of the API, - Timeout: Keep the default of 10 seconds,
- Secret: This is where you’ll select the QA NATS Broker you previously created.
Launch the test and wait for a few seconds, and you should get access to the test results as illustrated below:
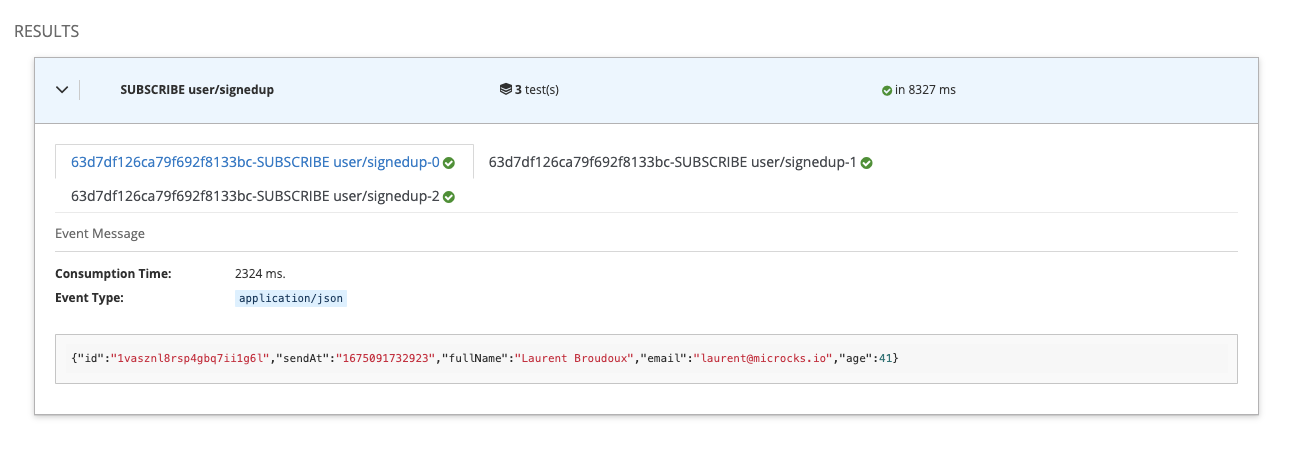
This is fine, and we can see that Microcks captured messages and validated them against the payload schema embedded into the AsyncAPI specification. In our sample, every property is required, and the message does not allow additionalProperties to be present; sendAt is of the string type.
So now let’s see what happened if we tweak that a bit… Open the producer.js script in your favorite editor to put comments on lines 28 and 29 and to remove comments on lines 30 and 31. It’s removing the fullName measure and adding an unexpected displayName property, and it’s also changing the type of the sendAt property, as shown below after having restarted the producer:
node producer.js nats-broker-qa.app.example.com:4222 user-signedups qa-user qa-password
Connecting to nats-broker-qa.app.example.com:4222 on topic user-signedups
Sending {"id":"9x12cp2u40f01avend41ryw","sendAt":1675092166658,"displayName":"Laurent Broudoux","email":"laurent@microcks.io","age":41}
Sending {"id":"han9zjhmqhkzkl76epz4xm","sendAt":1675092169659,"displayName":"Laurent Broudoux","email":"laurent@microcks.io","age":41}
Sending {"id":"kdmsl91ydtn7xf99jzy8","sendAt":1675092172660,"displayName":"Laurent Broudoux","email":"laurent@microcks.io","age":41}
[...]
Relaunch a new test, and you should get results similar to those below:
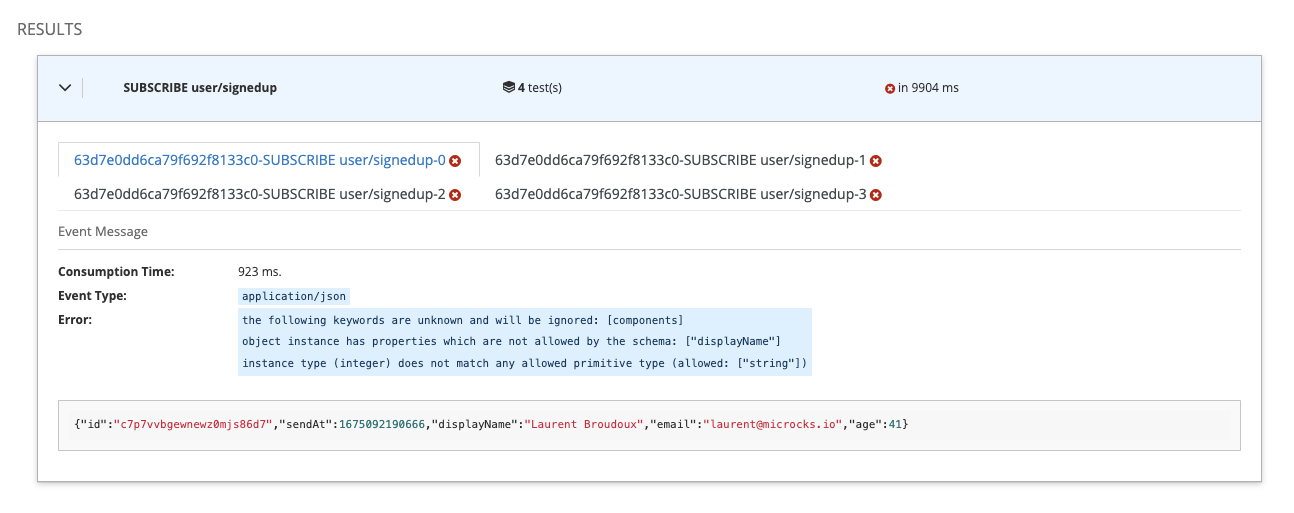
🥳 We can see that there’s now a failure, and that’s perfect! What does that mean? It means that when your application or devices are sending garbage, Microcks will be able to spot this and inform you that the expected message format is not respected.
Wrap-Up
In this guide, we have seen how Microcks can also be used to send mock messages on a Google PubSub service connected to the Microcks instance. This helps speed up the development of applications consuming these messages. We finally demonstrated how Microcks can be used to detect any drifting issues between the expected message format and the one effectively used by real-life producers.
Thanks for reading, and let you know what you think on our Discord chat 🐙

Still Didn’t Find Your Answer?
Join our community and get the help you need. Engage with other members, ask questions, and share knowledge to resolve your queries and expand your understanding.
Join the community