
Enabling the AI Copilot
🗓️ Last updated on March 21, 2025 | 4 | Improve this pageOverview
This guide shows you how to enable the AI Copilot feature introduced in Microcks `1.8.0. AI Copilot can generate meaningful samples to complete your API specification with mocks when you don’t have examples specified or need more examples to make the dataset more representative.
Starting with Microcks version 1.11.1, AI-augmented mocks can also be exported and thus easily shared with teammates.
The video below shows the AI Copilot in action and how you can quickly generate, export and re-import mocks created using AI.
At the time of writing, our AI Copilot only supports interacting with LLM via OpenAI-compatible APIs. However, the feature was designed to be easily configurable and support other interaction modes in the future.
Let’s go through an introduction to configuration properties and how to enable and configure them depending on the Microcks installation method.
1. Configuration properties
As mentioned in the Application Configuration reference, AI Copilot has its own configuration section with properties starting with ai-copilot. By default, the AI Copilot feature is disabled, and you’ll need to set the ai-copilot.enabled property to true.
The other important configuration property is the LLM implementation you’d like to use. As stated in the overview, today’s only available option is OpenAI.
OpenAI properties
When openai is the chosen implementation for the AI Copilot, you’ll have access to the following properties:
api-keyis mandatory and represents your OpenAPI-compatible LLA API key,api-urlis optional (set to default OpenAI API endpoint) and can be used to target another endpoint,modelis optional. As the time of writing,gpt-3.5-turbois the one used by default,timeoutis optional. It represents the maximum time in seconds Microcks is waiting for an LLM response,maxTokensis optional. It allows you to limit the number of tokens exchanged with the LLM. The default value is currently3000.
2. Enable via Docker Desktop Extension
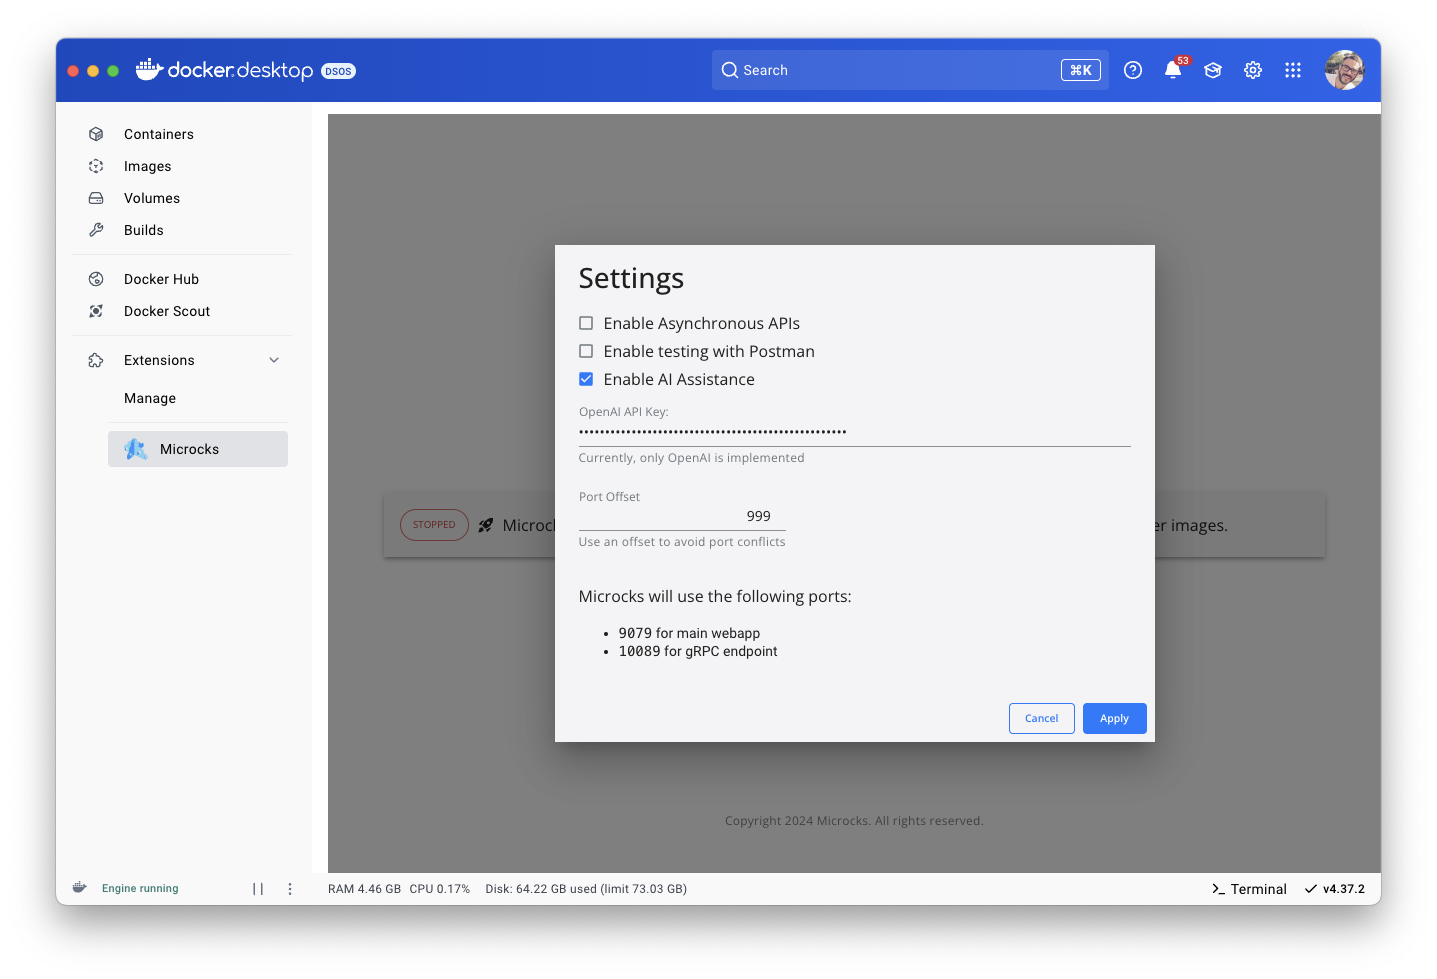
AI Copilot can be enabled via the Microcks Docker Desktop Extension with minimal customization capabilities. Just access the Settings panel from the extension main page and then tick the Enable AI Assistance checkbox like below. You’ll also have to paste your OpenAI API key in the input field, as illustrated in the capture below:
Enabling the AI Copilot will require a restart of Microcks. Next time you access the Microcks UI via your browser, you’ll get access to the AI Copilot buttons.
3. Enable via Docker/Podman Compose
AI Copilot can also be enabled using Docker Compose or Podman Compose installation methods. To do so, you must mount two configuration files (application.properties and features.properties) into the main microcks container. You can see an example of how to do that on the docker-compose-devmode.yml configuration.
Here’s a sample configuration in the application.properties file:
# AI Copilot configuration properties
ai-copilot.enabled=true
ai-copilot.implementation=openai

# OpenAI or OpenAI-comptaible LLM configuration properties
ai-copilot.openai.api-key=<sk-my-openai-api-key>
#ai-copilot.openai.api-url=http://localhost:1234/
ai-copilot.openai.model=gpt-3.5-turbo
ai-copilot.openai.timeout=30
ai-copilot.openai.maxTokens=3000
The features.properties file must only set a flag to inform the UI that the feature is enabled:
features.feature.ai-copilot.enabled=true
Again, restarting the running container is required to force the files’ re-reading and enable the feature.
4. Enable via Helm Chart
When deploying Microcks using its Helm Chart, you can enable and configure the AI Copilot using a values.yaml file or with --set flags on the command line.
Below are the properties that are available for configuration:
features:
  # [...]
  # AI Copilot configuration properties
  aiCopilot:
    enabled: true
    implementation: openai

    openai:
      apiKey: <sk-my-openai-api-token>
      timeout: 20
      model: gpt-3.5-turbo
      maxTokens: 2000
It is worth noting that the apiUrl configuration is not yet available via the Helm Chart method. To track that addition, there’s a GitHub issue opened.
5. Enable via Kubernetes Operator
When deploying Microcks using its Kubernetes Operation, you can enable and configure the AI Copilot using the Microcks Custom Resource.
Below are the properties that are available for configuration:
spec:
  features:
    # [...]
    # AI Copilot configuration properties
    aiCopilot:
      enabled: true
      implementation: openai

      openai:
        apiKey: <sk-my-openai-api-token>
        timeout: 20
        model: gpt-3.5-turbo
        maxTokens: 2000
It is worth noting that the apiUrl configuration is not yet available via the Kubernetes Operator method. To track that addition, there’s a GitHub issue opened.
Wrap-up
Congrats 🎉 You now know how to connect Microcks to your favourite LLM to enrich your mock dataset!
As a complementary reading, you can check how to Boost your API mocking workflow with Ollama and Microcks that explores how to use the AI Copilot features locally with the LLM and model of your choice!

Still Didn’t Find Your Answer?
Join our community and get the help you need. Engage with other members, ask questions, and share knowledge to resolve your queries and expand your understanding.
Join the community