
-
Using
- Importing Services & APIs
- Comparison to alternatives
- OpenAPI Mocking and Testing
- Swagger Mocking and Testing
- AsyncAPI Mocking and Testing
- Postman usage for Microcks
- gRPC Mocking and Testing
- GraphQL Mocking and Testing
- SoapUI Mocking and Testing
- Http Archive usage for Microcks
- Using exposed mocks
- Getting direct API
- Testing with Microcks
- Advanced topics
- Organizing repository
- Templating mock responses
- Dispatcher & dispatching rules
- Microcks APIMetadata
- Monitoring & Observability
- Installing
- Automating
- Administrating
- Guides
Amazon SQS/SNS Mocking & Testing
🗓️ Last updated on June 6, 2023 | 10 | Improve this pageThis guide is a walkthrough on how to use a Amazon SQS and Amazon SNS messaging services with Microcks. As those two services are very frequently used in combination, we decided to cover both of them in the same guide as principles and configuration are very similar. However, Microcks may provide mocking and testing services for SQS only and mocking and testing services for SNS only. You don’t have to use both to benefit from Microcks features.
Amazon Simple Queue Service (SQS) lets you send, store, and receive messages between software components. As stated by the name, it is a message queuing service where one message from a queue can only be consumed by one component. Amazon Simple Notification Service (SNS) sends notifications two ways and provides high-throughput, push-based, many-to-many messaging between distributed systems, microservices, and event-driven serverless applications.
Starting with the 1.7.1 release of Microcks, we support Amazon SQS and SNS as a protocol bindings for AsyncAPI
. That means that Microcks is able to connect to either SQS or SNS service for publishing mock messages as soon as it receives a valid AsyncAPI
Specification and to connect to any SQS/SNS queue or topic to check that flowing messages are compliant to the schema described within your specification.
Let’s go! 🏄♂️
1. Setup AWS services connection
First mandatory step here is to setup Microcks so that it will be able to connect to the target AWS service for sending mock messages. In order to do that, you’ll need to ensure you got proper credentials in your cluster.
As accessing AWS Service is subject to authentication and authorization, the pre-requisite is to create one IAM Account with the required policies. If you plan to use both services, we recommend creating two different accounts so that you’ll limit scope of risk.
Once you get your IAM account ready, you’ll need their access keys so that an application running outside of AWS will be able to use those services.
From there, you have two options to provide the access keys details to Microcks:
- Store this access keys details directly as keys into a Kubernetes
Secret- keys that will be injected as environment variables within your Microcks instance, - Store this access keys details into a Profile file
you’ll also wrap into a Kubernetes
Secret. This Secret will be mounted on Microcks instance filesystem in read-only mode.
Based on the option you chose and the way you handle secrets in your cluster, you’ll typically have to issue one of this command.
Create a Secret for environment variable usage:
$ kubectl create secret generic my-aws-credentials \
    --from-literal=access_key_id=$AWS_ACCESS_KEY_ID \
    --from-literal=secret_access_key=$AWS_SECRET_ACCESS_KEY \
    --from-literal=secret_token_key=$AWS_SESSION_TOKEN \
     -n microcks
Create a Secret for profile file usage:
$ kubectl create secret generic my-aws-credentials \
    --from-file=./my-aws-credentials.profile -n microcks
You also have to ensure that this IAM Account has the required permissions for connecting to the service. In order to use SQS service with Microcks, your IAM account will need the AmazonSQSFullAccess policy to create, list and get details on queues but also publish messages to them. In order to use SNS service with Microcks, your IAM account will need the AmazonSNSFullAccess policy to create, list and get details on topics but also publish messages to them.
If you have used the Operator based installation
of Microcks, you’ll need to add some extra properties to your MicrocksInstall custom resource. The fragment below shows the important ones with the 2 alternatives of using a Secret that keys will be injected as environment variables or using a Secret holding a profile file that will be mounted on filesystem:
apiVersion: microcks.github.io/v1alpha1
kind: MicrocksInstall
metadata:
  name: microcks
spec:
  [...]
  features:
    async:
      enabled: true
      [...]
      sqs:
        region: eu-west-3
        credentialsType: env-variable
        credentialsSecretRef:
          secret: my-aws-credentials
          #accessKeyIdKey: access_key_id          # Allow customization of key
          #secretAccessKeyKey: secret_access_key  # Allow customization of key
          #sessionTokenKey: secret_token_key      # This one is optional
        #OR
        credentialsType: profile
        credentialsProfile: my-sqs-profile
        credentialsSecretRef:
          secret: my-aws-credentials
          fileKey: my-aws-credentials.profile
      sns:
        # Same parameters as above for SNS access
The async feature should of course be enabled and then the important things to notice are located in to the sqs and sns blocks:
regionis the region identifier where the Amazon SQS/SNS service you’re using are located,creadentialsTypeallow to specify if you want to useenv-variablesor aprofilefile,- in the case of
profilefile being used, you can specify thecredentialsProfileyou want to use (default tomicrocks-sqs-admin), credentialsSecretRefis the name of theSecretholding either your IAM account environment variables or profile file. You can configure either secret keys or file key.
If you have used the Helm Chart based installation
of Microcks, this is the corresponding fragment put in a Values.yml file:
[...]
features:
  async:
    enabled: true
    [...]
    sqs:
      region: eu-west-3
      credentialsType: env-variable
      credentialsSecretRef:
        secret: my-aws-credentials
Actual connection to the Google Pub/Sub service will only be made once Microcks will send mock messages to it. Let see below how to use Pub/Sub binding with AsyncAPI.
Running AWS on LocalStack ? Microcks supports that too! Each configuration section (for SQS and SNS) allows to provide an optional
endpointOverrideproperty that will allow you to target your LocalStack instance.You’ll end up with something like
features.async.sqs.endpointOverride=http://localhost:4566for example.
2. Use AWS services in AsyncAPI
As SQS and SNS are not the default bindings into Microcks, you should explicitly add then as a valid binding within your AsyncAPI contract. Here is below a fragment of AsyncAPI specification file that shows the important things to notice when planning to use SQS and Microcks with AsyncAPI. It comes for one sample you can find on our GitHub repository .
asyncapi: '2.1.0'
id: 'urn:io.microcks.example.user-signedup'
[...]
channels:
  user/signedup:
    [...]
    subscribe:
      [...]
      bindings:
        sqs:
          queue:
            name: my-sqs-queue
      message:
        [...]
        payload:
          [...]
We have the exact same sample for SNS here .
You’ll notice that we just have to add a sqs non empty block within the operation bindings. Just define one property (like queue.name for example) and Microcks will detect this binding has been specified. As of today, the full binding specs for SQS and SNS are not yet defined in AsyncAPI but there’s an ongoing effort
to push them. As Microcks does not depend on the internal structure of the binding, future changes will not impact your mocks and tests.
As usual, as Microcks internal mechanics are based on examples, you will also have to attach examples to your AsyncAPI specification.
asyncapi: '2.1.0'
id: 'urn:io.microcks.example.user-signedup'
[...]
channels:
  user/signedup:
    [...]
    subscribe:
      [...]
      message:
        [...]
        examples:
          - laurent:
              summary: Example for Laurent user
              headers: |>
                {"my-app-header": 23}
              payload: |>
                {"id": "{{randomString(32)}}", "sendAt": "{{now()}}", "fullName": "Laurent Broudoux", "email": "laurent@microcks.io", "age": 41}
          - john:
              summary: Example for John Doe user
              headers:
                my-app-header: 24
              payload:
                id: '{{randomString(32)}}'
                sendAt: '{{now()}}'
                fullName: John Doe
                email: john@microcks.io
                age: 36
If you’re now yet accustomed to it, you may wonder what it this {{randomFullName()}} notation? These are just Templating functions
that allow generation of dynamic content! 😉
Now simply import your AsyncAPI file into Microcks either using a Direct upload import or by defining a Importer Job. Both methods are described in this page .
3. Validate your mocks
Now it’s time to validate that mock publication of messages on the targeted SQS Queue or SNS Topic is correct. In a real world scenario this mean developing a consuming script or application that connects to the topic where Microcks is publishing messages.
The easiest way of doing things here would be to use the AWS console to get a quick check on what is actually published by Microcks. As soon as you have imported the AsyncAPI spec, Microcks has created a new queue named UsersignedupAPI-0140-user-signedup (depends on API name, version and operation channel) and starts publishing messages on it. If you get on the screen that allows sending and receiving messages, you’ll get something like:
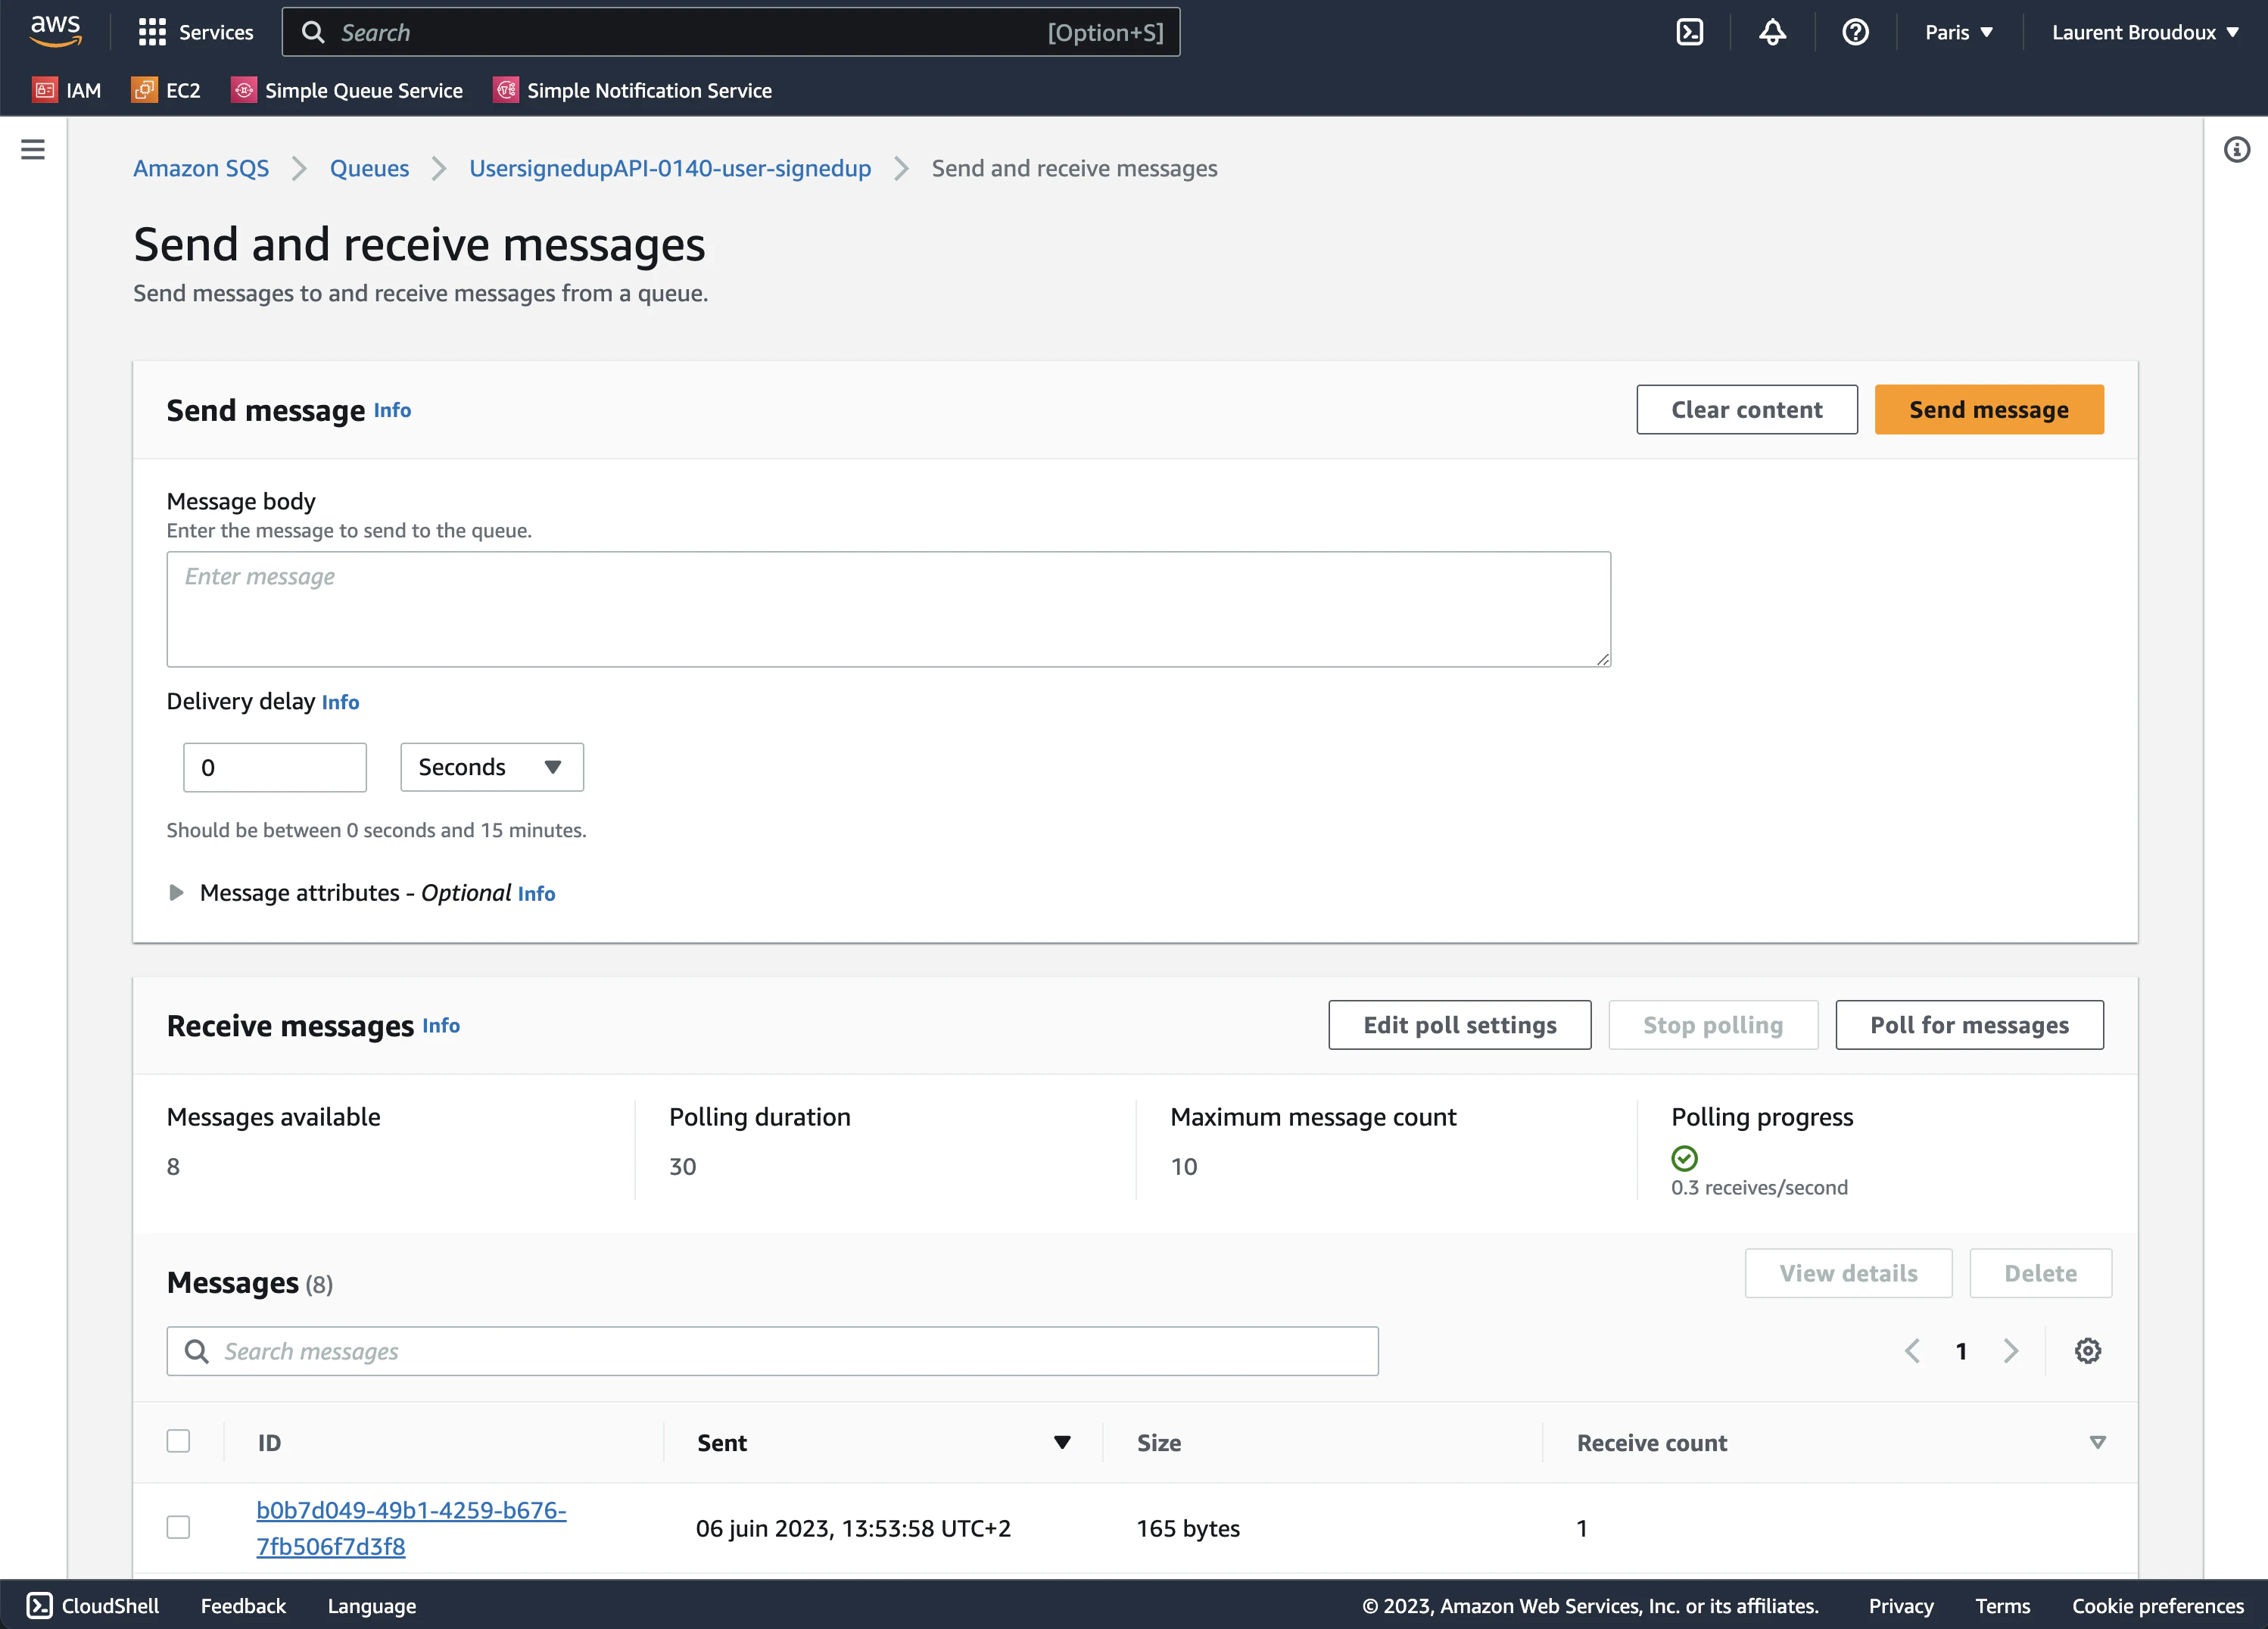
Accessing the details of one of the polled messages will give you a content similar to this one:
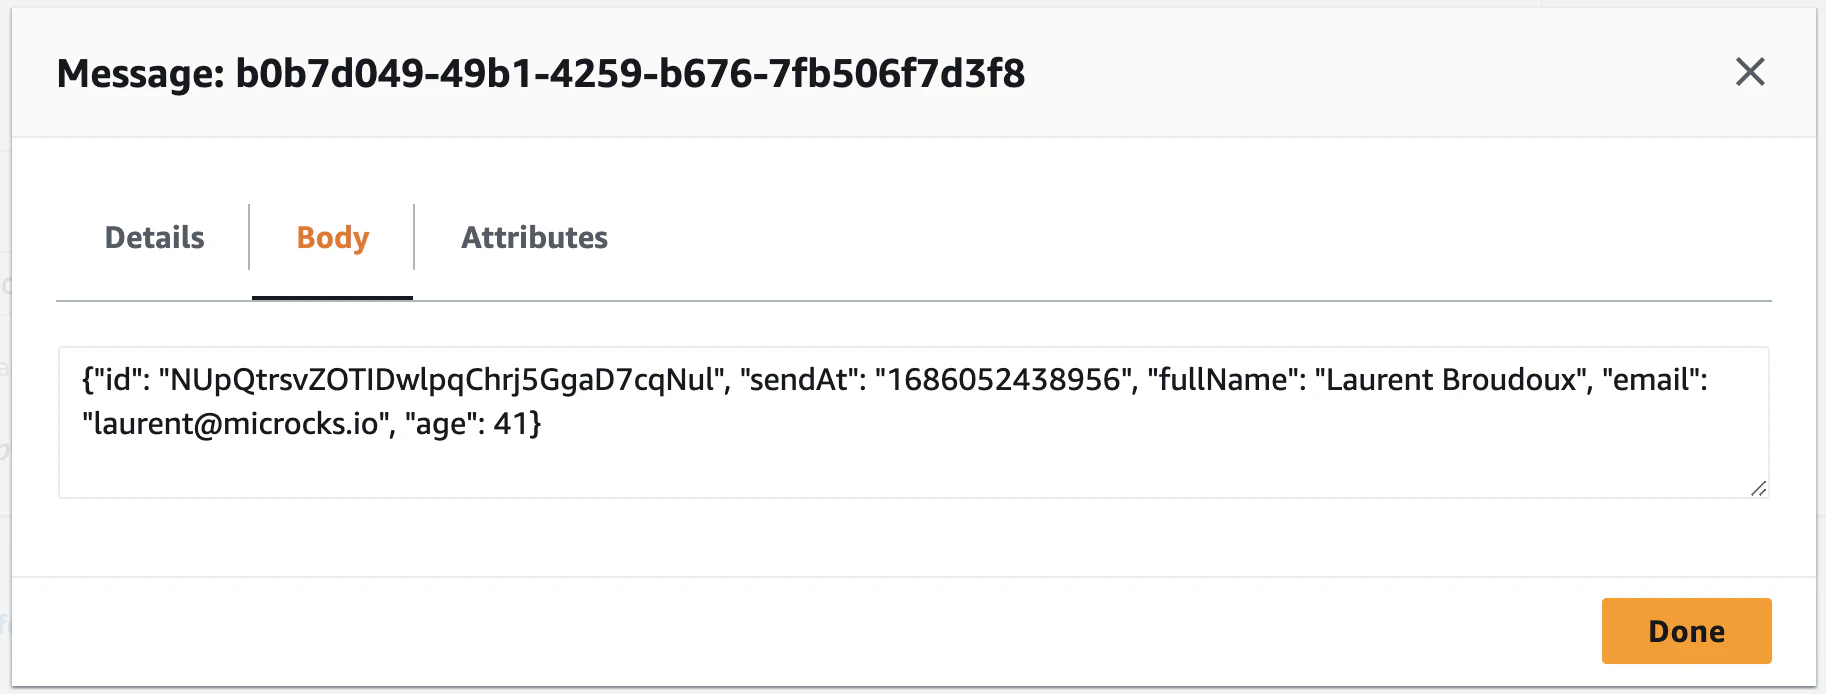
🎉 Fantastic! We are receiving the two different messages corresponding to the two defined examples each and every 3 seconds that is the default publication frequency. You’ll notice that each id and sendAt properties have different values thanks to the templating notation.
And for SNS? Checking SNS with the sample we provide will basically provide the same results but on a SNS Topic named
UsersignedupAPI-0150-user-signedup. In order to see messages sent to this topic, you’ll have to create a subscription to route messages to an endpoint like a SQS Queue. That way, you’ll browse messages the same way we did just before.
4. Run AsyncAPI tests
Now the final step is to perform some tests of the validation features in Microcks. Here again, for sake of simplicity, we’ll use the AWS console to send test messages to either a SQS Queue or a SNS Topic.
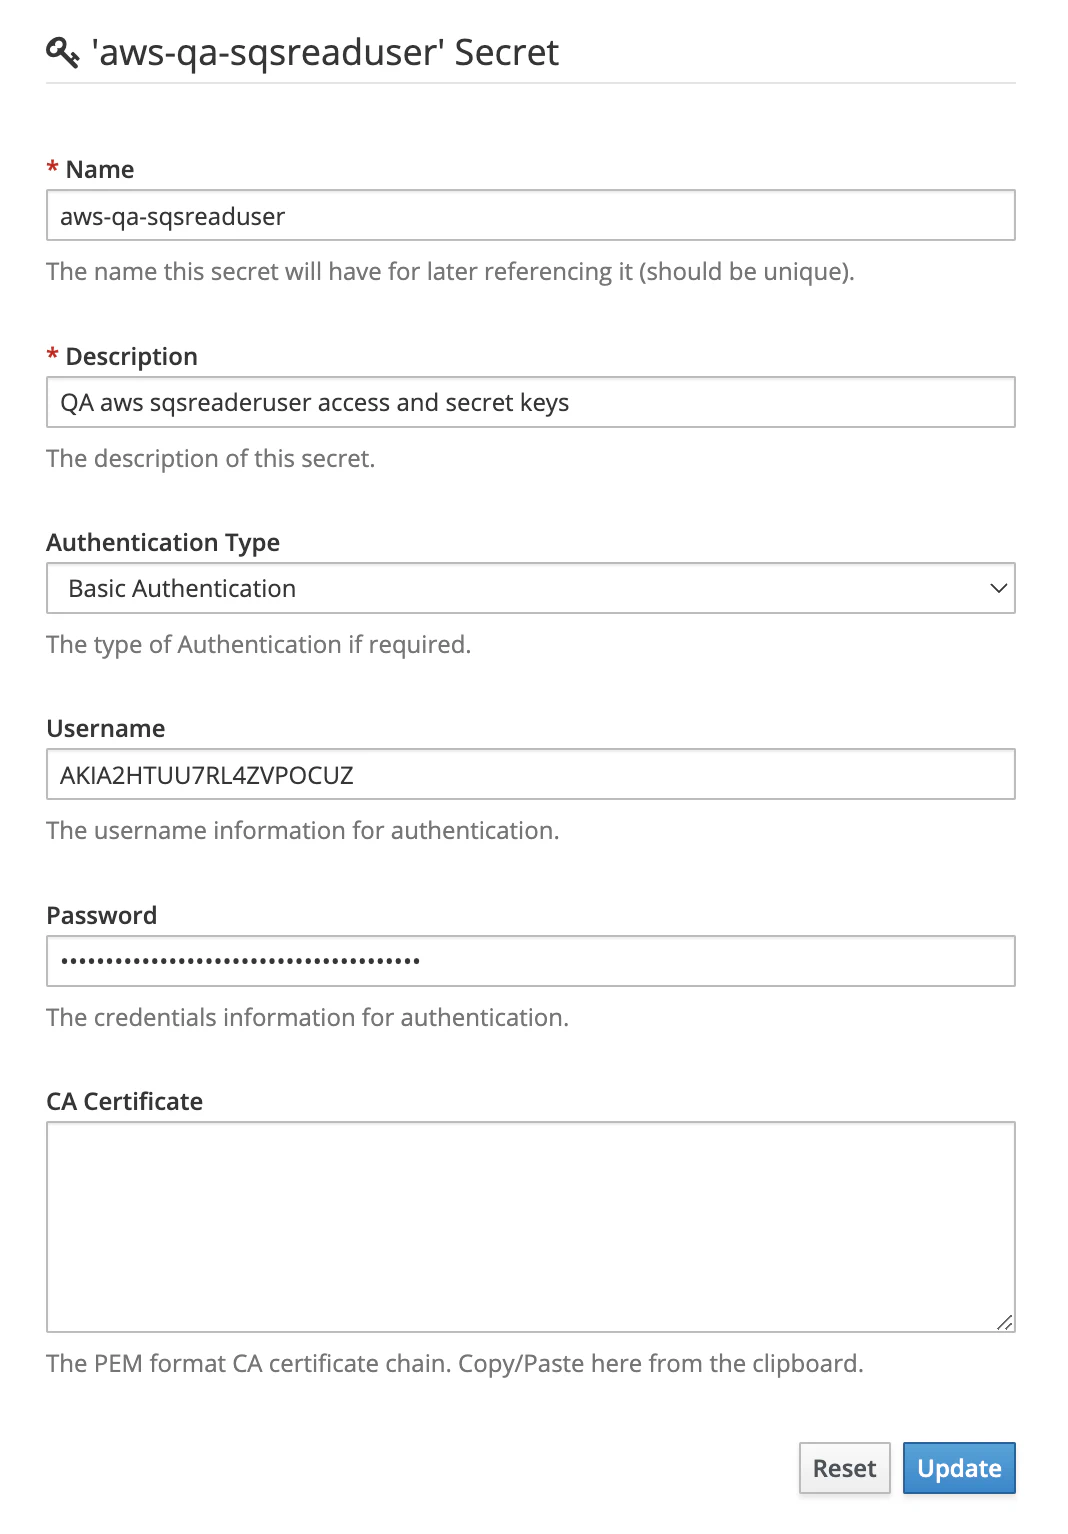
Imagine that you want to validate messages from a QA environment on a specific Amazon region (not necessarily the same as the Microcks instance is connected to for mocking purposes). As the QA resources access is secured, you’ll need - like described above in Step 1 - to retrieve an IAM account access key credentials. In order to run tests on SQS service, such an IAM account will require the AmazonSQSReadOnlyAccess to list queues, get queue attributes and read messages. In order to run tests on SNS service, the IAM account will require slightly more permissions being the AmazonSNSFullAccess and the AmazonSQSFullAccess. This is actualy necessary as Microcks will dynamically create temporary SQS queue and SNS subscription in order to performa a test.
Once you get the IAM account access key, you will then have to manage a Secret in Microcks to hold these informations. Within Microcks console, first go to the Administration section and the Secrets tab.
Administration and Secrets will only be available to people having the
administratorrole assigned. Please check this documentation for details.
On this tab, you’ll have to create a Basic Authentication secret with the username being the Access Key Id of your IAM account and the password being its Secret Access Key.
The screenshot below illustrates the creation of such a secret for your aws-qa-sqsreaduser with username, and credentials.
We can now prepare for a first test! Open the AWS SQS on your region of choice (we’ve chosen eu-west-3 in our example below) and create a user-signups standard queue. Go to the Send and receive messages page and prepare to send the following message:
{"id":"gm6c39oa69nw7dukbpper","sendAt":"1675848602703","fullName":"Laurent Broudoux","email":"laurent@microcks.io","age":44}
Don’t click the Send message now but be prepared!

We’re now going to launch a New Test within Microcks web console. Use the following elements in the Test form:
- Test Endpoint:
sqs://eu-west-3/user-signupsthat is referencing the Google Pub/Sub service and topic endpoint, - Runner:
ASYNC API SCHEMAfor validating against the AsyncAPI specification of the API, - Timeout: Keep the default of 10 seconds,
- Secret: This is where you’ll select the aws-qa-sqsreader you previously created.
And for SNS? Well it’s basically exactly the same thing with a slight variation in test endpoint syntax. You will have to put there something like
sns://eu-west-3/user-signupswhereuser-signupsis the name of the SNS Topic your application is using.
Launch the test and quickly switch to the AWS console to send a bunch of messages. Wait for some seconds and you should get access to the test results as illustrated below:
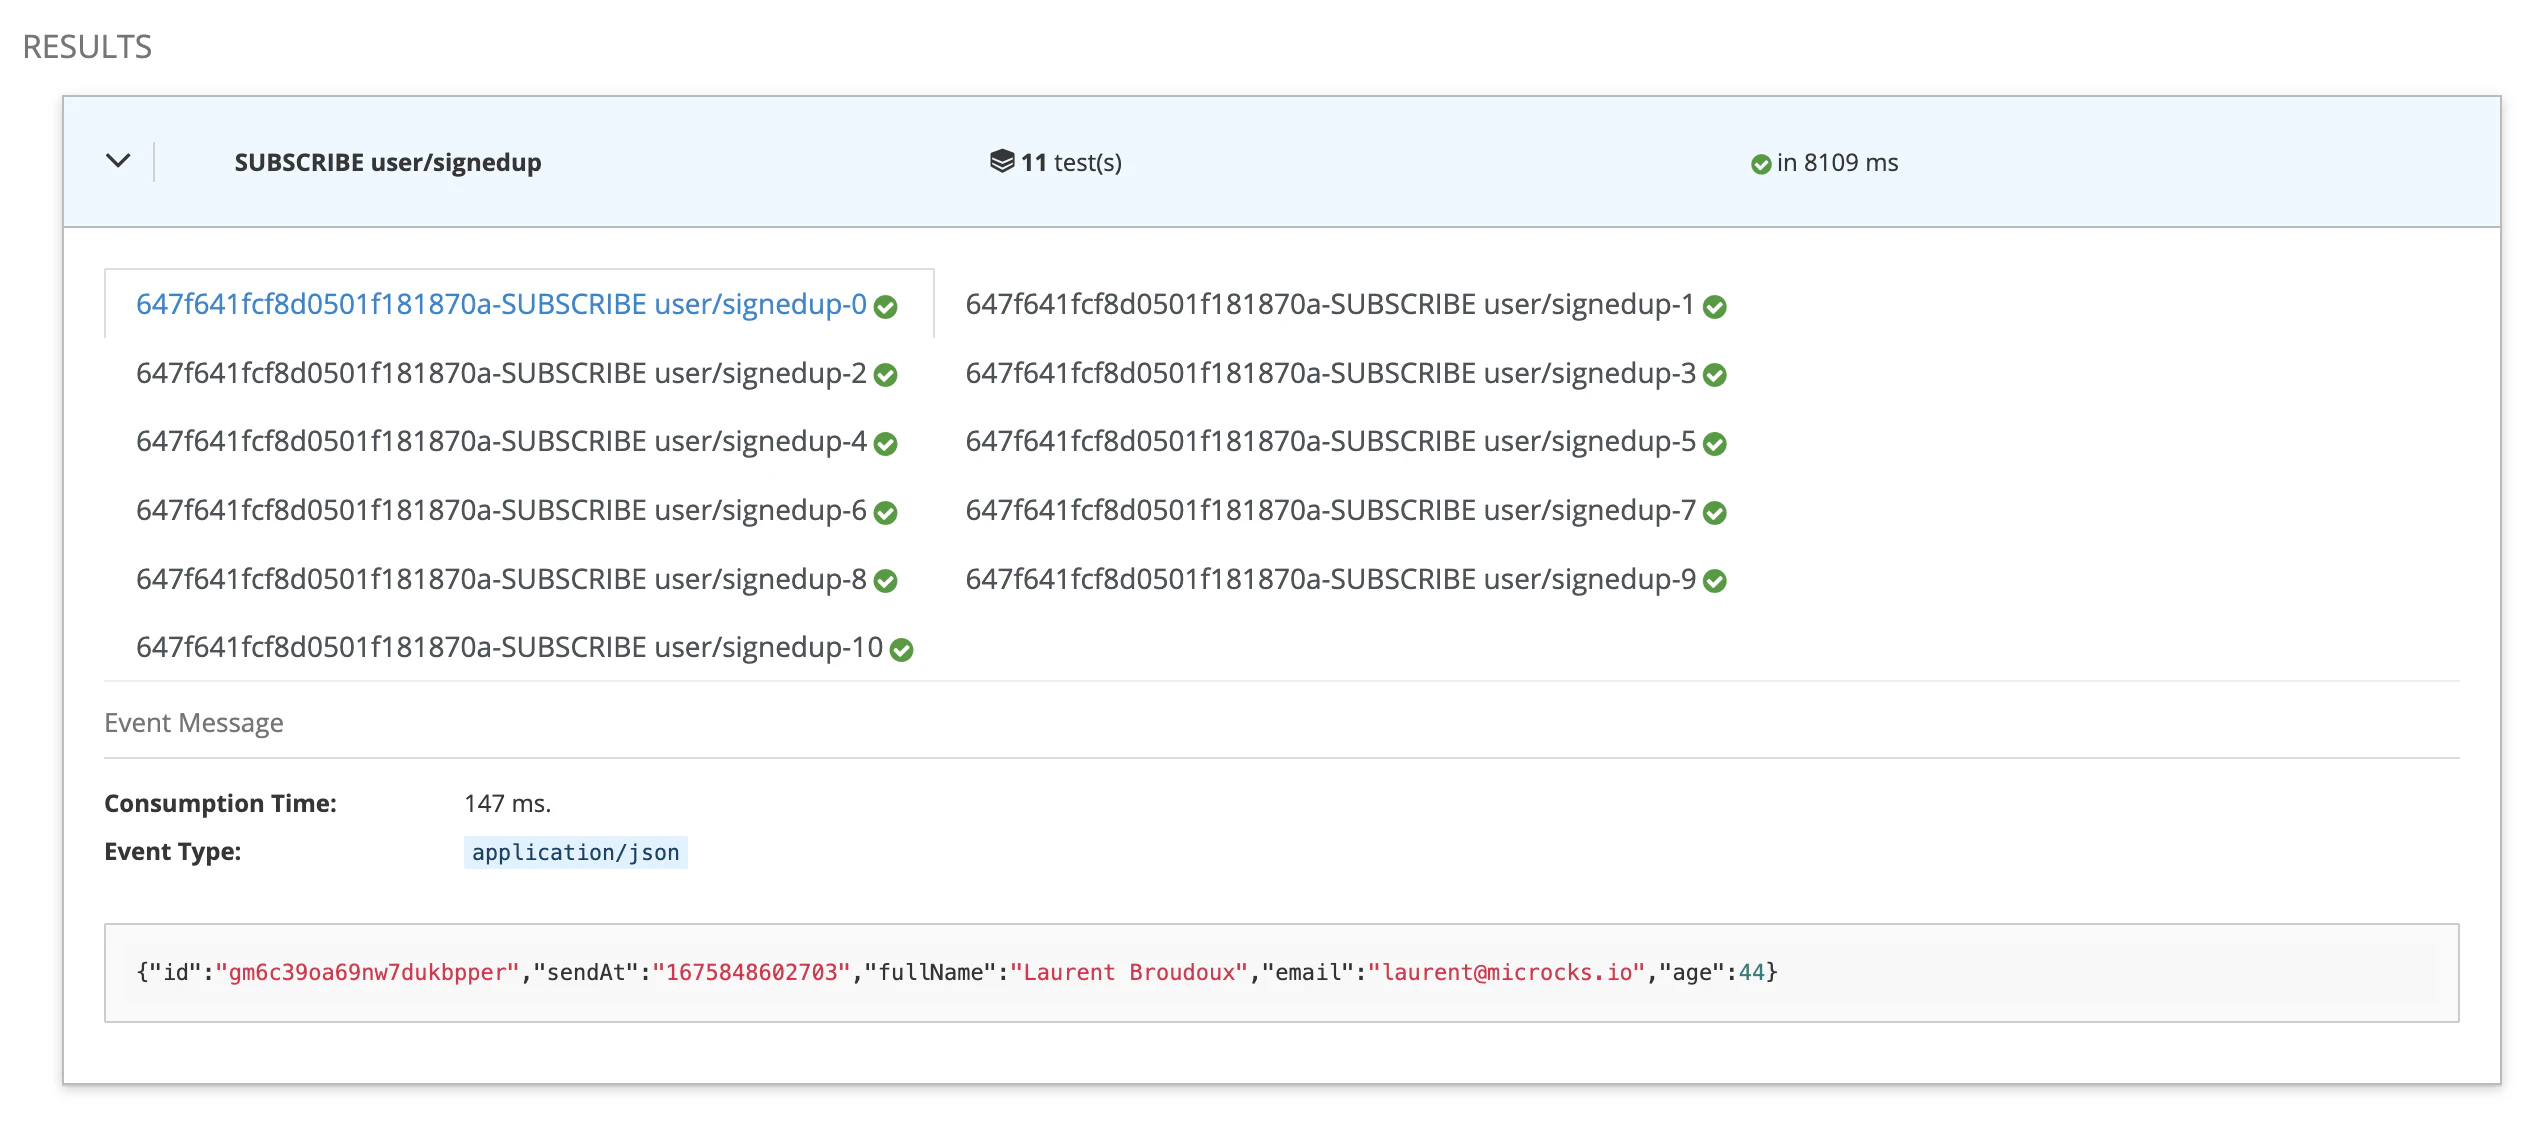
This is fine and we can see that Microcks captured messages and validated them against the payload schema that is embedded into the AsyncAPI specification. In our sample, every property is required and message does not allow additionalProperties to be define, sendAt is of string type.
So now let see what happened if we tweak that a bit… We’re going to re-launch the same test but using JSON below to simulate invalid messages:
{"id":"2zzo4kf16mxu5e6k8hyecl","sendAt":1675848602937,"displayName":"Laurent Broudoux","email":"laurent@microcks.io","age":44}
Relaunch a new test and you should get results similar to those below:
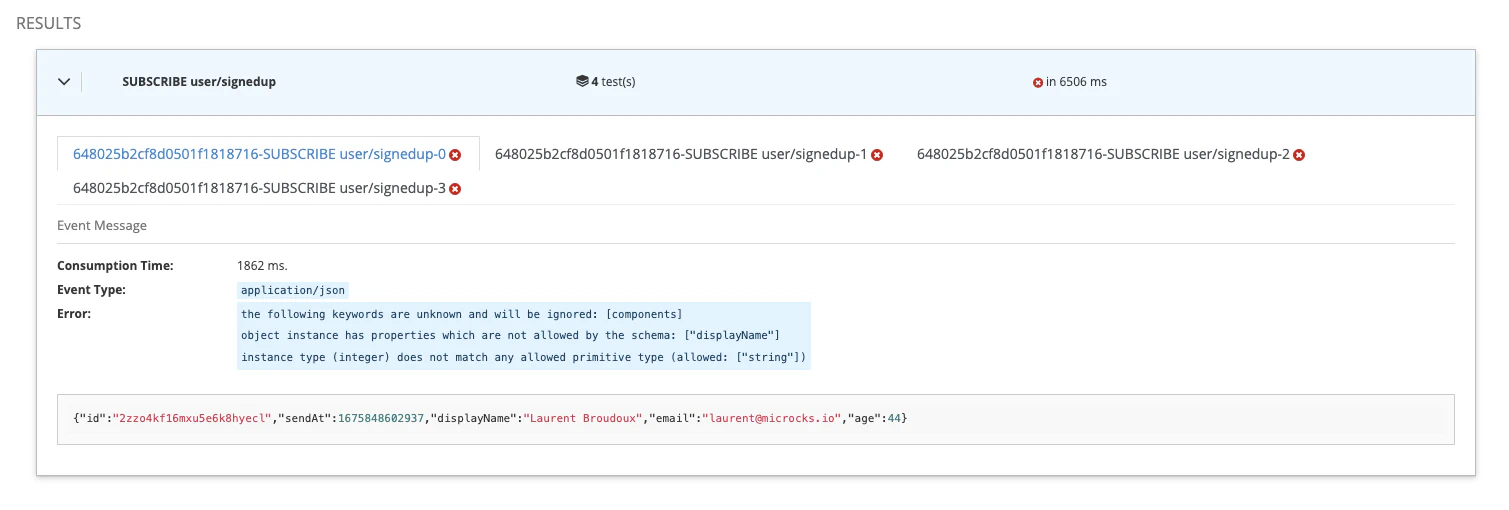
🥳 We can see that there’s now a failure and that’s perfect! What does that mean? It means that when your application or devices are sending garbage, Microcks will be able to spot this and inform you that the expected message format is not respected.
Running AWS on LocalStack ? Microcks supports that too! You’ll just have to add an extra
overrideUrloption to your test endpoint URL so that Microcks will target your LocalStack instance.You’ll end up with something like
sqs://eu-west-3/user-signups?overrideUrl=http://localhost:4566for example.
Wrap-Up
In this guide we have seen how Microcks can also be used to send mock messages on SQS Queue or SNS Topic managed service connected to the Microcks instance. This helps speeding-up the development of application consuming these messages. We finally ended up demonstrating how Microcks can be used to detect any drifting issues between expected message format and the one effectively used by real-life producers.
Thanks for reading and let you know what you think on our Discord chat 🐙

Still Didn’t Find Your Answer?
Join our community and get the help you need. Engage with other members, ask questions, and share knowledge to resolve your queries and expand your understanding.
Join the community