

Co-founder of Microcks | Director of Engineering at Postman Open Technologies
Integrating Microcks into Apicurio Keycloak
Microcks is an amazing tool that helps developers mock their APIs seamlessly using OpenAPI specs. This makes it easy for distributed teams to develop complex micro-services without having to wait for full development cycles to complete, thus maximising team efficiencies.
Apicurio Studio is another great tool to start creating your API documentation via a fully integrated OpenAPI spec editor and adds features like ability to view your documentation live as teams collaborate and edit specs on the editor in real-time.
A cool feature in Apicurio is the ability to integrate seamlessly with Microcks to mock the API definition with just a single click. This yields to a great developer experience overall as clients can start consuming mock endpoints with sample responses even if the actual API is going through the CI pipeline and yet to reach staging or production environments.
However, the latest version of Microcks (version 1.1.0 as of writing this post) doesn’t work if we follow the Apicurio docker-compose installation. One of the main reason being the Keycloak realm in the Apicurio installation is not uptodate for the changes made in Microcks, especially with the missing “user” role in the microcks-app client in the Keycloak realm setting.
As of publishing this article, I proposed a Pull Request to fix and ease this setup. Event if the steps described below might no longer be necessary, this post helps understand how things are supposed to work and the elements to check in case of troubles 😉
Also for users who just want to take the installation for a spin on localhost, may face the issue with SSL being a pre-requisite to using Keycloak with Apicurio. I strongly RECOMMEND to ensure that you have TLS setup for anything in production, but I will provide steps to overcome this limitation for setting up Apicurio and Microcks in development environments.
Downloading and getting ready with the Apicurio setup
The steps to setup Apicurio are similar to the steps mentioned in their GitHub docker-compose readme page. As of writing this article, Apicurio is at version BETA 2.46
- Clone the Apicurio repository in a convenient location
git clone https://github.com/Apicurio/apicurio-studio.git
- Cd to the directory to enter the Apicurio docker-compose installation workspace. Its now time to make a few edits
cd apicurio-studio/distro/docker-compose
Setting up the correct realm configuration in Keycloak
Once your inside the docker-compose workspace. Make the following edits:
Replace the Keycloak realm configuration with the correct one from Microcks repository. Start by changing to the config directory.
cd config/keycloakDownload the copy of the correct Keycloak realm file from Microcks repository.
wget https://raw.githubusercontent.com/microcks/microcks/master/install/keycloak-microcks-realm-full.jsonRename the existing Microcks realm file to something different.
mv microcks-realm.json microcks-realm.json.bkupRename the realm file you downloaded above to
microcks-realm.json.mv keycloak-microcks-realm-full.json microcks-realm.json
These steps will ensure that you have the correct realm configuration to start the installation. Once done, follow the remaining instructions as-is in the Apicurio docker-compose readme here https://github.com/Apicurio/apicurio-studio/blob/master/distro/docker-compose/Readme.md
Ensuring the “user” role is present correctly in the microcks-app client
Once your installation is up and running, login to Keycloak with your admin credential and follow the following steps:
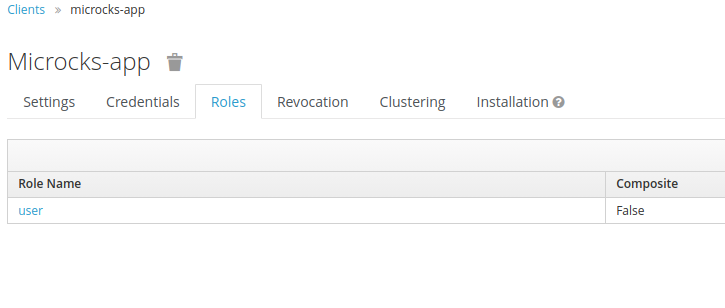
Click on Client -> microcks-app.
Click on Roles tab and check to confirm if the “user” role set correctly. If the role is not present, just create one using the “Add Role” button and give the name of the role as “user” and press “Save”.
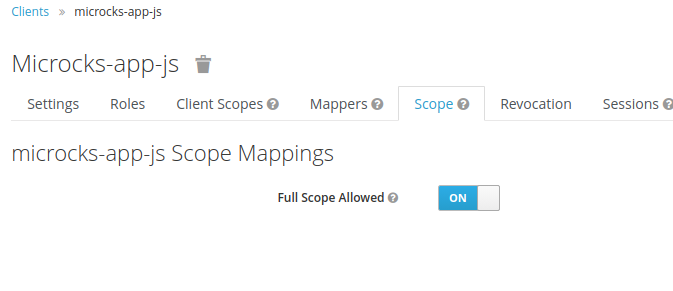
Now, click on Client again and move to
microcks-app-js.Here click on “Scope” and ensure Full Scope allowed is “ON”
Creating users in Microcks Keycloak realm
Now go ahead and create a user in Microcks realm. Once a user is created, Follow the steps below to ensure that the user is setup correctly.
- Ensure that the user has a role called “user” in the client role section under
microcks-appclient. For checking this, click on the user in the Users page and navigate to the Role Mappings tab. - Here in the Client roles drop-down select microcks-app. You should see the an entry called “user” in Assigned Roles and Effective Roles sections (both should have it)
- Once this confirmed. Navigate to Clients -> microcks-app-js
- Here, click on the Client scopes and then Evaluate
- In the user input, enter the name of the user whom you want to check and then click “Evaluate”
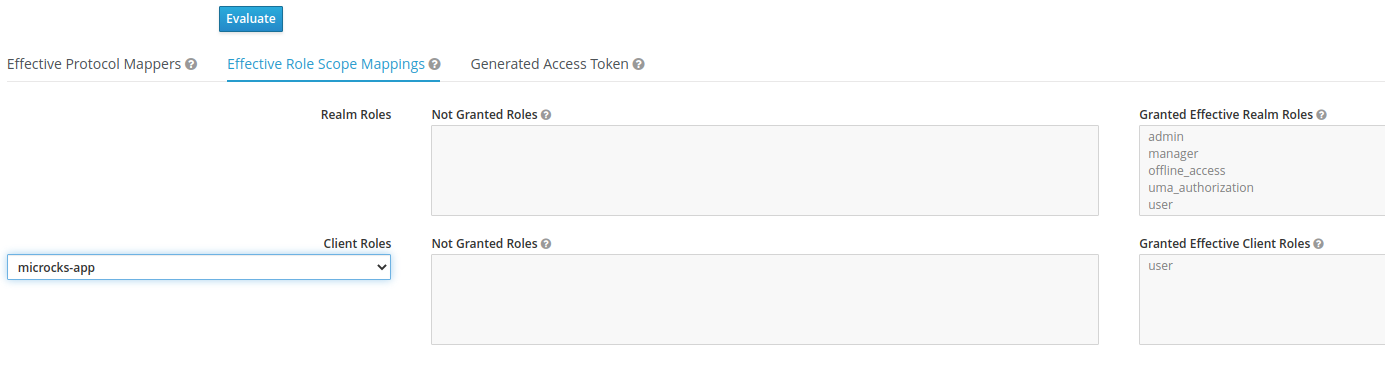
- In the form that pops up up below, click on “Effective Role Scope Mapping”
- Here, under Client roles drop down, select
microcks-app. - You should see the “user” role in the Granted Effective Client Role section.
Logging in to Microcks !
Now login to Microcks app and mock away !!! You should see any APIs that you posted from Apicurio or specs that you manually uploaded using the Importers section, come up correctly in the Dashboard and the APIs | Services section
Skipping TLS !!!!
Dragons ahead !! BEWARE, at no point should this be done for production environment. TLS is one of the first steps to ensuring a strong and secure environment for the tools we are working with and at no point should you disable SSL-required configuration in Keycloak. This is ONLY for development purposes. Also this change is ONLY required when you make external calls to these services. If you provide your Apicurio IP in the range of
192.168.\*.\*or127.0.0.1orlocalhostyou can just set the SSL-required setting in your Keycloak realm’s ‘Login’ setting to false (or OFF as in the UI console).
For those independent developers and coders/hobbyist, use services like Let’s Encrypt to get your free TLS certs to use with these services.
Now for the steps:
Stop your docker-compose installation of Apicurio.
docker-compose -f "<name of the compose files>" downDownload the application.properties file into you Apicurio’s docker-compose config folder as shown below
cd docker-compose/config
wget https://raw.githubusercontent.com/microcks/microcks/master/install/docker-compose/config/application.properties
wget https://raw.githubusercontent.com/microcks/microcks/master/install/docker-compose/config/logback.xml
Comment ‘all’ the lines in application.properties except the following lines and change them as shown below:
security.require-ssl=false
keycloak.ssl-required=false
Restart your Apicurio installation. The Keycloak system and the
RequestAuthenticatorclass will not complain of SSL-required for external requests now. You can check in the docker logs as well.
I hope this blog post provides an interim solution to the Apicurio-Microcks installation woes. I have raised a bug and proposed a Pull Request for the permanent fix for this to the Apicurio team. Until then, Happy Mocking !!